Why Homeowners Are Switching to Recessed Lighting LED Retrofit
A recessed lighting LED retrofit is one of the fastest, most cost-effective upgrades you can make to your home’s lighting — no full rewiring, no ceiling tear-out, no contractor required in most cases.
Here’s the quick answer if you’re short on time:
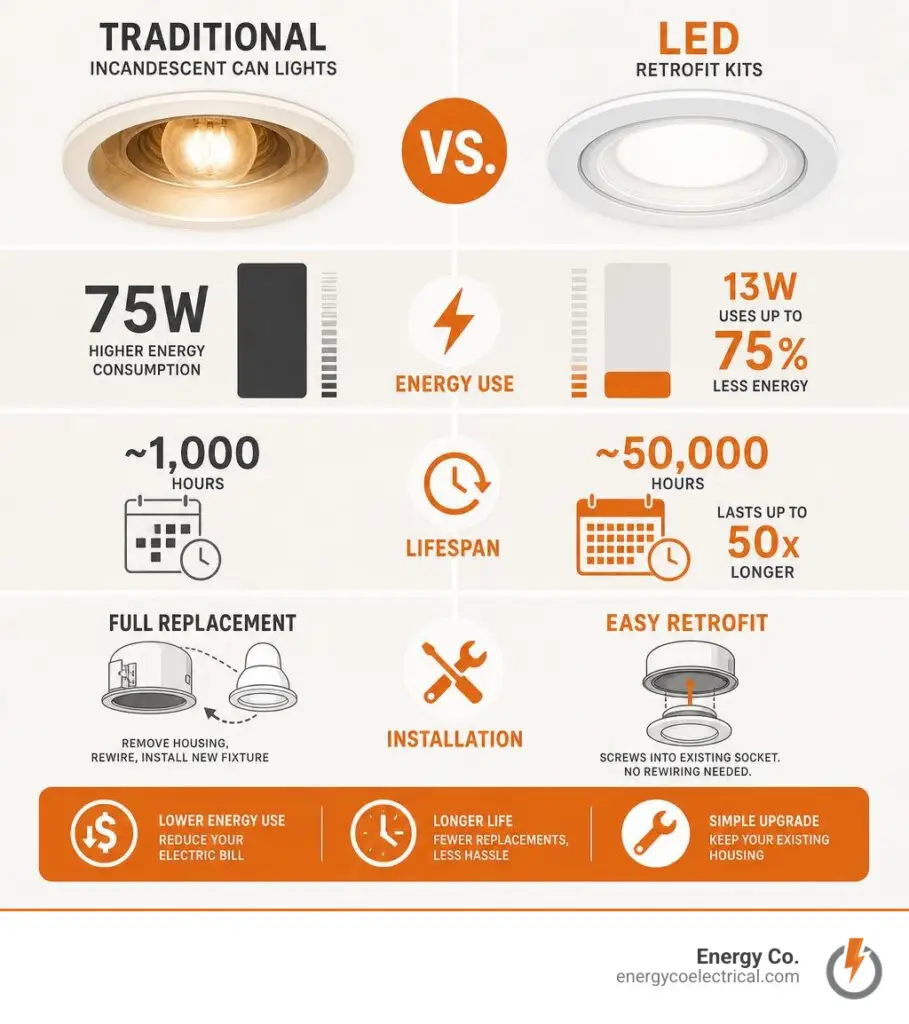
What is a recessed lighting LED retrofit? It replaces the bulb and trim inside your existing recessed can (housing) with an integrated LED unit. You keep the housing in the ceiling and swap everything visible in minutes.
Why do it?
- Uses up to 75% less energy than incandescent bulbs
- A standard 13W LED retrofit produces the same light as a 75W incandescent bulb (about 965 lumens)
- LEDs last roughly 50,000 hours — that’s over 45 years of average use
- No rewiring needed — most kits screw into the existing E26 socket
- Saves an estimated $75+ per year just by replacing your five most-used fixtures
Who is this guide for? Chicago homeowners and business owners with older recessed “can” lights who want brighter, cheaper, longer-lasting lighting — without a major renovation.
Older Chicago homes are full of recessed fixtures running hot, inefficient incandescent or halogen bulbs. If your ceiling cans are more than 10 years old, there’s a good chance you’re paying far more on your electric bill than you need to — and the fix is simpler than most people think.
I’m Michał Napieralski, founder of Energy Co. and a licensed electrician serving the Chicagoland area, with years of hands-on experience helping homeowners and businesses complete recessed lighting LED retrofit projects safely and up to code. In this guide, I’ll walk you through everything — from picking the right kit to installing it step by step.
Understanding the Recessed Lighting LED Retrofit
To understand why a recessed lighting LED retrofit is such a game-changer, we have to look at what is actually inside your ceiling.
Traditional recessed lights consist of three main parts: the housing (the metal “can” hidden inside the ceiling), the trim (the plastic or metal ring visible from below), and the bulb itself. In the past, upgrading to energy-efficient lighting meant either squeezing a bulky CFL or LED bulb into an old, yellowed trim, or tearing out the entire metal housing to install a brand-new fixture.
An LED retrofit kit bypasses all of that mess. It combines the LED light source and the trim into one single, integrated piece. It is designed to slide directly into your existing metal can, using a clever piece of hardware called an Edison pigtail adapter. This adapter has a standard screw-in base on one end (just like a regular lightbulb) and a quick-connect plug on the other. You simply screw the adapter into your old socket, plug it into the new LED fixture, and push the fixture into the ceiling.
This brings up a common question: what is the difference between retrofitting an existing can and installing “canless” LED lights? Canless LEDs are ultra-thin fixtures that do not require a metal housing at all; instead, they clip directly into a hole cut in the drywall. While canless lights are excellent for new construction or ceilings with limited joist space, retrofitting is the undisputed king of remodeling. If you already have metal cans installed, retrofitting is faster, cleaner, and preserves your existing ceiling structure without requiring drywall repairs.
Beyond convenience, the physical benefits of switching to LEDs are massive. Traditional incandescent and halogen bulbs are essentially small space heaters that happen to emit light. They convert up to 90% of their energy into heat, which bakes your ceiling, degrades wire insulation over time, and forces your air conditioner to work harder during hot Chicago summers in Cook County. LEDs run remarkably cool because they use solid-state technology to generate light, drastically reducing your cooling load and protecting your home’s wiring.
For those interested in how this fits into modern design trends, check out The 2026 Guide to Smart Home Lighting: Human-Centric Design for Chicagoland Homeowners to see how retrofits play a role in contemporary, wellness-focused home environments.
| Feature | Traditional Incandescent Bulbs | Integrated LED Retrofits |
|---|---|---|
| Average Lifespan | 1,000 to 2,000 hours | 50,000+ hours |
| Wattage for ~950 Lumens | 75 Watts | 12 to 13 Watts |
| Heat Output | Extremely High (up to 300°F) | Minimal (warm to the touch) |
| Trim & Bulb Design | Separate pieces (can yellow/gap) | Integrated single-piece (seamless) |
| Mercury/Hazardous Materials | None (but highly fragile) | Completely mercury-free & durable |
How to Choose the Right Retrofit Kit for Your Ceiling
Before you run out to the local home improvement store in Schaumburg or order a box of lights online, you need to understand the technical specifications. Choosing the wrong kit can result in lights that flicker, look too harsh, or physically do not fit into your ceiling.
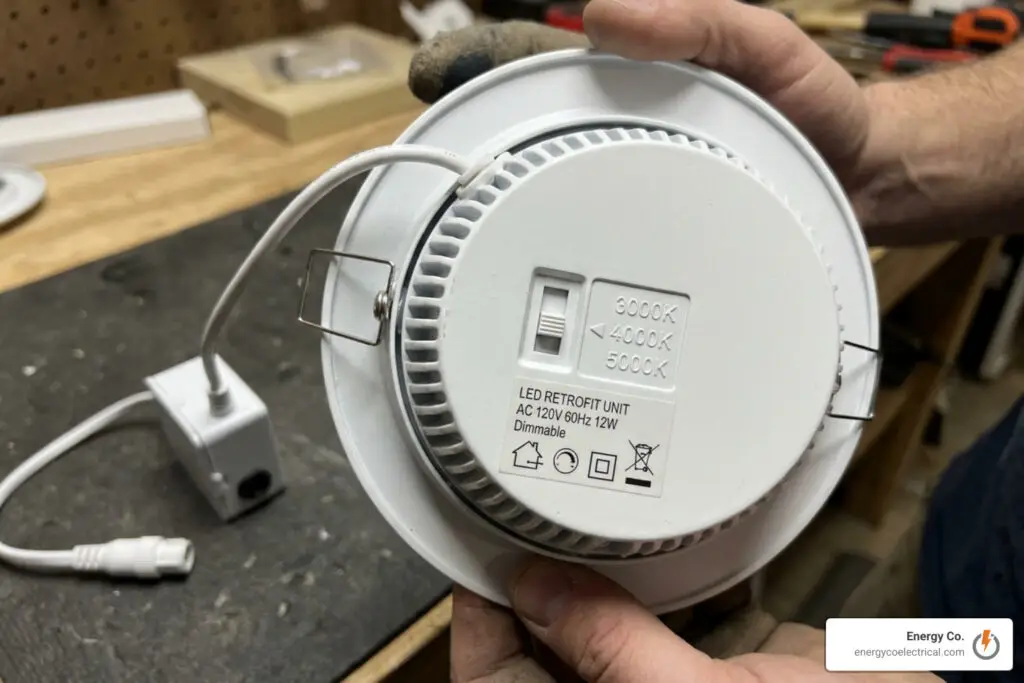
When shopping for a recessed lighting LED retrofit, keep these core specifications in mind:
- Selectable CCT (Correlated Color Temperature): This is one of the best innovations in modern lighting. Instead of buying a light with a fixed color profile, selectable CCT fixtures feature a small physical switch on the back of the unit. This switch lets you toggle between different color temperatures—usually ranging from warm white (2700K) to daylight (5000K)—before you push the light into the ceiling.
- Lumens vs. Wattage: Forget everything you know about wattage as a measure of brightness. Wattage only tells you how much power a light consumes. Lumens measure actual light output. If you are replacing a 65W incandescent bulb, look for an LED retrofit that produces roughly 650 to 800 lumens while consuming only 7 to 10 watts.
- CRI (Color Rendering Index): CRI measures how accurately a light source reveals the true colors of objects beneath it, on a scale up to 100. For living rooms, kitchens, and bathrooms, always choose a fixture with a CRI of 90 or higher. Low-CRI lights (80 or below) can make your paint colors look muddy and your skin tones look washed out.
- IC (Insulation Contact) Rating: If your recessed cans are installed in an attic floor or a ceiling that has blown-in or fiberglass insulation packed tightly around the metal housing, you must ensure your existing cans are IC-rated, or choose a retrofit designed to keep operating temperatures safely within limits.
- Wet vs. Damp Ratings: Damp-rated lights are perfect for kitchens, laundry rooms, and covered outdoor patios. Wet-rated lights are sealed against direct water contact and are required if you are retrofitting a light directly over a shower or tub.
Sizing Your Recessed Lighting LED Retrofit
Sizing is where most DIY mistakes happen. Recessed cans are classified by their nominal inner diameter, with the most common residential sizes being 4-inch, 5-inch, and 6-inch.
To determine what size you need, do not measure the outer plastic trim ring. Instead, pull out the old bulb and use a tape measure to measure the inside diameter of the metal housing itself.
- 4-Inch Cans: Typically found in modern kitchens, bathrooms, or used for accent lighting. If you have 4-inch cans, you will need a dedicated 4-inch kit, such as the 4-inch selectable LED kit, which offers a compact design and clean output.
- 5-Inch and 6-Inch Cans: Older homes in the Northwest Suburbs often feature 5-inch or 6-inch cans. Fortunately, because these sizes are so similar, many manufacturers produce universal kits. A 5/6-inch selectable LED kit features adjustable spring clips that can be widened or narrowed to fit snugly in either housing size.
Selecting Trim Styles and Color Temperatures
The trim style you choose has a major impact on the visual comfort and style of your room:
- Baffle Trim: Features deep, ribbed grooves inside the collar. These ridges are designed to absorb excess light, reducing glare and making the ceiling look softer and less intense.
- Smooth Trim: Offers a clean, flat, modern aesthetic. It maximizes light output and looks incredibly sleek in minimalist or contemporary spaces.
- Gimbal (Adjustable) Trim: Allows you to pivot and tilt the light module inside the trim. This is perfect for sloped ceilings, highlighting artwork, or directing light toward a fireplace mantle.
- Disk Downlight: A surface-mount option that mimics the look of a recessed light but sits slightly flatter against the drywall, often used when retrofitting junction boxes that aren’t deep enough for traditional cans.
When it comes to color temperature, the choice depends entirely on the room’s function. Warm white (2700K to 3000K) is cozy and inviting, making it ideal for bedrooms, family rooms, and dining areas. Cool white to daylight (4000K to 5000K) is crisp and energizing, perfect for home offices, garages, and kitchen work zones.
If you want ultimate flexibility, a multi-pack kit like the 5-6 in. 9.4W (75-Watt Replacement) Selectable White Integrated LED Recessed Downlight Retrofit Kit (4-Pack) allows you to test different color temperatures in real-time in your own space before finalizing your design.
Step-by-Step Installation Guide
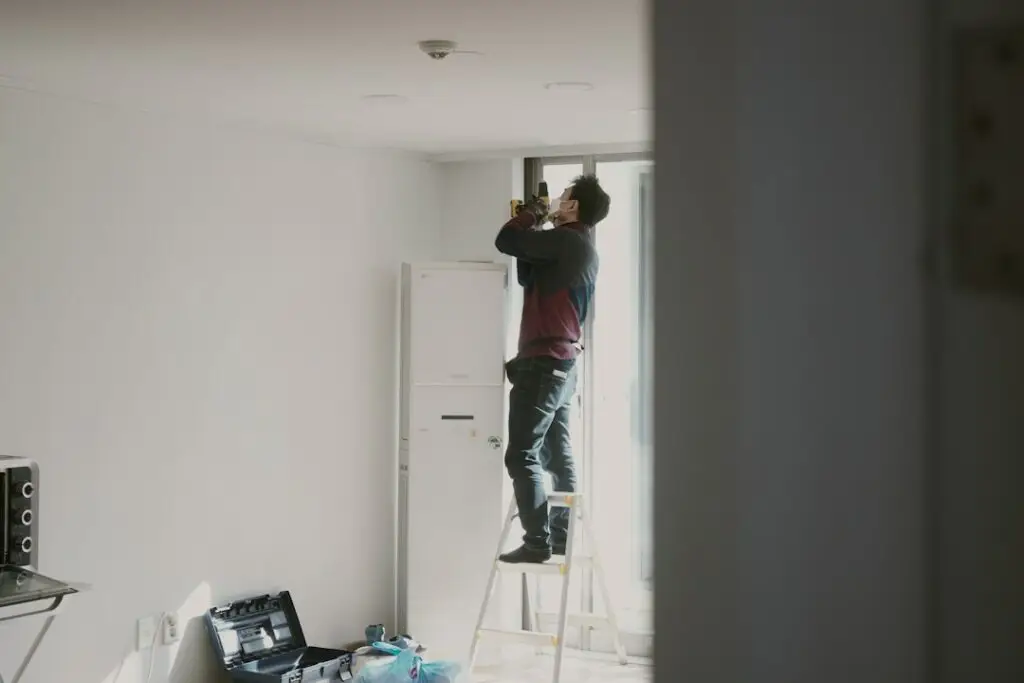
Upgrading your home with a recessed lighting LED retrofit is one of the most rewarding DIY projects you can tackle. However, because you are dealing with electricity, safety must always come first.
If you are upgrading commercial spaces or feel uncomfortable working with electrical fixtures, we highly recommend consulting our guide on how to Save Green by Going Green with Chicago Commercial Lighting Upgrades to see how professional upgrades can maximize rebate opportunities and ensure total code compliance.
Preparing for Your Recessed Lighting LED Retrofit
Before you begin, gather the right tools. You won’t need anything highly specialized, but having these items on hand will make the process seamless:
- A sturdy ladder or step stool
- A non-contact voltage tester
- A flathead and Phillips-head screwdriver
- A pair of work gloves and safety glasses
- Retrofit C-clips (only required if your existing metal cans do not have built-in mounting brackets inside them)
If you discover that your old metal cans are damaged, poorly wired, or lack the structural integrity to hold new trims, it is always wise to call in a professional. You can learn more about finding the right help by checking out our page on the Top Rated Lighting Contractor in Chicago: Expert Services for Your Project.
Step-by-Step Retrofit Process
Follow this sequence to safely and efficiently replace your old recessed lights with brand-new LED retrofits:
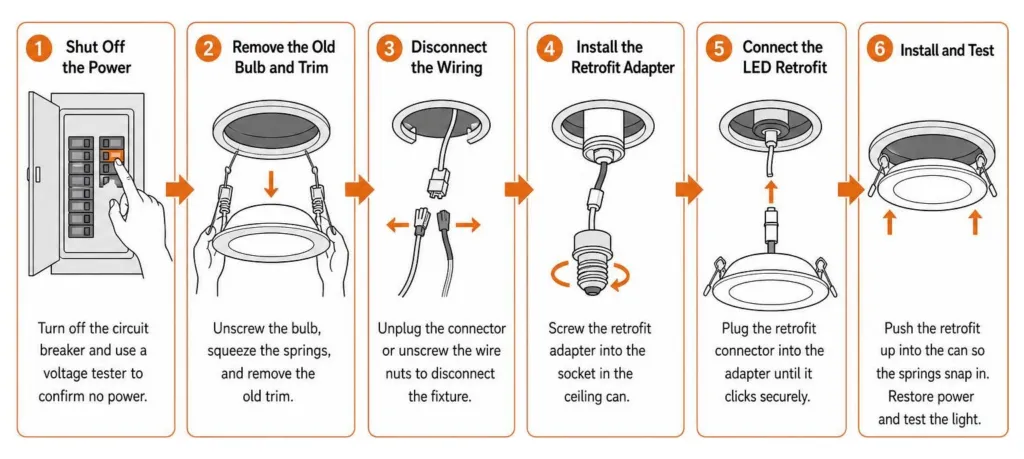
Step 1: Shut Off the Power
Go to your home’s main electrical breaker panel and switch off the circuit breaker that controls the lights you will be working on. Do not rely solely on the wall switch—someone could easily walk into the room and flip the switch back on while you are holding live wires. Use your non-contact voltage tester near the lightbulb to confirm there is absolutely no electrical current flowing to the fixture.
Step 2: Remove the Old Bulb and Trim
Carefully unscrew the existing lightbulb. Next, pull the old trim ring down slightly from the ceiling. Most older trims are held in place by metal coil springs or V-shaped torsion springs. Reach inside the gap, squeeze these springs to release them from their mounting brackets, and remove the old trim entirely.
Step 3: Check for C-Clips
Look inside the empty metal can. You should see two small metal brackets with holes (called C-clips) mounted opposite each other on the inner walls of the housing. These are what the new LED retrofit’s spring clips will hook into. If your older cans do not have these, you can buy a cheap retrofit clip kit, mark the proper height inside the can, and screw the clips into the sheet metal using a right-angle drill attachment.
Step 4: Screw in the Edison Socket Adapter
Take the E26 socket adapter (included in your retrofit kit) and screw it directly into the empty light socket inside the can, just like you would screw in a standard lightbulb.
Step 5: Connect the Ground Wire (If Required)
Some retrofit kits include a green ground wire with a metal ring terminal. If your kit has this, locate a ground screw inside your metal can, loosen it slightly, slide the ring terminal underneath, and tighten the screw securely.
Step 6: Set Your Color Temperature
If your LED retrofit features a selectable CCT switch on the back of the driver box, set it to your desired color temperature now. (Pro tip: start with 3000K for a balanced, warm-yet-clean look).
Step 7: Plug in the Quick-Connect Adapter
Take the orange plug extending from the socket adapter you just screwed into the can, and snap it securely into the matching receptacle on the back of the new LED retrofit unit.
Step 8: Squeeze and Insert the Torsion Springs
Squeeze the two wire torsion springs on the sides of the LED retrofit unit inward. Guide them into the slots of the C-clips inside the metal can. Once they are hooked, release them; the tension will naturally pull the light fixture upward toward the ceiling.
Step 9: Push Flush and Restore Power
Gently push the LED downlight upward until the outer trim ring sits perfectly flush against your drywall. Once all fixtures are installed, head back to your breaker panel, turn the power back on, and flip your wall switch to enjoy your beautiful, energy-efficient new lighting!
Frequently Asked Questions about Retrofit Downlights
Do I need a permit for recessed lighting installation in Chicago?
In the city of Chicago and many surrounding suburbs like Cicero and Arlington Heights, electrical codes are exceptionally strict to prevent fire hazards in our historic wood-framed buildings.
If you are performing a simple, direct swap of a lightbulb and trim using a plug-and-play recessed lighting LED retrofit kit into an existing, code-compliant can, a permit is generally not required because you are not altering the structural wiring of the home.
However, if your retrofit project involves running new Romex or conduit, installing new metal housings, or adding new wall dimmers where none existed before, local building regulations require an electrical permit. These installations must be completed by a licensed, bonded electrical contractor to ensure safety and compliance with Chicago’s unique electrical codes.
Are retrofit LED lights dimmable, and what dimmers are compatible?
Yes, the vast majority of high-quality LED retrofits are fully dimmable, but they require the correct type of dimmer switch to function properly.
Older dimmer switches designed for incandescent bulbs work by rapidly cutting off the electrical current (known as Triac dimming). Because LEDs operate on low-voltage direct current (DC) rather than high-voltage alternating current (AC), using an old dimmer will cause your new LEDs to buzz, flicker, or have a very narrow dimming range.
To achieve smooth, flicker-free dimming down to 10%, you must replace your old wall switch with a modern LED-compatible dimmer (specifically rated for ELV – Electronic Low Voltage or LED loads). If you are building a smart home system, ensure your smart dimmers are fully compatible with low-wattage LED fixtures.
Can I install retrofit LED lights in wet or damp locations like bathrooms?
Absolutely, but you must select a fixture with the appropriate environmental rating.
For general bathroom lighting or outdoor soffits over a porch in Mount Prospect or Schaumburg, a “damp-rated” fixture is perfectly fine. It is designed to handle high humidity and condensation without corroding or shorting out.
However, if you want to install a recessed light directly inside a shower stall where water will actively splash onto the fixture, you must use a “wet-rated” and fully sealed model. An adjustable option like the 4 in. 9.6W (65W Replacement) Daylight (5000K) Enhance Dimmable Adjustable LED Recessed Downlight provides both the safety rating required for wet zones and the directional flexibility to highlight specific bathroom design features.
Conclusion
Upgrading to a recessed lighting LED retrofit is one of the smartest, most satisfying investments you can make for your Chicagoland home. By swapping out those power-hungry, heat-emitting incandescent bulbs for sleek, modern, and highly efficient integrated LED fixtures, you will immediately cut your energy bills, eliminate the annoyance of changing dead bulbs, and completely transform the look and feel of your living spaces.
While many retrofit projects can be completed over a weekend, older Chicago homes often present unique challenges—such as outdated knob-and-tube wiring, non-standard junction boxes, or tricky plaster-and-lath ceilings.
If you run into any unexpected wiring issues during your project, or if you simply prefer to have the peace of mind that comes with a professional installation, we are here to help. At Energy Co., our licensed, expert electricians have spent years upgrading homes and commercial properties throughout Chicago, Schaumburg, Elk Grove Village, and the surrounding suburbs. We can ensure your new lighting system is perfectly spaced, safely wired, and fully compliant with all local building codes.
Ready to take your ceiling to the next level? Learn more about our specialized upgrades by exploring our comprehensive guide on Shining a Light on Commercial Lighting Services and Retrofits, or contact us today to schedule your residential lighting consultation!