Why Bathroom Exhaust Fan Installation Matters More Than You Think
Bathroom exhaust fan installation is one of the most impactful upgrades you can make to protect your home from moisture damage, mold, and poor air quality. Here’s what you need to know at a glance:
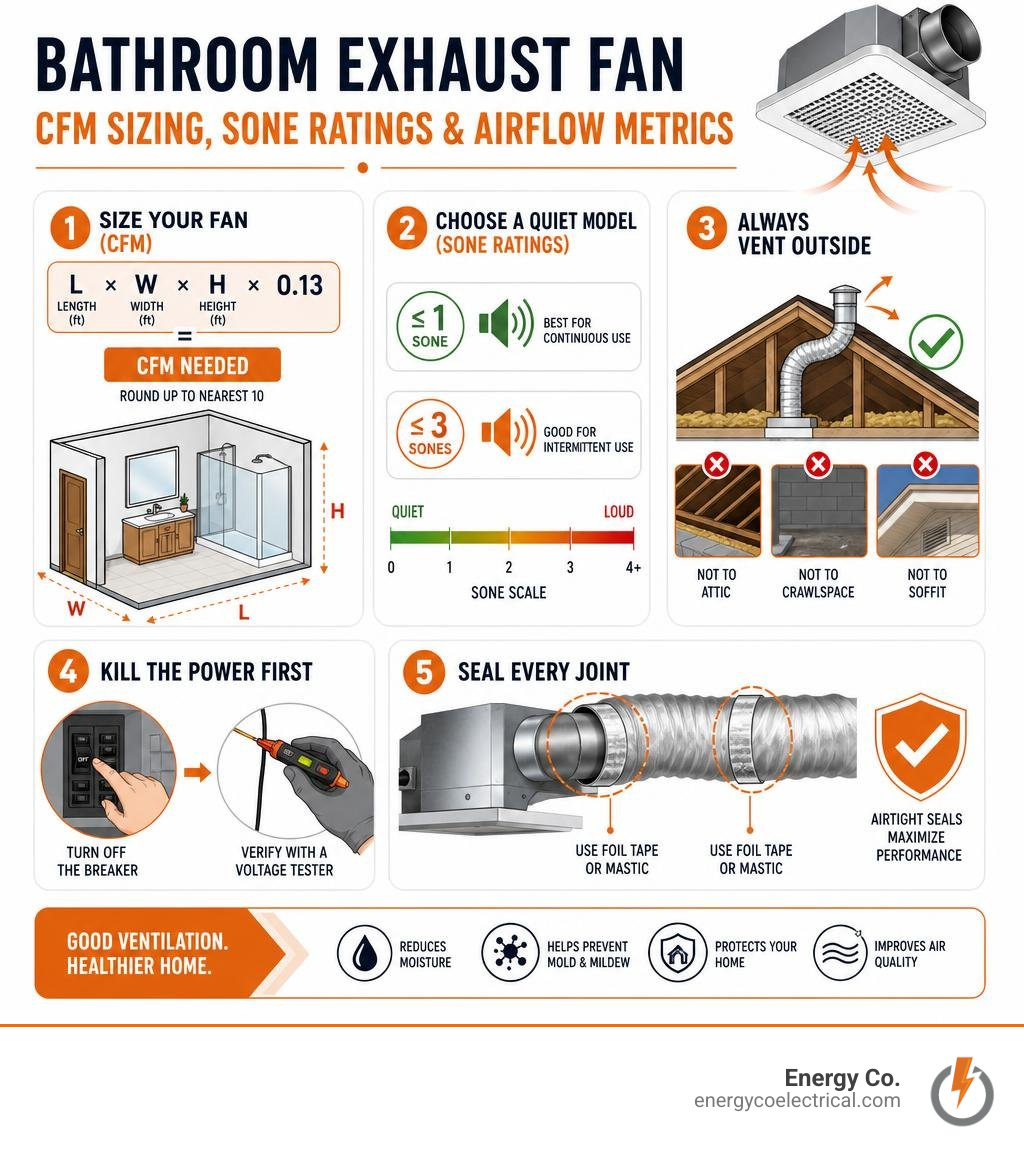
- Size your fan correctly — use the formula: Length × Width × Height × 0.13 = CFM needed, rounded up to the nearest 10
- Choose a quiet model — look for ≤ 1 sone for continuous use, ≤ 3 sones for intermittent use
- Always vent outside — never into an attic, crawlspace, or soffit
- Kill the power first — turn off the breaker and verify with a voltage tester before touching any wires
- Seal every joint — use foil tape or mastic on all duct connections
You step out of a hot shower, wipe the mirror, and catch a musty smell. The ceiling paint is peeling, and there’s a faint dark ring forming around the old fan grille. That’s not just an eyesore — it’s a warning sign that your ventilation is failing, and your home’s structure could be paying the price.
A failing or undersized bathroom fan allows moisture to build up inside walls, under flooring, and along ceiling joists. Over time, that means mold, rot, and costly repairs. In 2026, with tighter ventilation standards and more homeowners tackling older Chicago-area housing stock, getting this right matters more than ever.
I’m Michał Napieralski, a licensed electrician and the founder of Energy Co., with years of hands-on experience handling bathroom exhaust fan installation and complex electrical upgrades across Schaumburg and the greater Chicagoland area. In this guide, I’ll walk you through everything — from spotting the signs of a failing fan to wiring a new one safely and correctly.
Signs You Need an Upgrade and Sizing Your Fan
How do you know when your current exhaust fan has reached the end of its line? Most bath fans have an average lifespan of 10 to 15 years, but heavy daily use or poor maintenance can shorten that window significantly.
Here are the telltale warning signs that your bath fan is begging for retirement:
- Excessive or harsh motor noise: If flipping the switch sounds like a jet engine taking off or a loud blender grinding gravel, worn-out motor bearings or an unaligned blower wheel are to blame.
- Persistent bathroom humidity: If the mirror stays fogged for more than 10 to 15 minutes after a shower, the fan is no longer pulling its weight.
- Visible moisture damage: Flaking ceiling paint, rusted light fixtures, dark mildew spots on drywall corners, or water dripping back down from the fan housing signal trapped humidity.
- Dust build-up inside the housing: Aging motors overheat when clogged with years of caked dust, creating an inefficient motor drag that drains power without moving air.
When it comes to selecting a replacement fan, the two most critical metrics you need to evaluate are CFM (Cubic Feet per Minute) and sones (the measurement of operational sound).
How to Calculate Required CFM
CFM measures the volume of air the fan moves each minute. Mechanical ventilation codes mandate that a bathroom fan must deliver at least 50 CFM for intermittent use or 20 CFM for continuous operation. However, real-world duct friction usually reduces actual delivered airflow by roughly 50%. Therefore, properly sizing your unit upfront prevents lingering moisture.
For bathrooms under 100 square feet, the rule of thumb is simple: 1 CFM per square foot of floor space, with a strict minimum floor of 50 CFM.
For a more precise, volume-based calculation (especially for bathrooms with high ceilings), use this formula:
Length × Width × Height × 0.13 = Required CFM (Round up to the nearest 10).
For example, an 8.5 ft. × 9.5 ft. bathroom with an 8 ft. ceiling yields:
8.5 × 9.5 × 8 × 0.13 = 83.98 CFM
In this case, you should purchase a 90 CFM or 100 CFM unit.
If your bathroom is larger than 100 square feet, calculate capacity by adding up the individual fixtures:
- Toilet: 50 CFM
- Shower: 50 CFM
- Standard Bathtub: 50 CFM
- Jacuzzi / Jet Tub: 100 CFM
Understanding Sone Ratings
Noise level is rated in sones. One sone is roughly equivalent to the quiet hum of a modern refrigerator. ENERGY STAR guidelines recommend exhaust fan sound ratings of ≤ 1.0 sone for continuous operation or ≤ 3.0 sones for intermittent operation. High-efficiency DC-motor models, such as Panasonic Whisper-series units, operate as low as 0.3 sones — virtually quieter than a whisper! Standard budget units, by contrast, frequently run at 3.0 to 4.0 sones, sounding as loud as a kitchen blender.
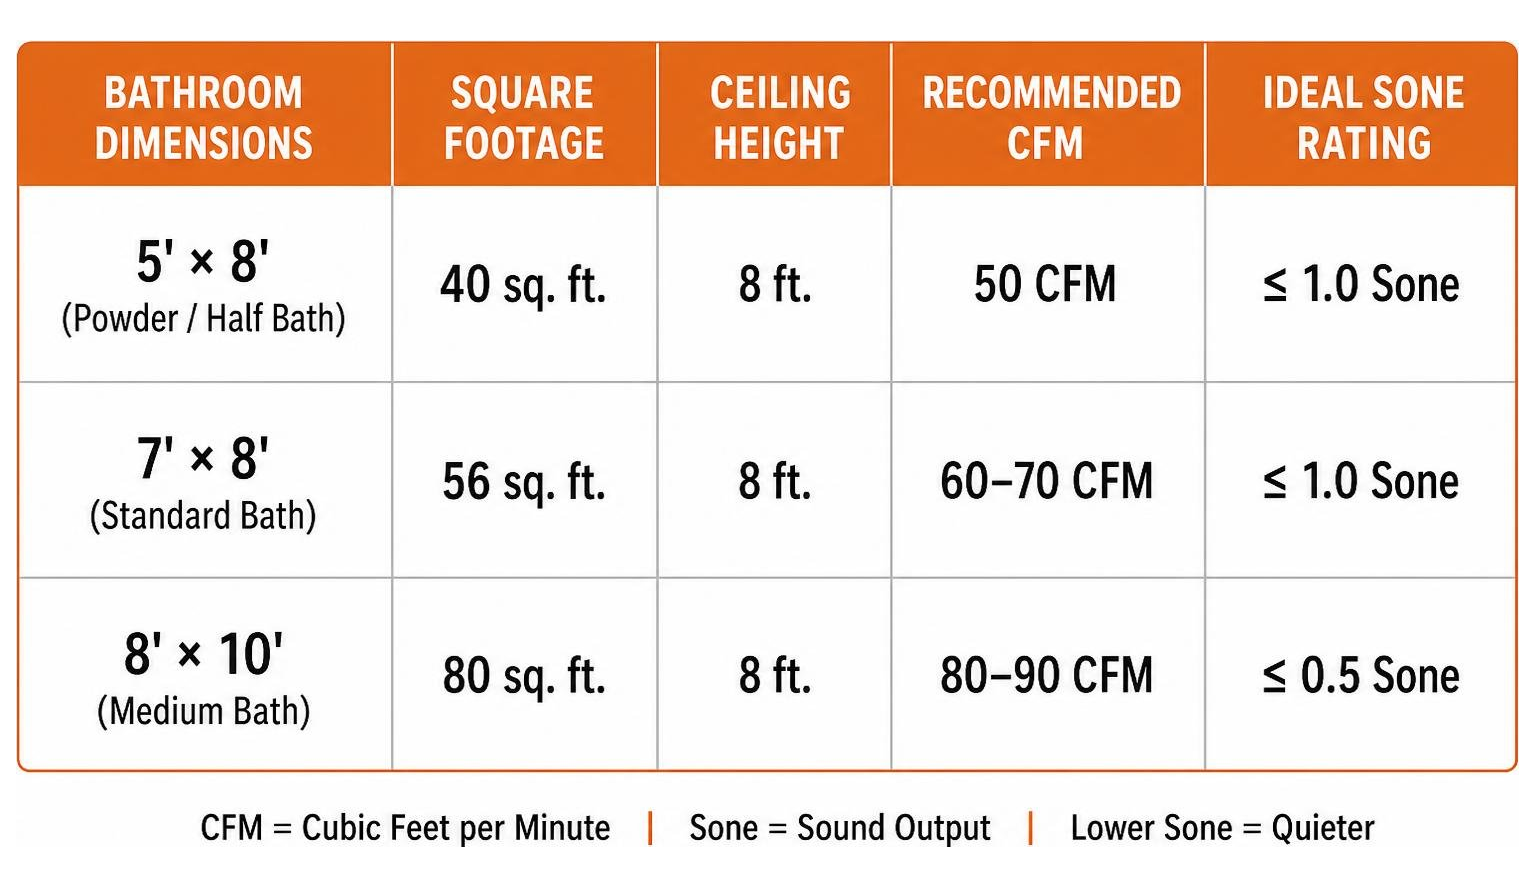
| Bathroom Dimensions | Square Footage | Ceiling Height | Recommended CFM | Ideal Sone Rating |
|---|---|---|---|---|
| 5′ × 8′ (Powder / Half Bath) | 40 sq. ft. | 8 ft. | 50 CFM | ≤ 1.0 Sone |
| 7′ × 8′ (Standard Bath) | 56 sq. ft. | 8 ft. | 60–70 CFM | ≤ 1.0 Sone |
| 8′ × 10′ (Medium Bath) | 80 sq. ft. | 8 ft. | 80–90 CFM | ≤ 0.5 Sone |
| 10′ × 12′ (Master Bath w/ Tub & Shower) | 120 sq. ft. | 9 ft. | 110–150 CFM | ≤ 0.3 Sone |
For complete DIY guidance on selecting features like humidity sensors or integrated LED lighting, consult this comprehensive guide on bathroom exhaust fan installation.
Preparing for Bathroom Exhaust Fan Installation: Tools and Materials
Before pulling down an old fan housing or cutting drywall overhead, gather the proper assembly tools, safety gear, and electrical equipment. Working smart starts with proper preparation.
Required Tools and Materials Checklist
- Hand & Cutting Tools:
- Drywall saw or oscillating multi-tool
- Stud finder
- Flathead and Phillips screwdrivers
- Wire cutters and wire strippers
- Measuring tape and pencil
- Reciprocating saw (for cutting old joist brackets if needed)
- Electrical & Safety Gear:
- Non-contact voltage tester (essential for verification)
- Safety goggles and dust mask (critical when cutting overhead drywall or moving attic insulation)
- Work gloves
- UL-approved wire nuts or push-in wire connectors
- Cable clamps / strain relief connectors
- Ducting & Sealing Supplies:
- 4-inch or 6-inch insulated flexible ducting or smooth rigid metal ducting
- Heavy-duty HVAC metal foil tape (UL 181-approved) — never use standard cloth duct tape
- Exterior wall or roof vent cap with built-in damper and pest screen
- Silicone caulk and caulk gun
Understanding basic circuit connections is vital before handling house wiring. Take a moment to review mastering the basics of electrical installation work to ensure you are comfortable working around junction boxes and terminal leads.
Step-by-Step Exhaust Fan Removal and Mounting
Properly removing the old unit sets the foundation for a seamless installation. Follow this physical step-by-step process.
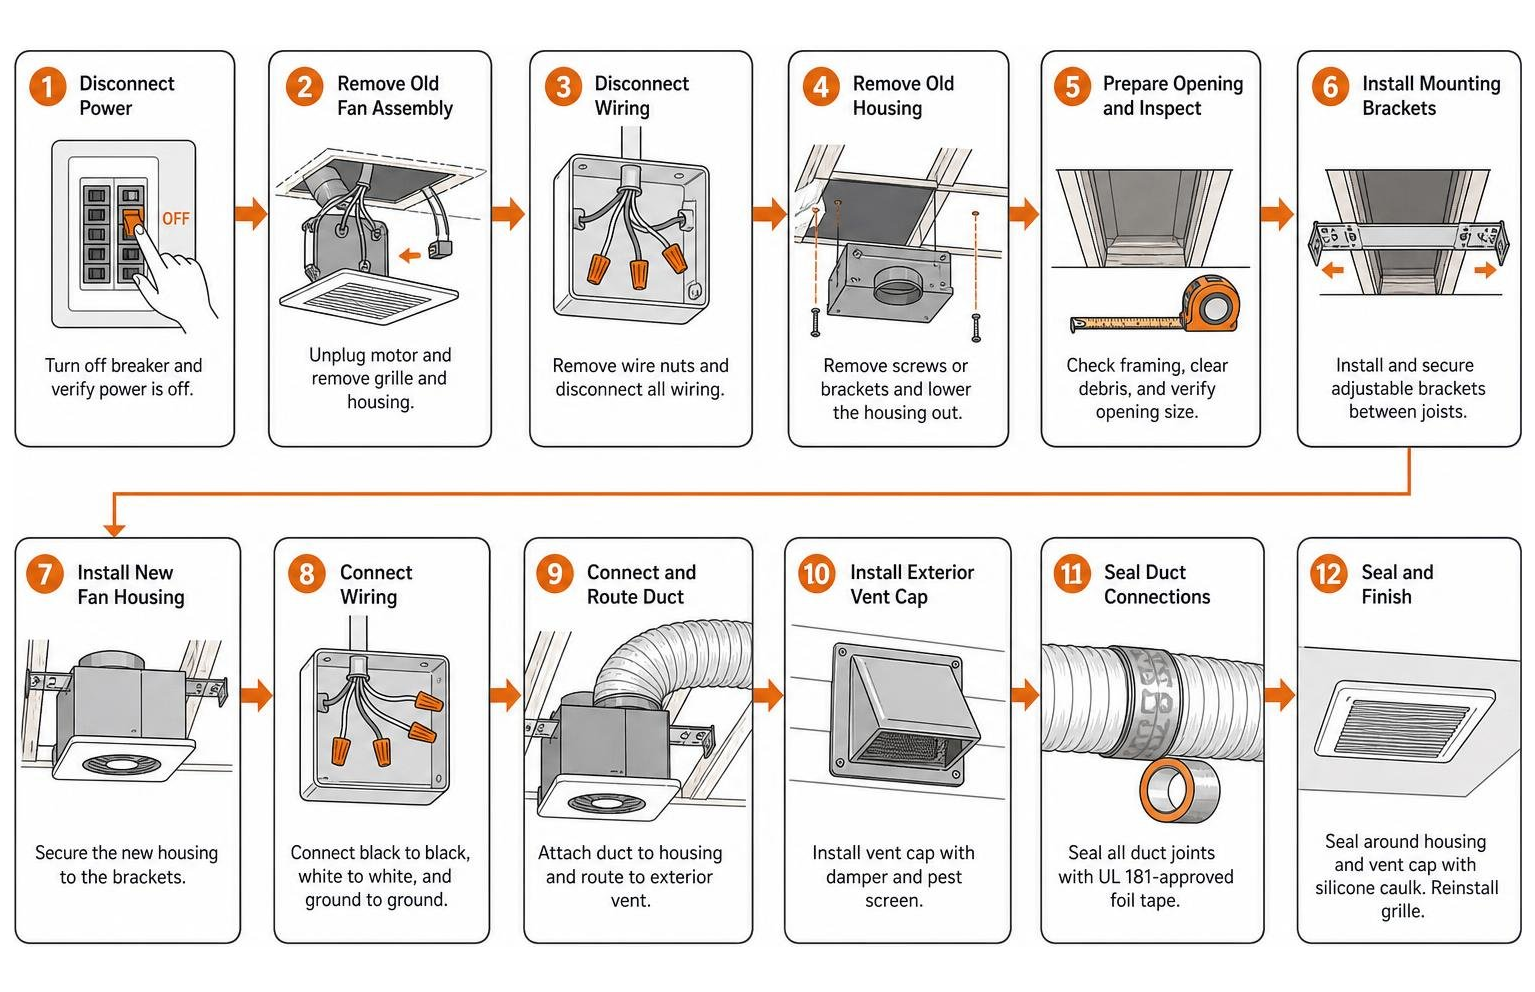
Step 1: Disconnect Electrical Power
Safety comes first. Go to your main breaker box and switch off the breaker supplying power to the bathroom. Return to the room and switch on the fan and light to verify power is killed. Remove the grille cover, take your non-contact voltage tester, and place it directly against the wiring leads inside the unit’s internal junction box to confirm the circuit is completely cold.
Step 2: Remove the Old Fan Assembly
- Unplug the motor assembly from the internal housing receptacle.
- Undo the screws holding the motor bracket in place, and pull the motor assembly out of the metal housing.
- Disconnect the house electrical wire nuts, unscrew the cable connector clamp, and feed the house cable safely out of the old junction box.
- Unscrew the housing from ceiling joists. If mounted on fixed slide bars, cut the metal brackets using an oscillating saw or reciprocating saw from below.
- Disconnect the old exhaust duct from the housing outlet port.
Step 3: Inspect and Upgrade Ductwork
One of the most crucial elements of any bathroom exhaust fan installation is ensuring the exhaust ducting routes directly to the outdoors.
- Where to vent: Route ductwork directly through an exterior sidewall or through the roof using a roof vent cap equipped with an operational backdraft damper and pest screen.
- Where NEVER to vent: Never exhaust moisture into an attic, crawlspace, soffit vent, or wall cavity! Discharging warm, humid air into unconditioned spaces leads to massive attic mold outbreaks and structural rafter decay.
- Duct selection: Use smooth rigid metal or insulated flexible ducting. Ensure duct runs remain as short and straight as possible. Allow at least 2 to 3 feet of straight pipe coming off the fan exhaust port before introducing the first curve.
For specific unit dimensions and mounting frame clearances, you can review manufacturer guidelines like the Broan 100HL Vent Fan Installation Instructions or the Air King IL Series Installation Specifications.
Bathroom Exhaust Fan Installation with Attic Access
If you have open attic space directly above the bathroom ceiling, mounting a new fan housing is straightforward. You can work comfortably from above without damaging finished ceiling surfaces.
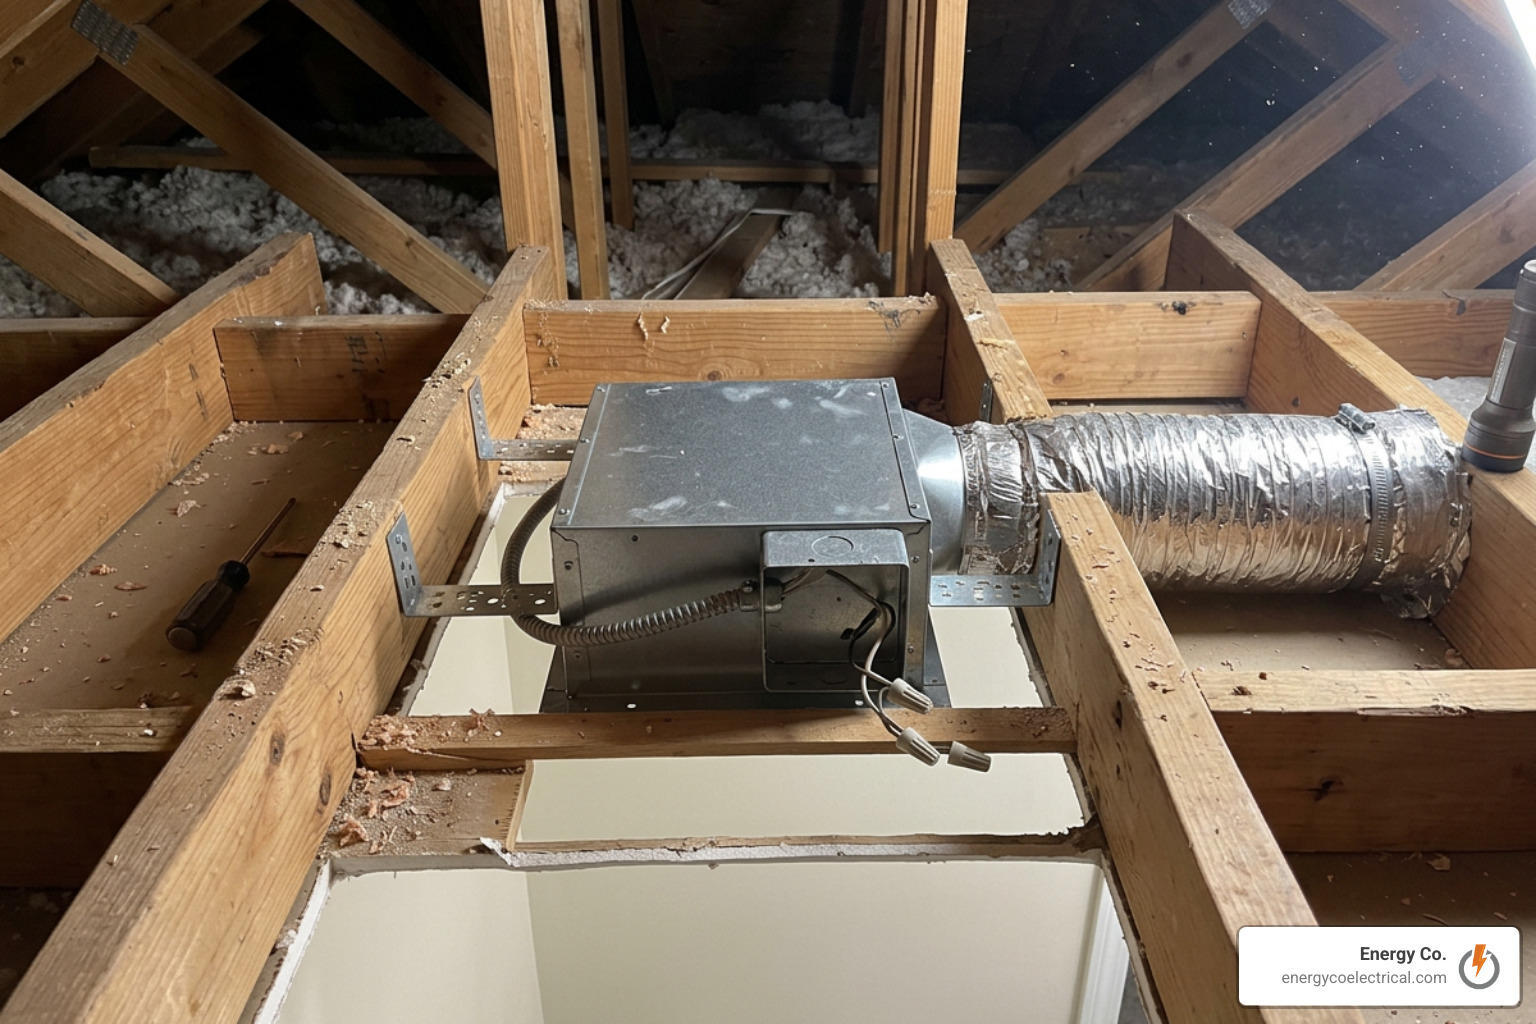
- Set Up Attic Workspace: Lay a sturdy piece of plywood across attic ceiling joists to create a safe, stable platform to stand or kneel on. Wear a dust mask and safety glasses.
- Size the Ceiling Cutout: From inside the bathroom, hold the template supplied with your new fan against the ceiling. Trace around it with a pencil. Cut out the drywall carefully using a drywall hand saw.
- Mount Housing Brackets: Extend the sliding hanger bars attached to the fan housing. Position the housing between the ceiling joists so the bottom lip extends roughly 1/8 inch below the bottom edge of the joist (matching your drywall thickness).
- Secure to Joists: Screw or nail the telescoping hanger brackets securely into the joists using wood screws.
- Attach Duct Connector and Ducting: Snap the 4-inch damper/duct connector onto the housing. Slide your insulated flexible or rigid duct over the collar, secure it with a screw clamp, and wrap the joint tightly with metal foil tape.
- Air Seal the Ceiling Opening: Apply a bead of caulk between the metal fan housing and the ceiling drywall from below to stop conditioned air from leaking into the attic.
If you are following a retailer step-by-step mounting guide, check out Lowe’s guide on installing bath fans for additional hardware tips.
Bathroom Exhaust Fan Installation without Attic Access
In high-rise condos across Chicago or two-story homes in Palatine and Arlington Heights, attic access directly above a ground-floor bathroom is often nonexistent. In these scenarios, you must perform a roomside “no-cut” or retrofit installation completely from inside the bathroom.
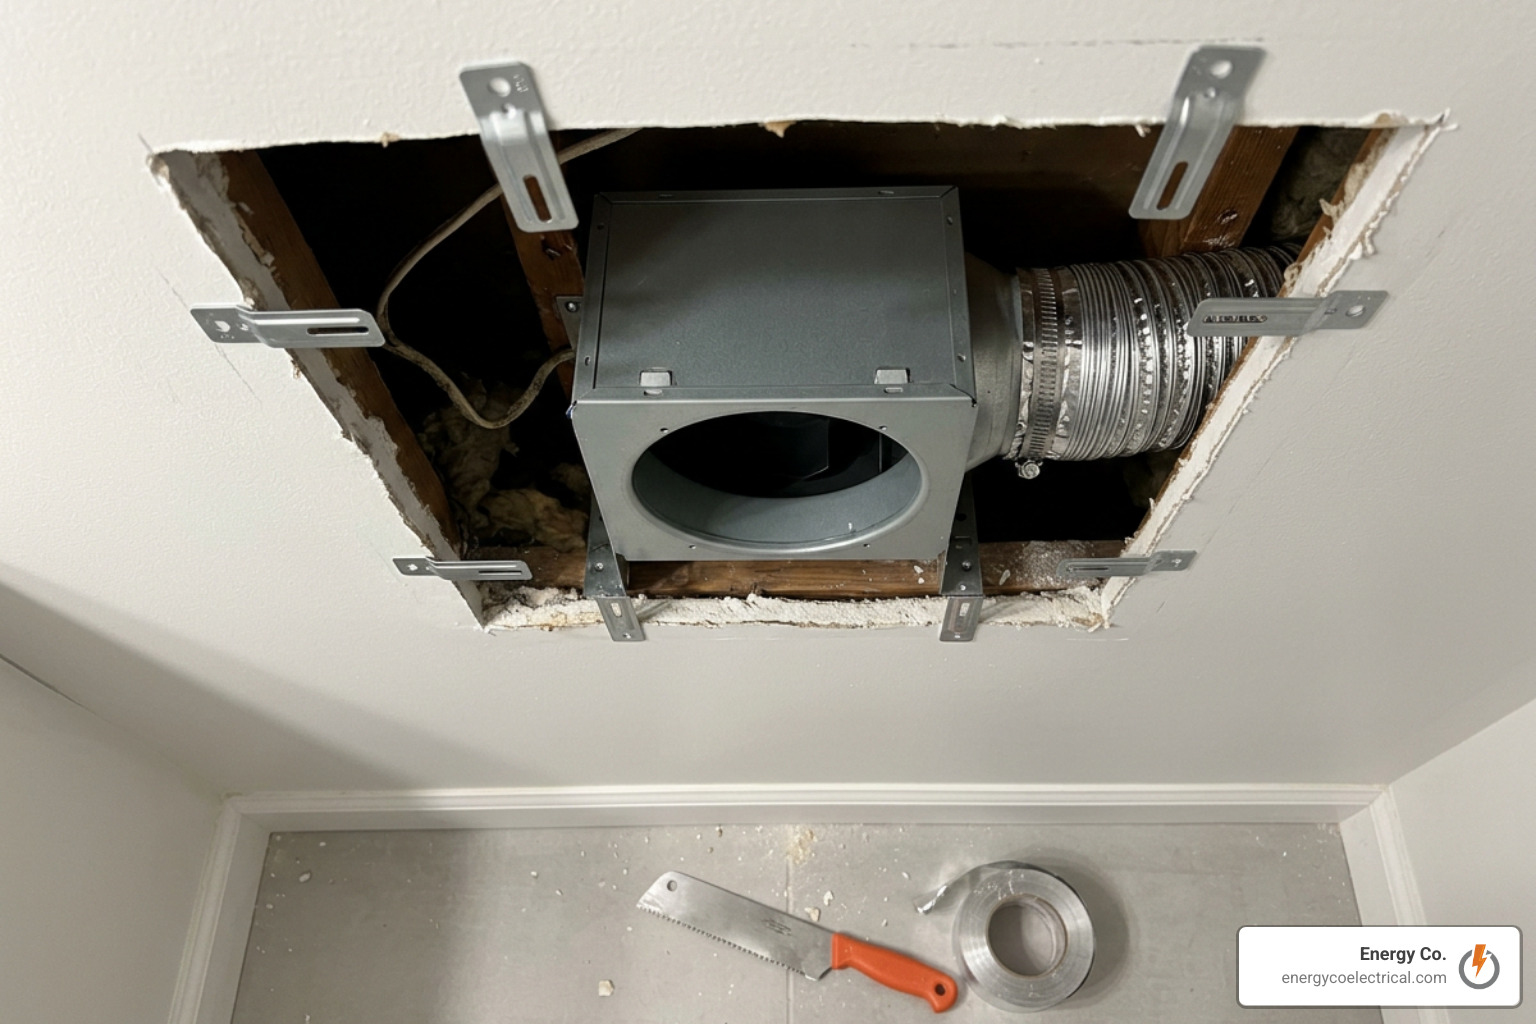
- Select a Retrofit-Friendly Fan: Choose a fan specifically designed for roomside installation (such as the Broan InVent Series). These models feature snap-in mounting brackets and flexible wiring compartments that assemble entirely through the drywall cut opening.
- Expand Ceiling Opening: Retrofit fan housings are often slightly larger than older builder-grade units. Place the cardboard cutout template over the existing hole, trace the new border, and enlarge the ceiling cutout using a drywall saw.
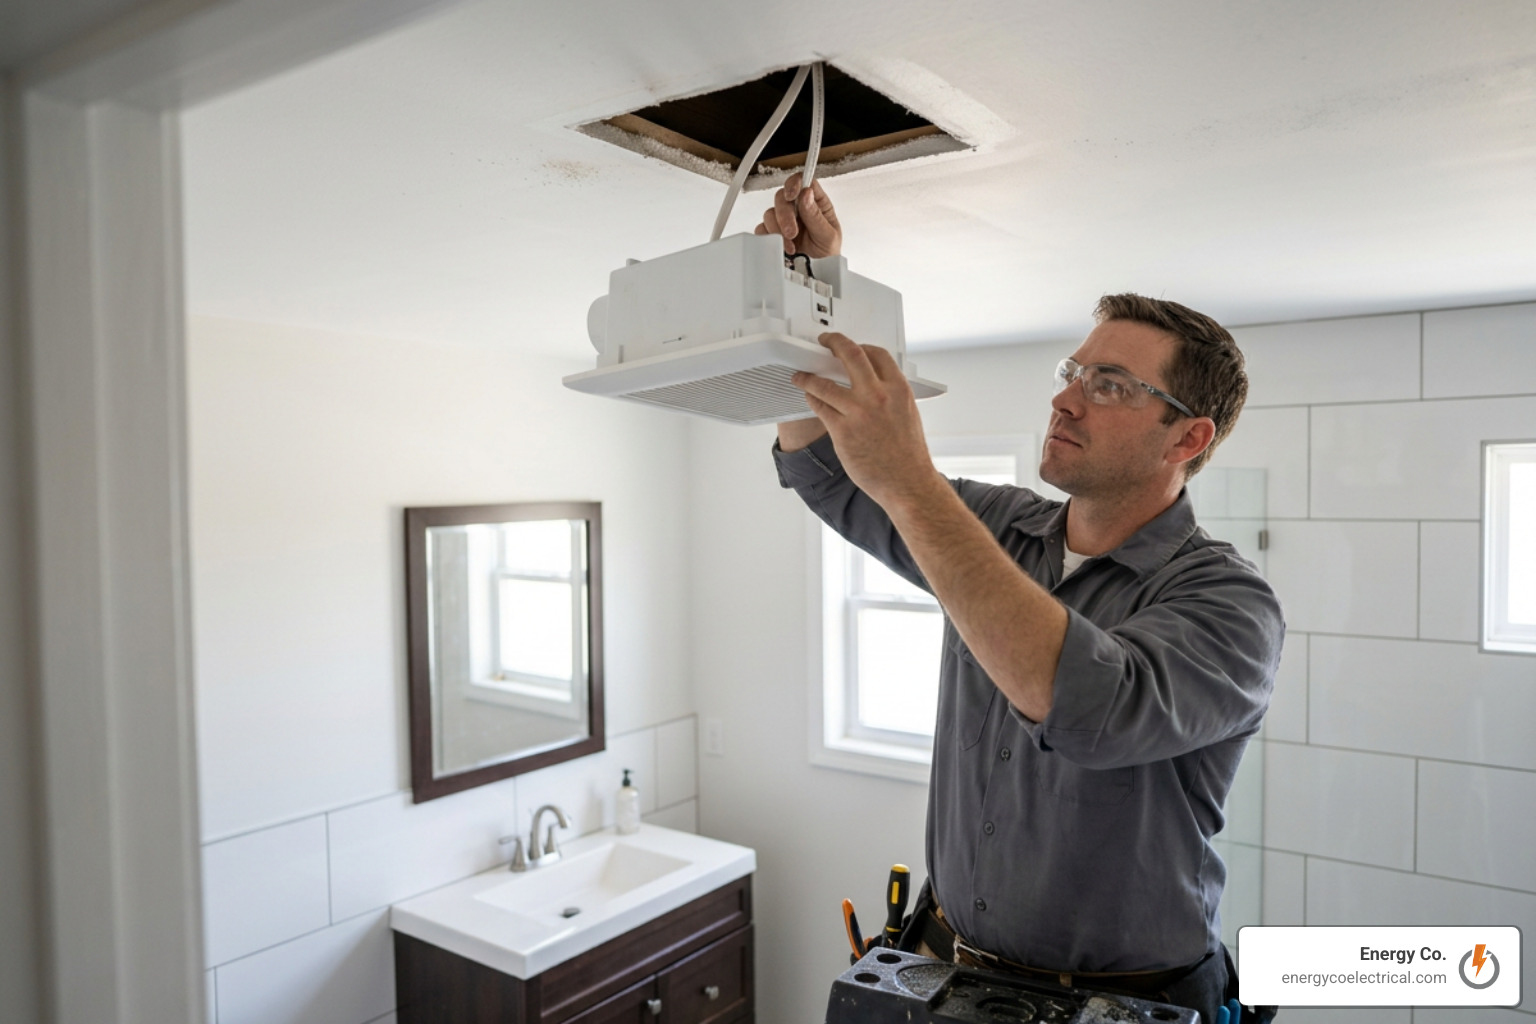
- Connect Wiring and Duct Roomside: Pull the existing electrical house cable down through the ceiling opening. Secure a cable clamp into the fan’s junction box knockout, route the wire into the box, and secure the clamp. Next, reach up through the ceiling hole, pull down the flexible exhaust duct, attach it to the removable duct connector collar, and wrap it securely with foil tape.
- Insert and Snap Brackets: Push the housing up into the ceiling cutout. Extend the internal mounting ears or roomside flange brackets until they firmly grip the top side of the ceiling drywall.
- Fasten Housing Screws: Drive screws through the interior fan housing wall directly into adjacent ceiling joists or drywall anchors to secure the housing flush against the ceiling.
For complete product-specific instructions, consult the Broan InVent Series Ceiling Fan Installation Guide or review details on recessed fan light models.
Wiring, Duct Routing, and Airflow Suction Testing
Once the housing is securely anchored, it’s time to connect the electrical wiring, assemble the grille trim, and verify suction performance.
Electrical Wiring Rules
Residential bath fan circuits run on standard 120V household power. When connecting house wiring to the unit’s wire leads:
- Hot to Hot: Connect the incoming black house wire to the black fan lead (and blue/red lead if the unit has an integrated light).
- Neutral to Neutral: Connect the incoming white house wire to the white fan neutral lead.
- Ground to Ground: Connect the bare copper or green house ground wire to the green grounding screw or wire lead on the fan housing.
Secure each connection firmly using proper wire nuts or push-in connectors. If your unit is mounted directly over a bathtub or shower enclosure, building safety codes strictly mandate that the unit must be connected to a GFCI-protected branch circuit.
For an in-depth breakdown of NM-B Romex routing, wire gauges, and junction box safety rules, explore our complete guide to residential wiring types and installation. You can also watch a visual demonstration via this Step-by-step video tutorial to see roomside wiring methods in real-time.
The Tissue Suction Test
After attaching the grille cover and restoring power at the main breaker panel, turn on the fan switch. How do you confirm your new fan is pulling air effectively?
- Take a single sheet of toilet paper or facial tissue.
- Hold it up directly beneath the fan grille.
- Release it. Strong fan suction should pull the tissue firmly flat against the grille and hold it there without dropping.
- Walk outside to the exterior wall or roof vent cap to feel warm air pushing past the backdraft damper, confirming that exhaust air flows freely without internal duct blockages.
When to Call a Professional Electrician
While replacing an existing fan with a unit of identical dimensions is manageable for experienced DIYers, many bathroom exhaust fan installation projects present hidden complexities that demand the skills of a licensed electrician.
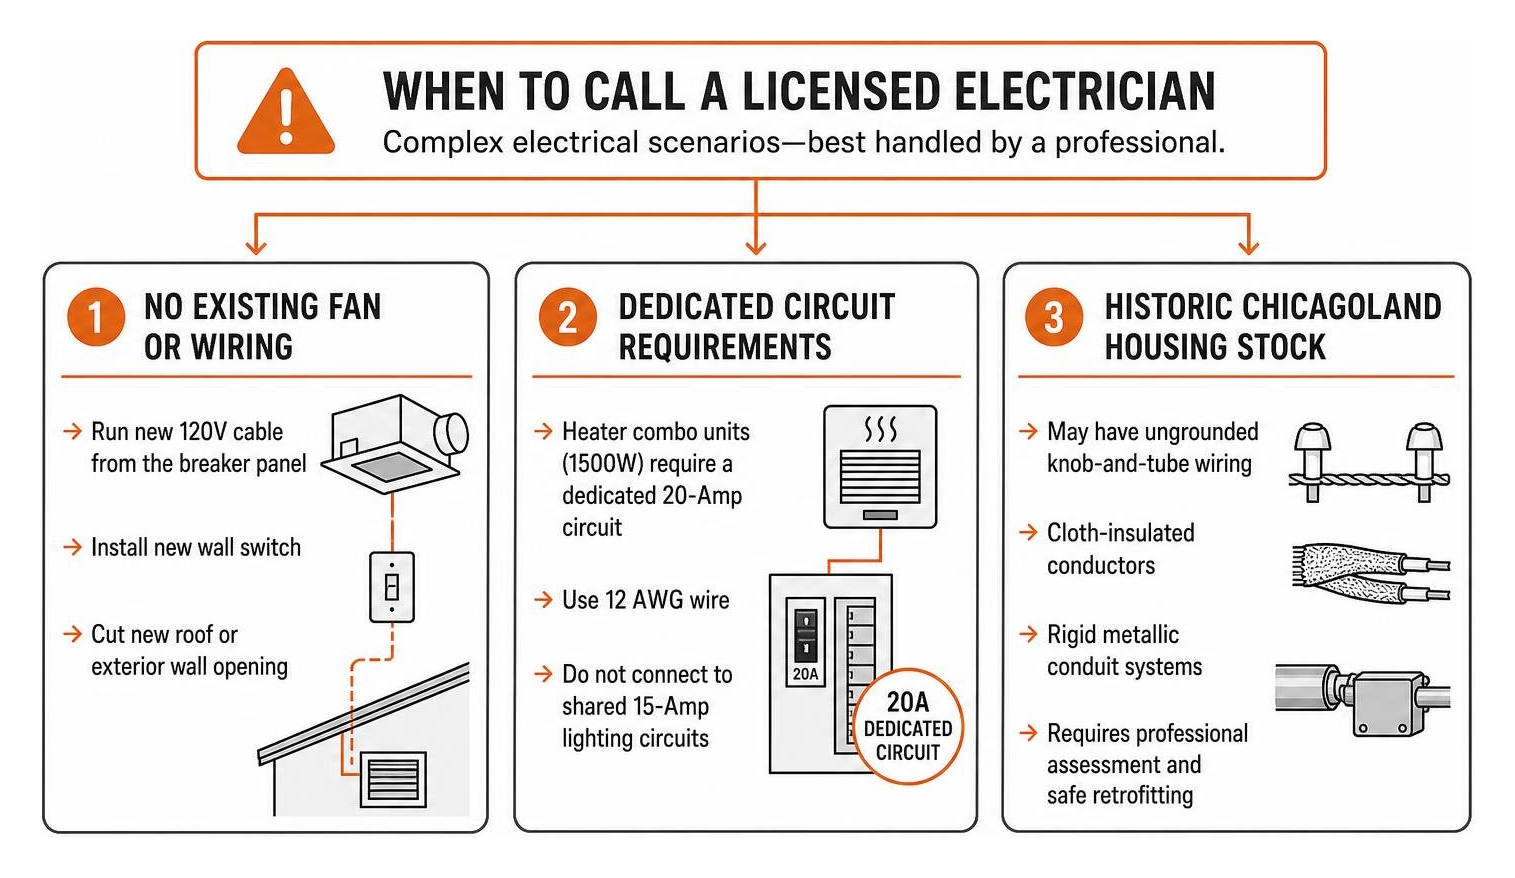
You should hire a licensed electrical contractor if you encounter any of the following situations:
- No Existing Fan or Wiring: Installing a fan in a bathroom that previously relied solely on an operable window requires running brand-new 120V electrical cable from the breaker panel, installing a new wall switch, and cutting a brand-new roof or exterior wall penetration.
- Dedicated Circuit Requirements: High-draw combination units incorporating built-in 1500W ceramic heaters require a dedicated 20-Amp circuit wired with 12 AWG cable. Connecting a heater combo unit to a standard 15-Amp shared lighting circuit will cause frequent breaker trips and dangerous wiring overheating.
- Historic Chicagoland Housing Stock: Many older homes across Chicago, Cicero, Roselle, and Streamwood feature ungrounded knob-and-tube wiring, cloth-insulated conductors, or rigid metallic conduit systems. Retrofitting modern grounded fan electronics into these vintage wiring systems requires professional expertise.
- Complex Roof Penetrations: Installing a new 4-inch or 5-inch exterior roof vent cap requires cutting shingles, applying flashing, and sealing with asphalt roof cement. Improper roof venting leads to severe water leaks during rainy Midwest storms.
When hiring a licensed pro, professional labor costs typically range between $200 and $500 for standard replacements, depending on ceiling height, drywall repairs, and attic access constraints. For expert support backed by local licensing and satisfaction guarantees, learn more about our full lineup of residential electrical services.
Conclusion
A successful bathroom exhaust fan installation eliminates lingering steam, protects your drywall and trim from destructive mold spores, and keeps indoor air fresh. By accurately calculating required CFM, choosing an ultra-quiet fan rated under 1.0 sone, routing ductwork directly outdoors, and ensuring safe electrical connections, you ensure your home stays protected for years to come.
Whether you’re upgrading a quiet half-bath in Hoffman Estates, retrofitting a master suite in Elk Grove Village or Rolling Meadows, or navigating vintage conduit wiring in Hanover Park or Mount Prospect, don’t let electrical confusion stall your project.
At Energy Co., our team of licensed, insured electricians brings years of local expertise to every job across Cook County and the Northwest Suburbs. We handle everything from high-efficiency fan upgrades and dedicated heater circuits to complete home rewiring with 24/7 emergency availability and a 100% satisfaction guarantee.
Ready to clear the air in your home? Connect with the certified team at Energy Co. Electrical Contracting Services today to schedule your consultation or electrical service appointment!