Last updated:
Signs You Need a 15 Amp Breaker Replacement
A circuit breaker is your home’s primary mechanical line of defense against electrical fires and damaged appliances. Standard 15-amp breakers power basic lighting circuits, bedroom outlets, and general living space receptacles throughout most Chicagoland homes. When a breaker begins to fail, it compromises the safety of your entire household electrical system.
According to national fire safety data, electrical failures contribute to nearly 23% of residential fires. Even more concerning is that faulty circuit breakers account for over 2,000 home fires annually, while improper installations or outdated electrical devices cause roughly 53% of all electrical failure incidents. Across the United States, electrical accidents result in approximately 24,000 injuries every year. Recognizing the warning signs early helps protect your property and family.
Here are the primary indicators that your circuit breaker is due for a 15 amp breaker replacement:
- Frequent or Unexplained Tripping: If a breaker trips immediately after being reset—even when no appliances are turned on—the internal trip mechanism may be worn out.
- Breaker Will Not Reset: If the toggle handle feels loose, springy, or fails to latch into the “ON” position after a trip, the breaker’s mechanical components have broken down.
- Warmth at the Panel: While electrical panels produce mild warmth under load, a breaker that feels hot to the touch indicates excessive internal resistance or loose terminal connections.
- Burning Smell or Scorch Marks: A persistent plastic burning odor around the breaker door or visible charring along the breaker housing signals dangerous overheating.
- Age and Wear: Circuit breakers have an average service lifespan of about 25 years. Outdated breakers in older homes across Chicago, Palatine, or Evanston often become unreliable simply due to component fatigue.
If you observe burning odors or melted plastic inside your panel, immediately turn off power and seek professional help. You can learn more about professional diagnostics by exploring our guide to Circuit Breaker Repair.
Safety Protocols and Required Tools Before You Begin

Working inside an electrical breaker panel demands respect, precision, and strict adherence to safety protocols. Even with the main disconnect switch flipped OFF, the main incoming service lines and lugs inside the panel enclosure remain energized with lethal voltage.
Before starting any 15 amp breaker replacement, assemble the appropriate tools and personal protective gear:
- Safety Glasses and Insulated Gloves: Protect your eyes and hands against potential sparks, debris, or arc flash.
- Voltage Tester or Digital Multimeter: Essential for verifying that power to the specific breaker terminal and wire is completely dead before touching any metal components.
- Insulated Screwdrivers (1,000V Rated): Flathead and Phillips insulated screwdrivers prevent accidental shorts if a tool contacts an active bus bar or terminal lug.
- Flashlight or Headlamp: Solar-powered or battery-operated lighting is vital because shutting off panel power will turn off overhead branch lights.
- Wire Strippers and Needle-Nose Pliers: Needed if the branch circuit wire end requires cleaning, trimming, or reshaping before re-attachment.
Before opening your panel door, we strongly recommend reading our guide on Demystifying Your Home Electric Panel Without Getting Shocked to familiarize yourself with basic load center layouts.
When purchasing a replacement unit, you must select the correct circuit protection style required by local Chicagoland electrical codes:
| Breaker Type | Primary Function | Typical Applications | Estimated Hardware Cost |
|---|---|---|---|
| Standard Single-Pole | Protects wiring against thermal overloads and direct short circuits | General lighting circuits, low-draw living area outlets | $6.50 – $10.00 |
| AFCI (Arc Fault) | Detects dangerous electrical arcing caused by damaged or pinched wiring | Bedrooms, hallway receptacles, living rooms (Modern Code) | $50.00 – $65.00 |
| GFCI (Ground Fault) | Protects humans against electrical shock caused by ground faults | Bathrooms, kitchens, outdoor outlets, basements, garages | $45.00 – $60.00 |
| Dual-Function (CAFCI/GFCI) | Combines comprehensive arc fault and ground fault protection in one device | Modern residential branch circuits requiring full code protection | $57.00 – $70.00 |
Identifying the Right 15 Amp Breaker Replacement for Your Panel
Never buy a replacement breaker based purely on visual appearance. Breakers from different manufacturers may look interchangeable, but variations in clip tension, bus bar connection depth, and shell design make mixing unapproved brands dangerous.
To choose the proper unit:
- Check the Panel Label: Open your panel door and locate the manufacturer label. It lists exact approved breaker series (e.g., Square D Homeline, Square D QO, Siemens QP, Eaton BR).
- Verify Voltage and Amperage: A standard single-pole 15-amp breaker operates on 120 volts and supports a total circuit capacity up to 1,800 watts (120V × 15A = 1,800W). Under continuous load guidelines, continuous draw should not exceed 1,440 watts (80% of capacity).
- Confirm Mounting Style: Most modern residential panels use plug-on breakers that push directly onto live metal bus tabs. Older commercial setups or specialized residential load centers use bolt-on designs.
- Match Interrupt Rating: Ensure the breaker features a standard interrupting capacity of 10,000 AIC (Ampere Interrupting Capacity) to safely handle sudden high-current faults.
If you own an older home in Chicagoland, you might encounter specialty panel brands requiring exact legacy replacements. For instance, replacement options include the Genuine Square D HOM115 15 Amp Single Pole Circuit Breaker Kit Plug for Homeline load centers, or the BR215 – Eaton – 15 Amp Circuit Breaker for double-pole 240V installations in Eaton BR, Challenger, and Westinghouse panels. Vintage homes may feature specialized panels requiring distinct components like a New UBIP 15 Amp 1-1/4 in. 2-Pole Pushmatic Replacement Circuit Breaker, a 15A 1 in. 1-Pole Type A Replacement Circuit Breaker for Wadsworth boxes, or a New UBIF Thick 15 Amp 2 in. 2-Pole Federal Pacific Stab-Lok Type NA Replacement Circuit Breaker. For single-pole Federal Pacific installations, homeowners look for specific units such as the New UBIF Thick 15 Amp 1 in. 1-Pole Federal Pacific Stab-Lok Breaker. Always cross-reference manufacturer specification sheets before ordering.
Step-by-Step Instructions to Safely Complete a 15 Amp Breaker Replacement
Executing a 15 amp breaker replacement safely requires methodically following structured steps. For broader instructional background on panel repairs, refer to standard guides like How to Easily Replace a 15 Amp Circuit Breaker Guide?, How to Change a 15 Amp Breaker, and How to Change a 15 Amp Circuit Breaker Safely.
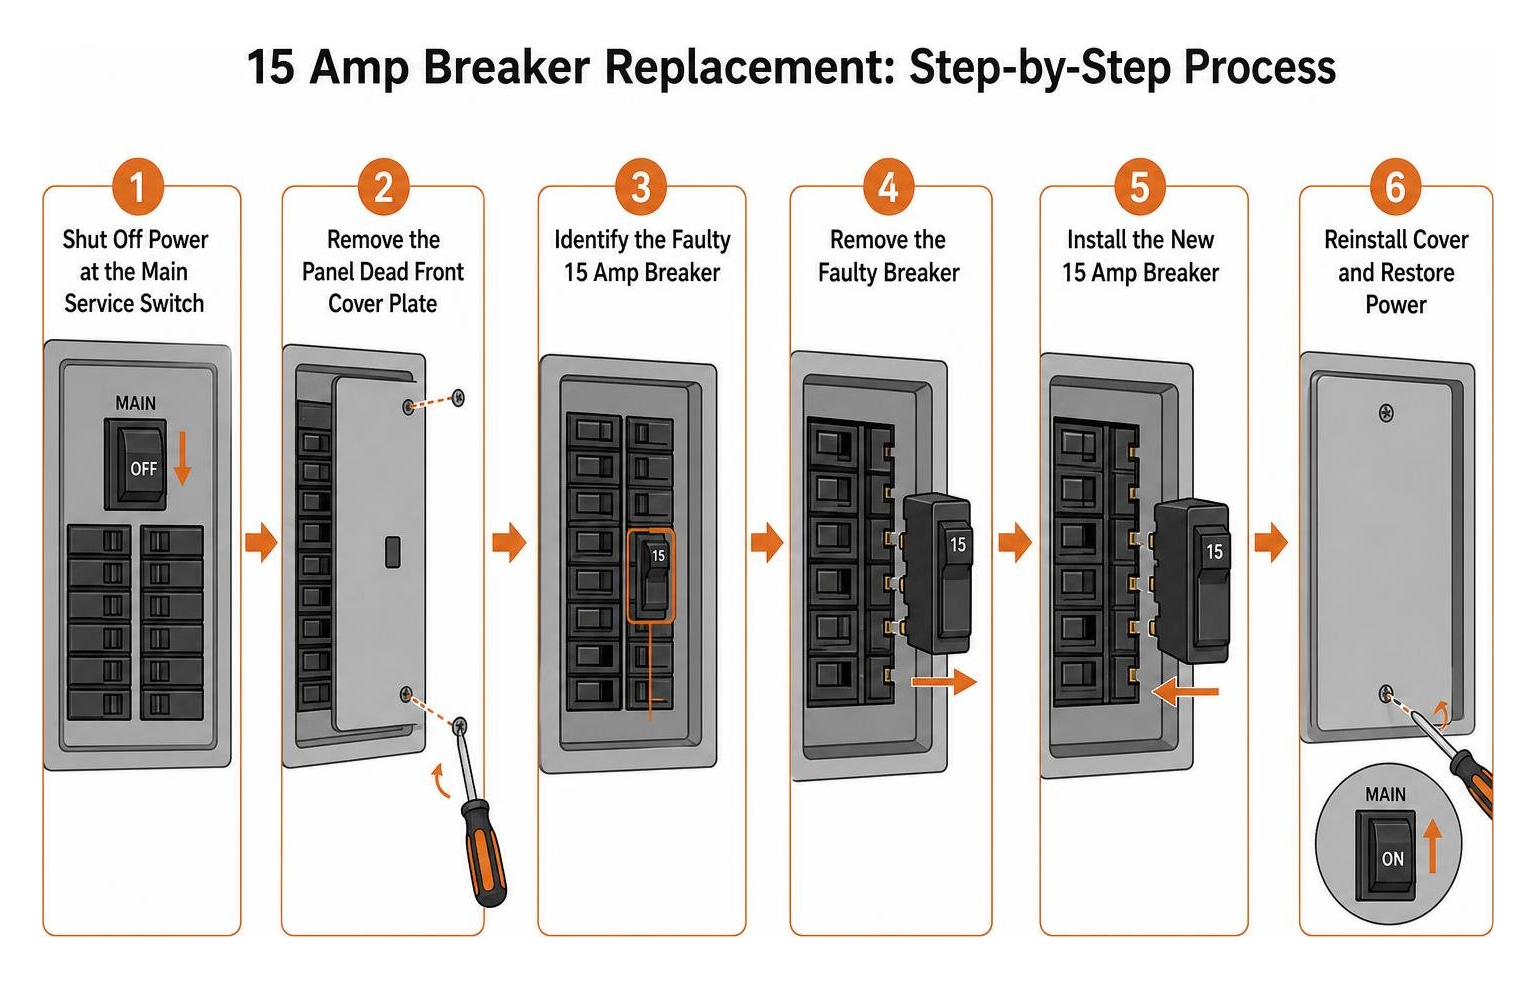
Step 1: Shut Off Power at the Main Service Switch
Locate the main circuit breaker at the top or bottom of your electrical panel (typically rated between 100 to 200 amps). Flip this main switch firmly to the “OFF” position. This de-energizes all branch circuit bus bars inside the load center. That the main incoming service cables coming from your electric utility meter remain live even when the main breaker is off.
Step 2: Remove the Panel Dead Front Cover Plate
Using your insulated screwdriver, back out the outer screws holding the metal panel cover plate (the dead front). Pro Safety Tip: Always support the bottom of the plate with one hand while removing the middle screws last. This prevents the heavy metal cover from slipping into the panel interior and accidentally bridging live electrical contacts.
Step 3: Test for Electrical Voltage
Before touching any wiring inside, turn on your multimeter or non-contact voltage tester. Touch the probe directly to the terminal screw of the 15-amp breaker you intend to replace. Verify that no voltage is present. Double-check surrounding wires to ensure complete safety.
Step 4: Disconnect the Branch Wiring
Loosen the terminal screw on the front of the old 15-amp breaker securing the hot wire (usually black or red). Carefully slide the bare copper wire end out of the terminal block. If replacing an AFCI or GFCI breaker, also disconnect the circuit neutral wire (white) from the breaker terminal and uncoil the white pigtail wire connected to the neutral bus bar.
Step 5: Unlatch and Remove the Old Breaker
Grasp the body of the breaker on the end facing the center panel bus. Pull the body firmly outward away from the center of the panel while pivoting it toward the outer gutter rail. The breaker will snap off the metal bus tab and disengage from its plastic outer mounting track.
Step 6: Install the New 15 Amp Circuit Breaker
Ensure your replacement breaker toggle is set to the “OFF” position. Hook the mounting notch on the back outer corner of the new breaker onto the panel’s outer plastic support rail. Pivot the inner side of the breaker toward the center panel bus bar and press firmly until you feel a solid snap. The clip should sit flush against the bus bar tab without any wobble.
Step 7: Secure Branch Wires to New Terminals
Insert the stripped end of the black hot wire into the new breaker’s terminal slot (marked “LOAD”). Using your insulated torque screwdriver, tighten the terminal lug screw firmly. Standard branch circuit lug torque specifications typically range between 25 to 35 inch-pounds (always check manufacturer labels printed on the side of the breaker shell). For high-amperage applications or specialized main breaker servicing, exact torque specs are critical to prevent loosening; you can review mechanical extraction guidelines in articles like Replace CH2150 150 Amp Breaker.
Step 8: Reattach Panel Dead Front Cover
Align the heavy dead front metal cover plate over the panel frame. Thread all cover screws loosely by hand before tightening them down evenly with your screwdriver.
Restoring Power and Testing Your New 15 Amp Breaker Replacement
Once the panel panel dead front cover plate is securely reinstalled, you can restore power safely using proper electrical handling technique:
- Use the Side-Standing Safety Stance: Stand to the side of the panel enclosure rather than directly in front of it. Turn your face away from the panel door. This simple safety technique protects your eyes and upper torso in the unlikely event of an arc flash fault.
- Turn ON the Main Service Breaker: Flip the main service disconnect toggle switch back to the “ON” position.
- Flip the New 15 Amp Breaker ON: Switch the new branch breaker toggle firmly from OFF to ON.
- Test Branch Outlets and Fixtures: Plug in a lamp or load tester at an outlet connected to the newly serviced circuit to confirm steady power delivery.
- Perform a Multimeter Verification: For complete peace of mind, test receptacle terminals with a multimeter to verify voltage reads steady between 115V and 120V across hot and neutral conductors.
Can You Replace a 15 Amp Breaker with a 20 Amp Breaker?
A common question homeowners ask when facing repetitive trips is whether they can simply upgrade a nagging 15-amp breaker to a higher-capacity 20-amp breaker.
The short answer is NO—unless the entire circuit wiring is rated for 20 amps.
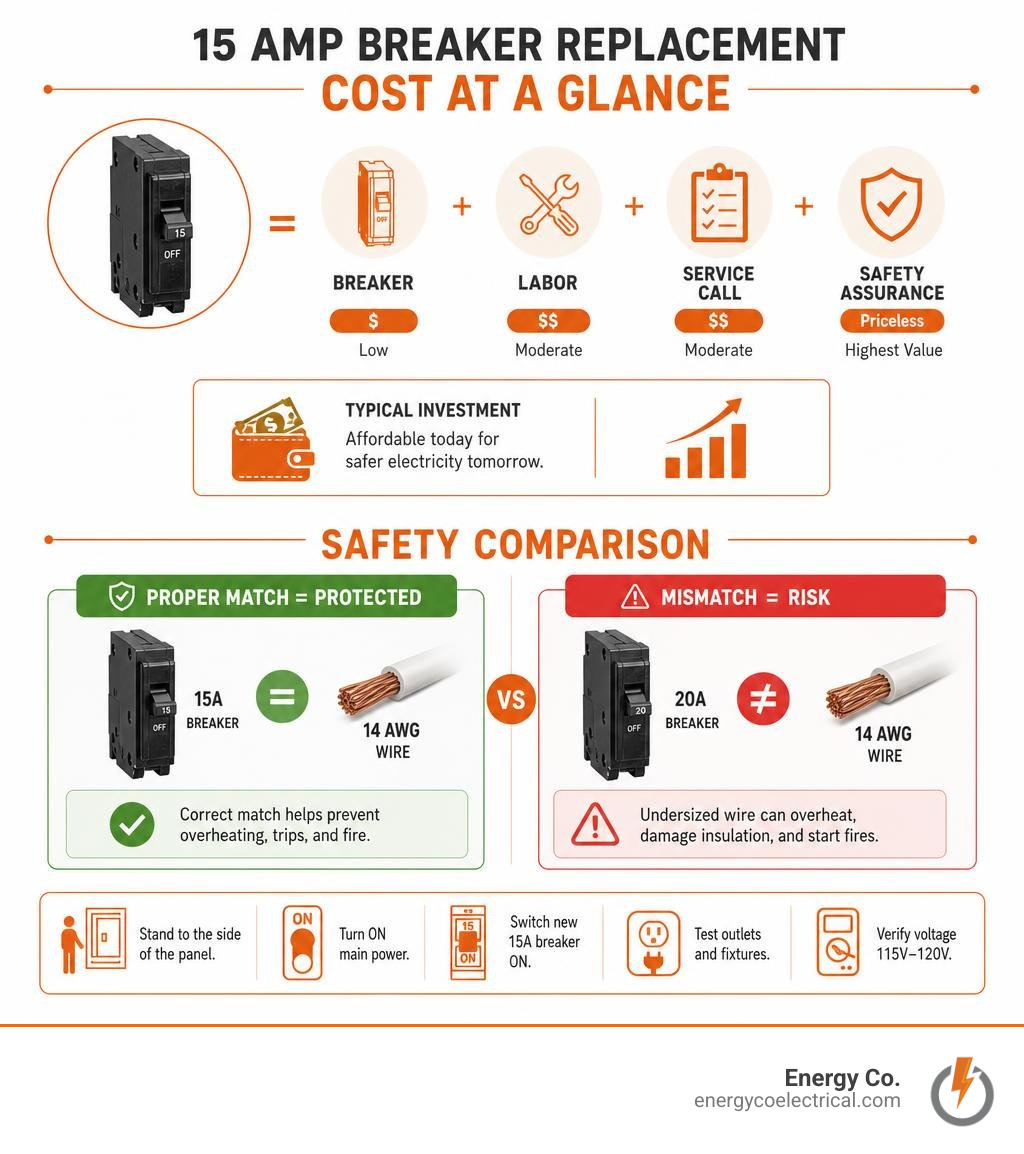
Circuit breakers are sized specifically to match the current-carrying capacity (ampacity) of the copper electrical wire installed inside your walls:
- 15-Amp Circuits: Wired using 14 AWG (American Wire Gauge) copper conductors. 14 AWG copper wire is rated to carry a maximum safe continuous current of 15 amperes.
- 20-Amp Circuits: Wired using thicker 12 AWG copper conductors. 12 AWG wire is rated for a maximum current capacity of 20 amperes.
If you install a 20-amp breaker on a circuit wired with thinner 14 AWG wire, the breaker will allow 20 amps of current to flow continuously. However, 14 AWG wire under a 20-amp load will overheat long before the breaker ever trips. The electrical insulation surrounding the wire will melt inside your walls, rapidly triggering a hidden, structural house fire. Firefighters often refer to putting a 20-amp breaker on 14-gauge wire as “job security”—a dangerous mistake you must avoid at all costs.
To solve frequent tripping on heavy-load circuits (such as kitchen appliances, space heaters, or window air conditioners), you have three legitimate options:
- Reduce the total wattage load connected to the existing 15-amp circuit by moving heavy appliances to other room circuits.
- Have a licensed electrician run completely new 12 AWG wiring from the electrical panel to install dedicated 20-amp branch circuits.
- Explore professional replacement and installation options by reading The Shocking Truth About the Cost for Electrician to Replace Circuit Breaker.
Frequently Asked Questions About Circuit Breaker Replacement
How do I know what brand of 15 amp replacement breaker fits my panel?
Open your panel door and inspect the large white manufacturer data label pasted inside the panel door frame. It lists approved replacement breaker types explicitly. For example, Square D Homeline panels mandate Homeline breakers, while Siemens load centers require Siemens QP or QT series breakers. Never assume a breaker is compatible simply because it physically fits into the bus slot.
Can I perform a 15 amp breaker replacement without turning off the main power?
While professional electricians occasionally work in live panels using specialized personal protective gear and rated insulated tools, DIY homeowners must NEVER attempt a breaker replacement without turning off the main service disconnect switch first. Even with the main breaker flipped OFF, incoming main lugs remain energized with lethal voltage. Always proceed with extreme caution and use a reliable voltage tester.
When should I call a professional electrician for breaker replacement?
You should stop work and contact a licensed electrician immediately if you encounter any of the following conditions:
- Visible pitting, rust, carbon scorch marks, or mechanical damage on the central bus bar tabs inside the panel.
- A newly installed replacement breaker trips immediately even when all devices on the line are unplugged, indicating a hidden dead short in the wall wiring.
- Multiple wires stuffed into a single breaker terminal screw (an illegal condition known as double-tapping).
- Your home utilizes outdated or high-risk panels (such as original Federal Pacific Stab-Lok or Zinsco equipment).
- You require local electrical code compliance checks, permits, or an upgraded panel capacity.
In these situations, it is best to schedule a full Electrical Panel Upgrade with experienced licensed professionals.
Conclusion
Completing a 15 amp breaker replacement is a manageable DIY project for homeowners who strictly observe safety rules, verify wire gauge ampacity, and install exact panel-matched hardware. By turning off the main disconnect switch, verifying de-energized wires with a multimeter, using the side-standing safety stance, and keeping 15-amp breakers paired exclusively with 14 AWG copper wire, you maintain a safe and efficient electrical system.
However, if you ever feel uncertain working near live panel components, discover damaged bus bars, or face persistent circuit shorting in your Chicagoland home, don’t take unnecessary risks. At Energy Co., our team of licensed, background-checked electricians brings decades of local expertise to residential panel repairs across Schaumburg, Hoffman Estates, Palatine, Naperville, and the surrounding Chicago suburbs.
Stay safe and protect your home investment. Contact us today or visit our main service hub for fast, reliable Circuit Breaker Repair and comprehensive residential electrical support!