
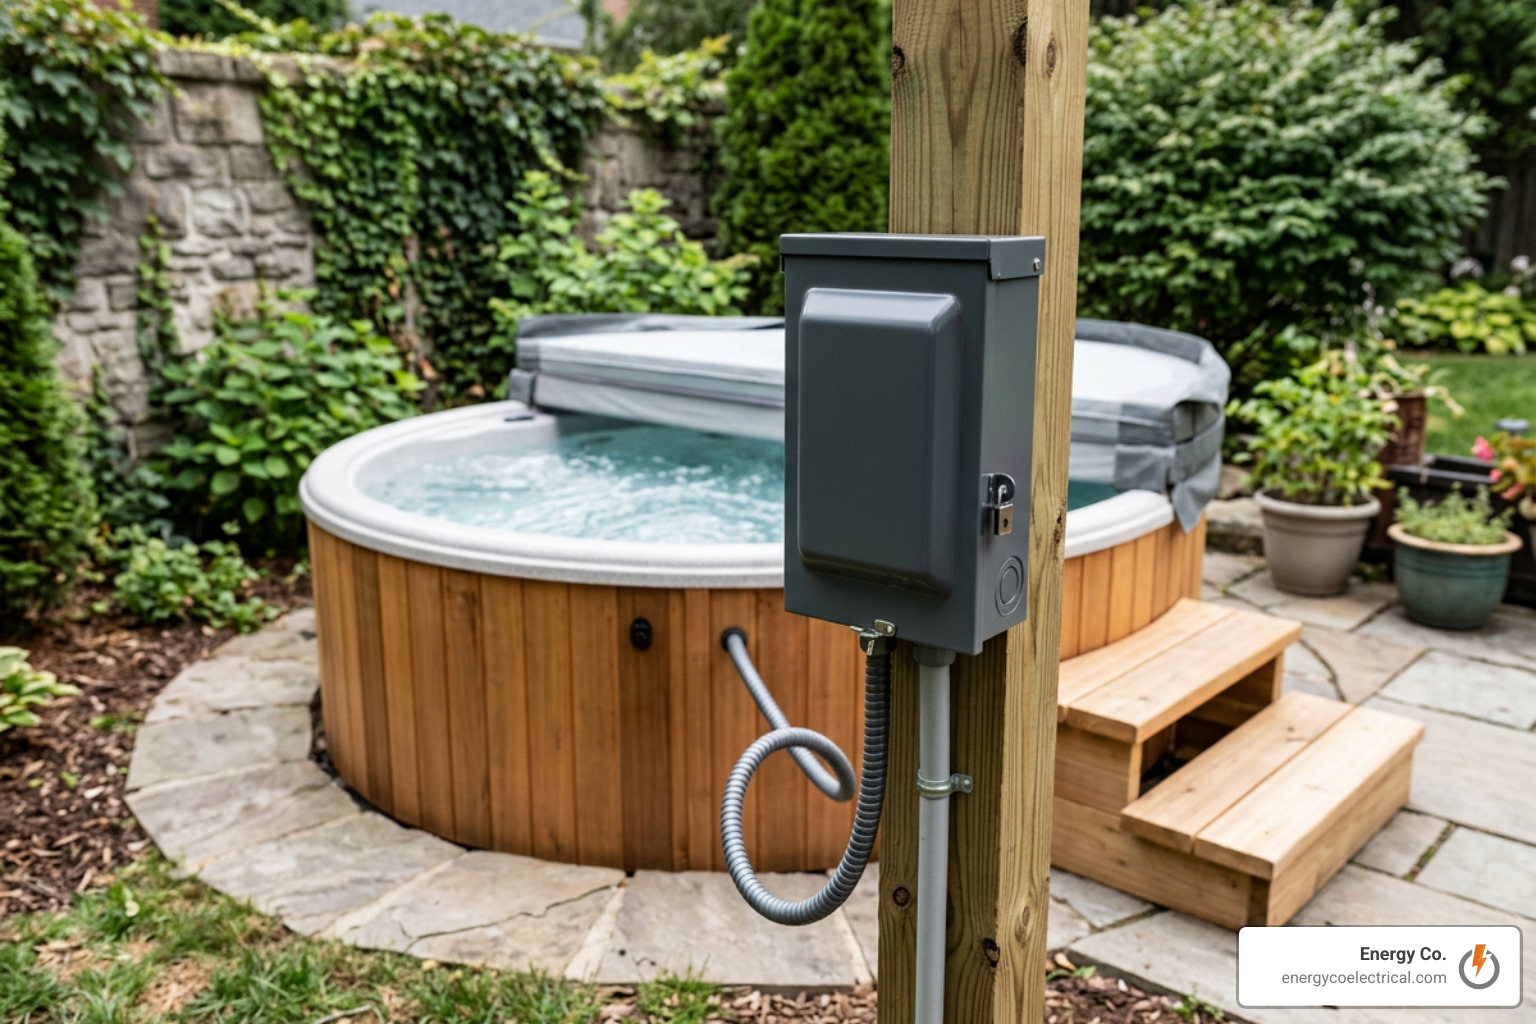
Spa Disconnect Wiring Starts With a Safe, Dedicated Circuit
For safe spa disconnect wiring, use a dedicated, correctly sized 240-volt circuit, a weatherproof GFCI disconnect, and copper conductors installed exactly as your spa maker specifies. The disconnect must be within sight of the hot tub, but at least 5 feet from the water, so someone can cut power quickly in an emergency.
Most full-size hot tubs use a 30- to 60-amp circuit, with 50 amps common. Modern models often need four wires: two hot wires, a neutral, and an insulated equipment ground. A wrong neutral connection, undersized wire, loose lug, or missing bonding can lead to shock hazards, fire, damaged spa equipment, or an immediately tripping GFCI.
This is not a circuit to share with patio lights, an outdoor kitchen, or other equipment. Check the spa data plate, obtain required permits, and have a licensed electrician complete and inspect the final connection.
I am Michał Napieralski of Energy Co., and our work with panel upgrades, circuit breakers, inspections, and outdoor electrical systems informs this guide to spa disconnect wiring. Next, we will cover the NEC rules that determine where the disconnect can go and how it must be protected.
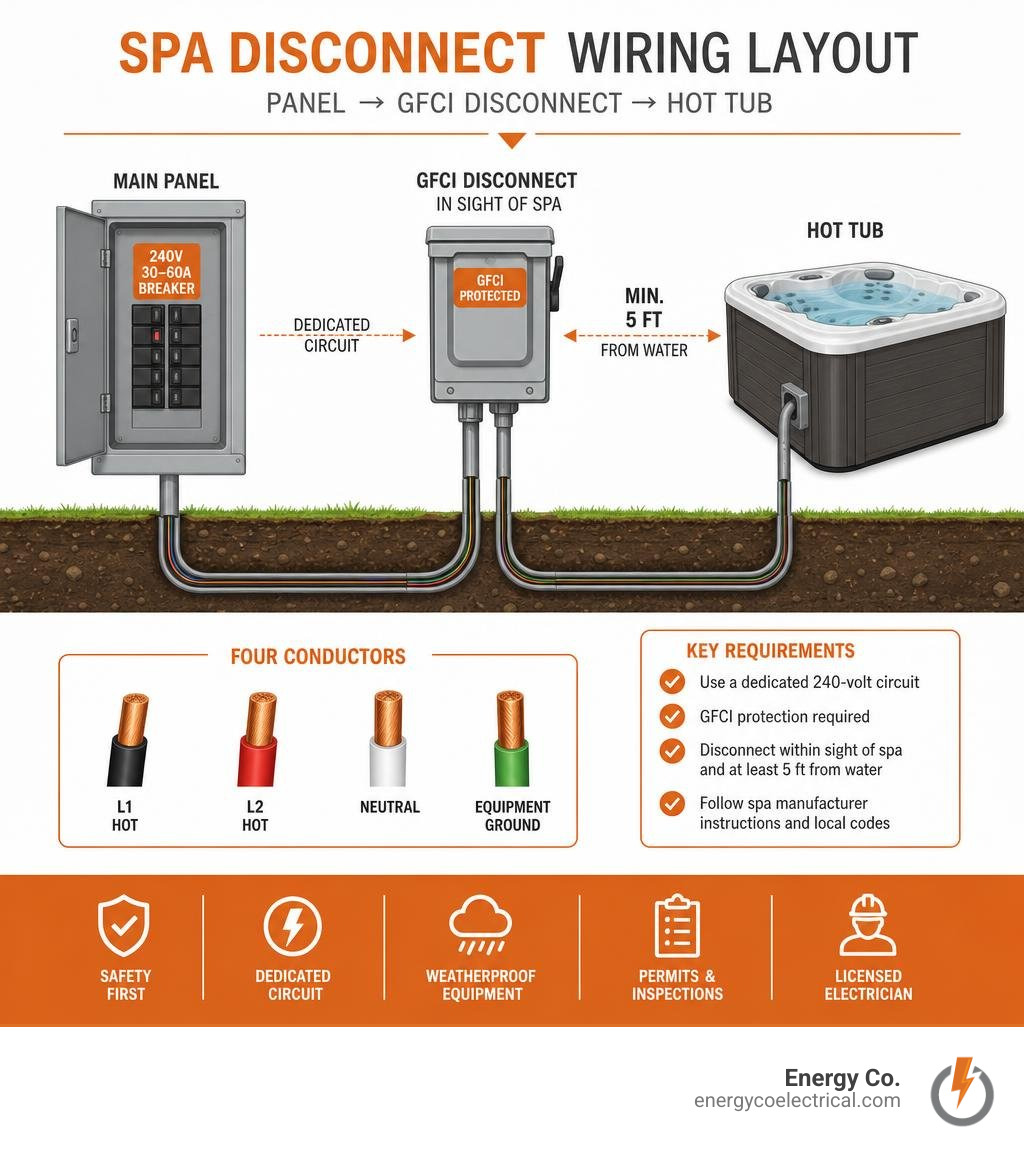
Basic spa disconnect wiring vocab:
NEC Code Requirements for Spa Disconnects
Wiring a hot tub is not like wiring a standard living room outlet. Because water and electricity are dangerous companions, the National Electrical Code (NEC Article 680) sets strict safety rules for hot tubs, spas, and swim spas.
First and foremost is the placement of your emergency shutoff switch. The NEC requires an approved manual disconnect switch installed within direct line of sight of the spa. However, it must be located at least 5 feet away from the inside water’s edge (often positioned between 5 and 15 feet away). This distance rule ensures that no one soaking in the tub can physically reach out and touch the electrical disconnect switch while in the water, yet anyone standing on the patio can immediately cut power during an emergency.
In addition to disconnect placement, the code enforces several critical guidelines:
- Dedicated Branch Circuit: Your spa must run on its own dedicated circuit. It cannot share power with landscape lighting, outdoor kitchens, or shed outlets.
- GFCI Protection: The circuit must be protected by a Class A Ground Fault Circuit Interrupter (GFCI). This is commonly built right into the outdoor disconnect enclosure.
- Convenience Receptacle: NEC Article 680 mandates that at least one 125-volt, 15- or 20-amp GFCI-protected convenience receptacle be located between 6 and 10 feet (or up to 20 feet under certain code editions) from the inside wall of the spa. This prevents owners from running hazardous extension cords across the patio to power small electronics.
- Conduit Limitations: The final connection from the disconnect enclosure to the spa pack can use liquidtight flexible conduit (metallic or nonmetallic), but NEC 680.42(A)(1) limits this flexible run to a maximum length of 6 feet.
- Overhead Clearances: Spas must never be placed under existing power lines; overhead cables require a minimum clearance of 22.5 feet above the water level.
When planning an installation across Cook County or the Northwest Suburbs, local amendments often apply. For instance, reviewing local municipal standards like the Electrical Service Upgrades guidelines helps ensure your main service panel meets local load and safety requirements before adding a heavy 50-amp load.
Grounding, Bonding, and Panel Clearances
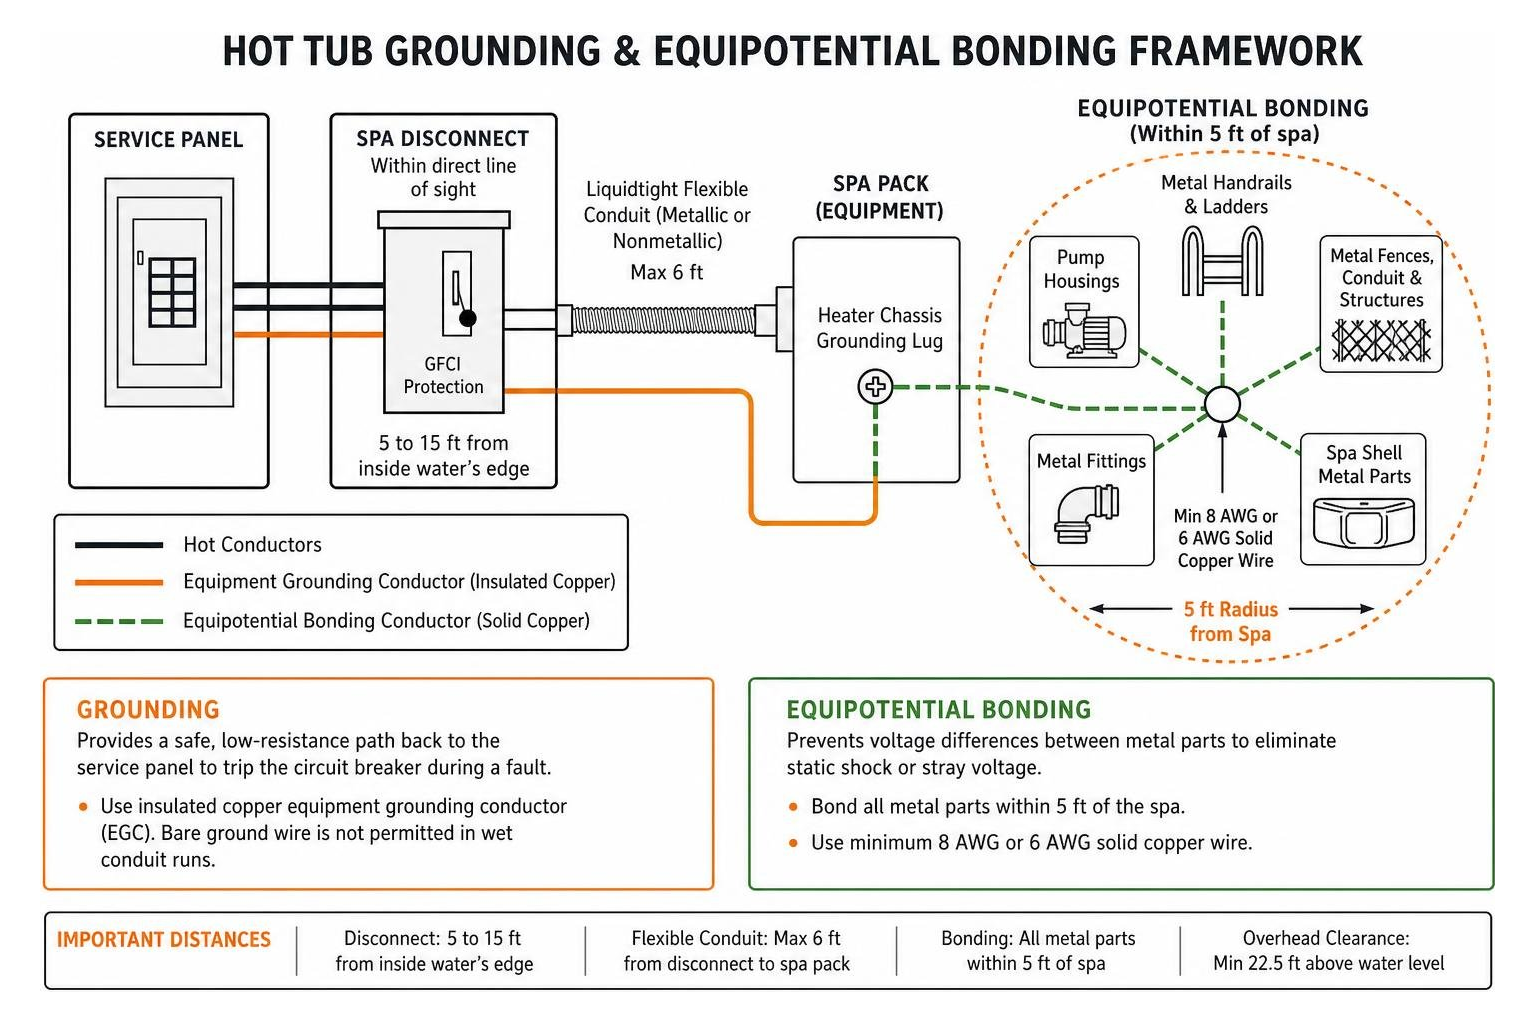
Grounding and bonding are two completely different safety systems, and both are required for a code-compliant hot tub installation.
Grounding provides a safe, low-resistance path back to your main electrical panel to quickly trip the circuit breaker if an electrical fault occurs. Under NEC Article 680, this equipment grounding conductor (EGC) must be an insulated copper wire—bare ground wires found in common residential cabling are not permitted in wet conduit runs.
Equipotential Bonding, on the other hand, prevents voltage differences between conductive metal parts around your hot tub. By linking all metal parts together with a minimum 8 AWG or 6 AWG solid copper wire, you eliminate the risk of static shock or stray voltage. You must bond:
- The grounding lugs located on the spa pack heater chassis.
- All metal fittings, handrails, ladders, and pump housings within 5 feet of the spa.
- Any metal fences, conduits, or structural metal frames within the 5-foot perimeter.
When mounting your exterior disconnect panel, ensure it is installed on a solid exterior wall or sturdy bracketed post with adequate front working clearance (at least 30 inches wide and 36 inches deep). In northern climates where deep freezes occur, install a PVC frost expansion joint where underground conduit rises out of the ground to prevent winter frost heaves from snapping your conduit fittings.
3-Wire vs. 4-Wire Spa Electrical Configurations
Understanding the difference between 3-wire and 4-wire spa systems is vital before purchasing materials or connecting terminals.
- Older 3-Wire Systems (Pure 240V): Older hot tubs (and a few modern specialized models) operate exclusively on 240 volts. They utilize two hot conductors (Line 1 and Line 2) and an equipment ground conductor. Because there are no 120V internal parts, no neutral wire is used to power the tub components.
- Modern 4-Wire Systems (120V/240V Mixed Voltage): Almost every residential spa built over the last two decades utilizes a 4-wire system. This setup uses two hot legs, one dedicated neutral conductor, and an equipment ground conductor. The 240V supply powers high-draw components like the 4 kW–5.5 kW heater and multi-horsepower jet pumps, while the 120V leg-to-neutral connection powers sensitive digital control boards, topside keypads, LED lighting, stereos, and ozonators.
Knowing how to choose the right electrical cable for hot tub installations ensures you pull the correct number of conductors from the start. Connecting a modern 4-wire spa to a 3-wire feed without a neutral wire will instantly destroy internal 120V electronics or cause the GFCI breaker to trip continuously.
Sizing Wire, Breakers, and Conduit for Hot Tubs
Selecting the proper wire gauge, circuit breaker, and conduit size prevents dangerous overheating, nuisance tripping, and performance-degrading voltage drop.
Always check your hot tub’s specification plate inside the equipment bay. Most mid-size to large spas require a 50-amp, 240-volt circuit, though smaller spas may run on 30 or 40 amps, and large dual-pump swim spas often require 60 amps.
| Circuit Amperage | Minimum Copper Wire Gauge (THHN/THWN) | Ground Wire Size | Recommended PVC Conduit Size | Maximum Standard Run |
|---|---|---|---|---|
| 30 Amps | #10 AWG Copper | #10 AWG Copper | 3/4-inch | 50–75 ft |
| 40 Amps | #8 AWG Copper | #10 AWG Copper | 3/4-inch | 50–75 ft |
| 50 Amps | #6 AWG Copper | #8 or #10 AWG Copper | 1-inch (or 3/4-inch min) | 100 ft |
| 60 Amps | #4 AWG or #3 AWG Copper | #8 AWG Copper | 1-inch or 1-1/4-inch | 100 ft |
Note: For detailed breaker sizing and panel configuration, refer to our comprehensive guide on hot tub 50 amp breaker wiring.
Wire Type and Voltage Drop Considerations
Always specify stranded THHN/THWN-2 pure copper conductors. Never use aluminum or copper-clad aluminum wiring for hot tub disconnects; aluminum expands and contracts rapidly under cycling thermal loads, loosening terminal lugs and causing arcing.
If your hot tub sits far from your main service panel (runs exceeding 100 feet), voltage drop can rob your pumps of power and cause premature motor burnout. In these long-run scenarios, upsize your hot and neutral conductors by one gauge size (e.g., jumping from #6 AWG to #4 AWG on a 50-amp circuit).
Conduit and Burial Depths
Underground wiring must be protected against physical damage and moisture:
- Schedule 40 / Schedule 80 PVC Conduit: Must be buried at a minimum trench depth of 18 inches. Use Schedule 80 where conduit is exposed to physical damage above ground.
- Rigid Metal Conduit (RMC): Must be buried at a minimum depth of 6 inches.
- Conduit Diameter: While 3/4-inch conduit technically meets fill capacity for four #6 wires, pulling heavy conductors through 3/4-inch sweeps is notoriously difficult. Using 1-inch PVC makes pulling smooth and prevents stripped conductor insulation.
Tools and Materials Required for Spa Disconnect Wiring
Gathering the right commercial-grade tools and parts before opening your electrical panel makes the installation safe and efficient:
- Safety Equipment: Safety glasses, insulated work gloves, and rubber-soled footwear.
- Testing Instruments: Reliable non-contact voltage tester and a digital multimeter.
- Wire Pulling Tools: Heavy-duty steel fish tape, pulling grip/lube (non-conductive wire pulling lubricant), and electrical tape.
- Hand Tools: High-leverage cable cutters, wire strippers (gauged for #6 to #10 AWG), lineman’s pliers, flathead and Phillips screwdrivers, and an adjustable torque screwdriver/wrench (calibrated in inch-pounds).
- Conduit Tools: PVC pipe cutter, conduit deburring tool, PVC primer, and medium-body solvent cement.
- Hardware & Materials: Weatherproof exterior spa disconnect box (with built-in 50A GFCI breaker), Schedule 40 PVC conduit and fittings, liquidtight flexible metallic/nonmetallic conduit (max 6 ft), liquidtight conduit connectors, continuous solid copper bonding wire, and grounding lugs.
Step-by-Step Spa Disconnect Wiring and Installation Guide

Wiring your outdoor disconnect panel requires methodical execution. Following the steps in our guide on how to wire a hot tub the right way alongside the manufacturer’s SPA disconnect installation manual ensures every wire lands on the proper terminal.
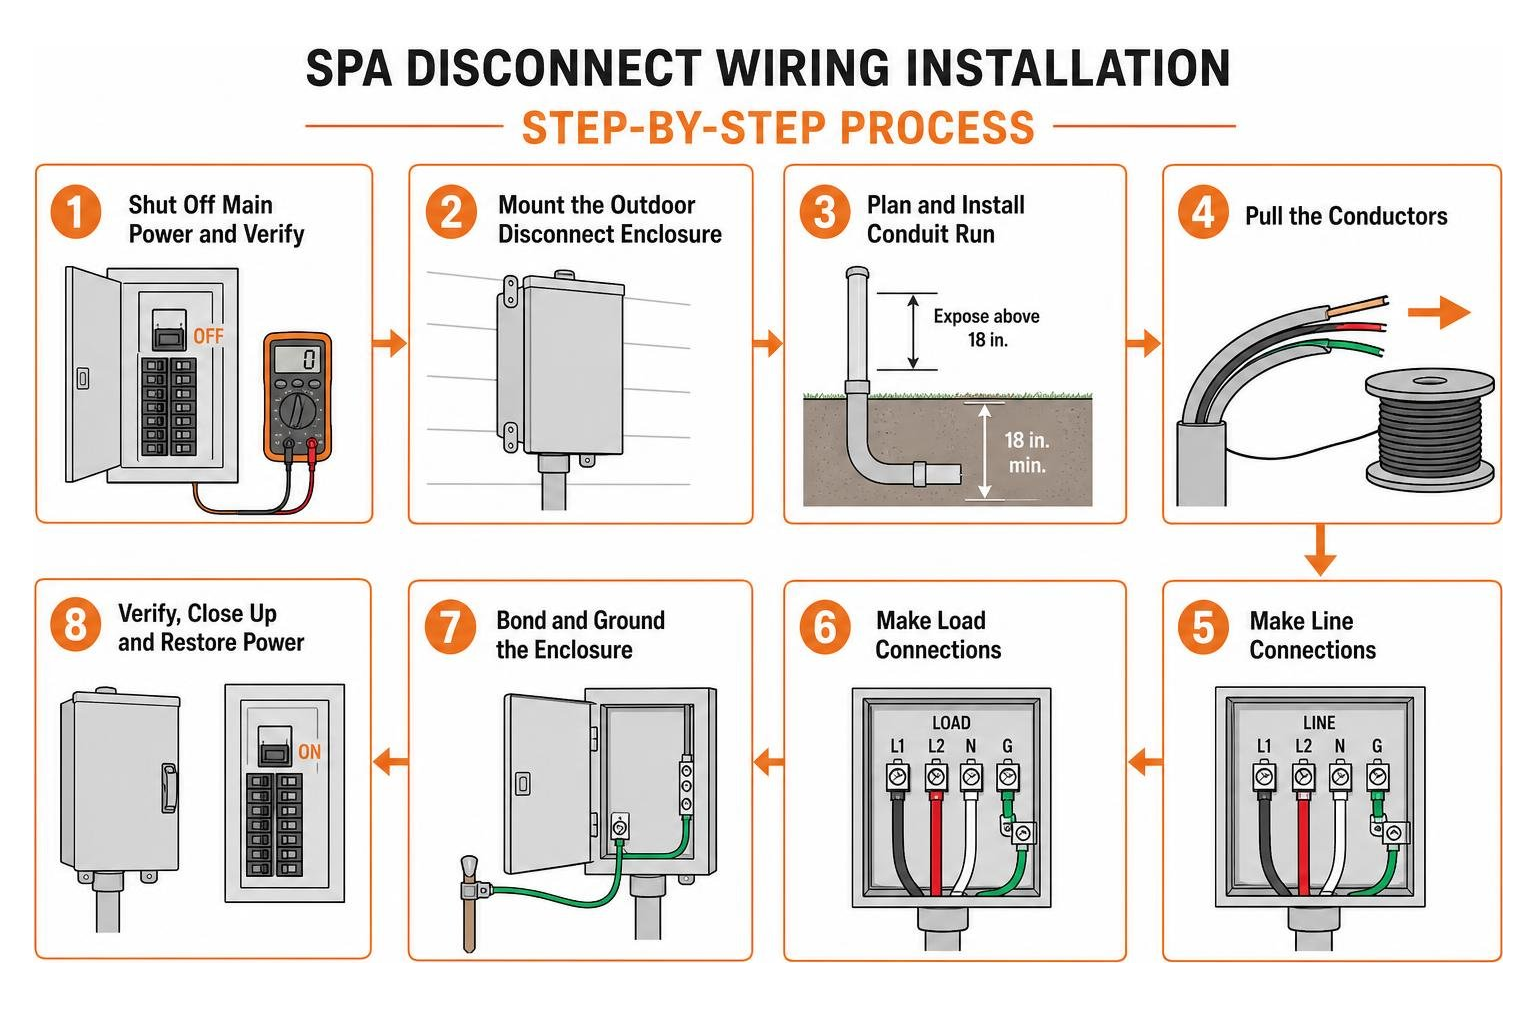
1. Shut Off Main Power and Verify
Before touching a single tool, switch off the main breaker at your home’s main service panel. Lock out and tag out the panel door to prevent anyone from flipping it back on while you work. Open the panel cover and test all incoming lines with your calibrated multimeter or non-contact voltage tester to verify that power is dead.
2. Mount the Outdoor Disconnect Enclosure
Position your weatherproof disconnect enclosure on an exterior wall or mounting post between 5 and 15 feet from the tub. Secure the box with stainless steel masonry screws or heavy-duty lag bolts. Ensure the box is level and the front door swings open freely without obstruction.
3. Route Feeder Wires from the Main Service Panel
Remove the appropriate knockout ring on the bottom of the disconnect enclosure using a hammer and screwdriver, driving the knockout inward and twisting it off with pliers. Install an approved conduit hub or connector.
Pull your four feeder conductors (Line 1 Red, Line 2 Black, White Neutral, Green Ground) through your buried PVC conduit run using fish tape and pulling lubricant.
- Pro Tip for Wire Pulling: Strip back 6 inches of outer insulation on your conductors, snip away one-third of the copper strands to reduce bulk, loop the remaining strands through the eye of the fish tape, and wrap the head tightly in smooth layers of electrical tape.
4. Wire the Line Side (Incoming Power)
Inside your outdoor disconnect enclosure:
- Connect the two hot conductors (Black and Red) from your main panel to the Line 1 (L1) and Line 2 (L2) terminal lugs on the disconnect switch or the line side of the GFCI breaker.
- Connect the incoming White Neutral wire directly to the main neutral terminal block/lug in the enclosure.
- Connect the incoming Green Ground conductor to the bonded equipment ground busbar.
5. Wire the Load Side (Power Out to the Hot Tub)
Run your liquidtight flexible conduit (not exceeding 6 feet) from the disconnect box to the internal spa pack controller knockout:
- Connect the spa’s two hot load wires to the Load/Contactor terminals (marked T1/T2 or Load Out on the GFCI breaker).
- Crucial Step: Connect the spa’s White Load Neutral wire directly to the load neutral lug located on the GFCI breaker itself (often marked “LOAD NEUTRAL”).
- Connect the curly white neutral pigtail wire attached to the GFCI breaker to the enclosure’s incoming neutral bar.
- Connect the equipment ground wire from the spa pack directly to the disconnect box grounding busbar.
6. Torque All Connections
Loose connections are the leading cause of electrical fires and melted terminal insulation. Using an insulated torque screwdriver, tighten every terminal lug, screw, and set-screw to the manufacturer’s exact specifications (typically 35–45 inch-pounds for #6 AWG lugs). Leave a few inches of wire slack inside both the disconnect box and the spa pack to prevent mechanical strain.
Testing, Troubleshooting, and Maintenance
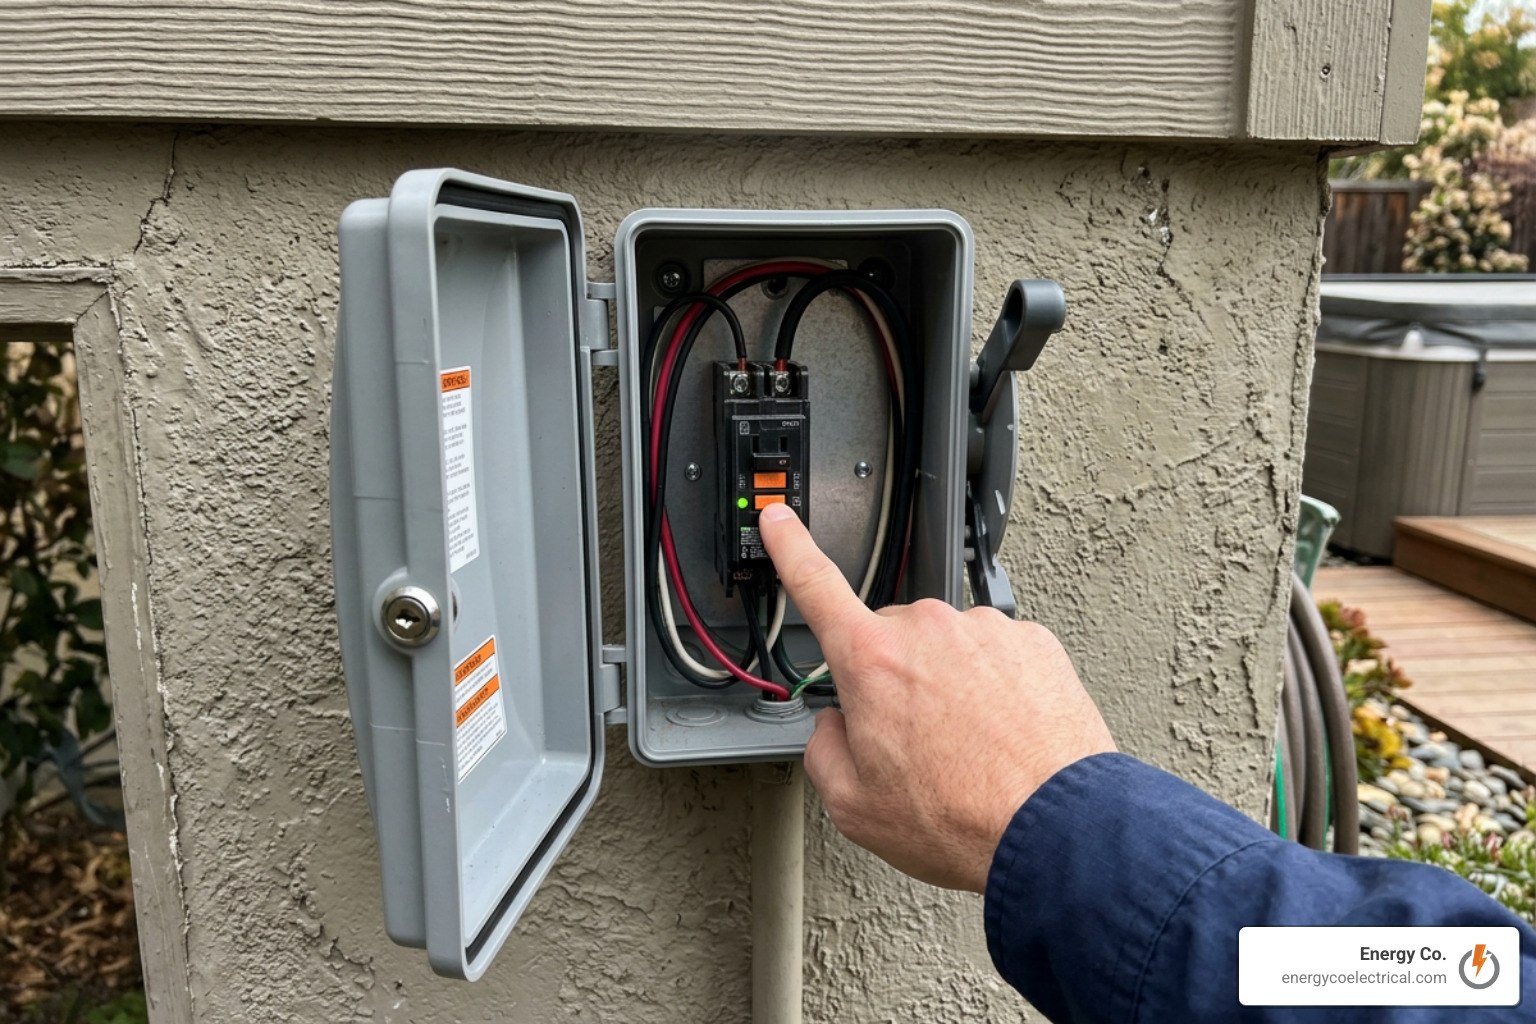
Never energize a hot tub until it has been completely filled with water to the manufacturer-specified level (usually 5 to 6 inches below the top lip). Energizing a dry spa can cause the heating elements to dry-fire and melt within seconds.
Once filled, follow these testing procedures:
- Initial Startup: Reinstall the disconnect pull-out handle or switch the disconnect breaker to the ON position. Turn on the main service breaker inside the house.
- Observe Diagnostics: Many modern spa packs automatically initiate a 4- to 6-minute priming mode followed by an internal diagnostic check.
- GFCI Trip Test: Push the test button on the outdoor GFCI breaker. The breaker should trip immediately with a crisp snap, cutting all power to the hot tub display and pumps.
- Reset: Switch the GFCI breaker completely to the OFF position, then push it firmly back to the ON position. Power should restore instantly.
If your breaker fails to trip during the test, or if it trips instantly upon energizing, shut off power and consult our team for circuit breaker repair before attempting to use the spa.
Common Mistakes to Avoid During Spa Disconnect Wiring
Even experienced DIYers and general contractors frequently make critical wiring errors when installing hot tub disconnects:
- Miswiring the GFCI Neutral (The #1 Error): If you land the spa pack’s white neutral wire on the disconnect box’s grounding bar or standard neutral bar instead of the dedicated GFCI breaker load lug, the GFCI detects an immediate current imbalance and trips the millisecond you turn it on.
- Bonding Neutral to Ground in the Disconnect: The neutral and ground buses must only be bonded together at your home’s main service panel. The outdoor spa disconnect acts as a subpanel; its neutral busbar must remain completely isolated (floating) from the grounding bar and metal enclosure.
- Using Flat Romex (NM-B) Underground: Standard indoor NM-B Romex cable is prohibited inside outdoor or underground conduits. Condensation naturally forms inside underground pipe, which degrades indoor paper insulation and creates short circuits. Always use individual THHN/THWN conductors.
- Using Aluminum Wire: Aluminum oxidizes, expands, and loosens under the heavy, cycling amperage demands of hot tub heaters. Use stranded copper conductors exclusively.
- Undersized Conduit and Kinked Sweeps: Forcing four heavy #6 gauge wires through tight 3/4-inch plumbing elbows will rip the conductor jackets. Use wide-radius electrical sweep elbows and 1-inch conduit.
- Missing Liquidtight Bushings: Omitting plastic conduit bushings on metal knockout edges allows sharp metal edges to slice through wire insulation over time due to pump vibration.
Frequently Asked Questions About Spa Disconnect Wiring
How far must the spa disconnect box be from the water?
Under NEC Article 680, the disconnect switch must be installed at least 5 feet away from the inside wall of the hot tub, within direct, unobstructed line of sight. It should generally be placed no further than 15 feet away so that it remains readily accessible during an emergency.
Why does my spa GFCI breaker trip immediately after installation?
An immediate trip on a newly installed spa is almost always caused by one of three things:
- The load neutral wire from the spa was connected to the grounding bar or standard neutral bar instead of the GFCI breaker’s dedicated load neutral terminal.
- The neutral and ground conductors are touching or bonded together inside the disconnect enclosure.
- The modern spa control pack is performing an automated startup ground fault diagnostic test that requires a manual reset.
Can I use direct burial UF-B cable instead of conduit for spa disconnects?
While some jurisdictions permit direct burial UF-B cable outside the 5-foot spa perimeter, it is generally discouraged. NEC 680.7 requires an insulated copper equipment grounding conductor for wet locations, which standard UF-B cable (containing a bare copper ground) does not provide. Running individual THHN/THWN conductors inside rigid Schedule 40/80 PVC conduit provides superior mechanical protection and full code compliance.
Conclusion
Wiring an outdoor hot tub disconnect box requires meticulous attention to detail, code compliance, and proper safety practices. From calculating your main panel load and pulling individual #6 AWG copper conductors through buried conduit to wiring the GFCI breaker terminals and bonding metal components, cutting corners is never an option when high voltage meets backyard water.
Unpermitted or improper electrical work risks equipment damage, voids manufacturer warranties, and exposes your family to severe shock hazards. Before filling your spa, secure the proper municipal permits and have your system evaluated by a licensed professional.
At Energy Co., our licensed electricians bring specialized local expertise to older homes, panel upgrades, and custom outdoor power installations throughout Schaumburg, Hoffman Estates, Arlington Heights, Mount Prospect, Cicero, Chicago, and the Northwest Suburbs. Whether you need a dedicated 50-amp subpanel installed, underground conduit trenched, or your electrical service updated, explore our complete residential electrical services to schedule an inspection and ensure your hot tub is connected safely from day one.