Fast Generator Not Starting Fix: Check These First
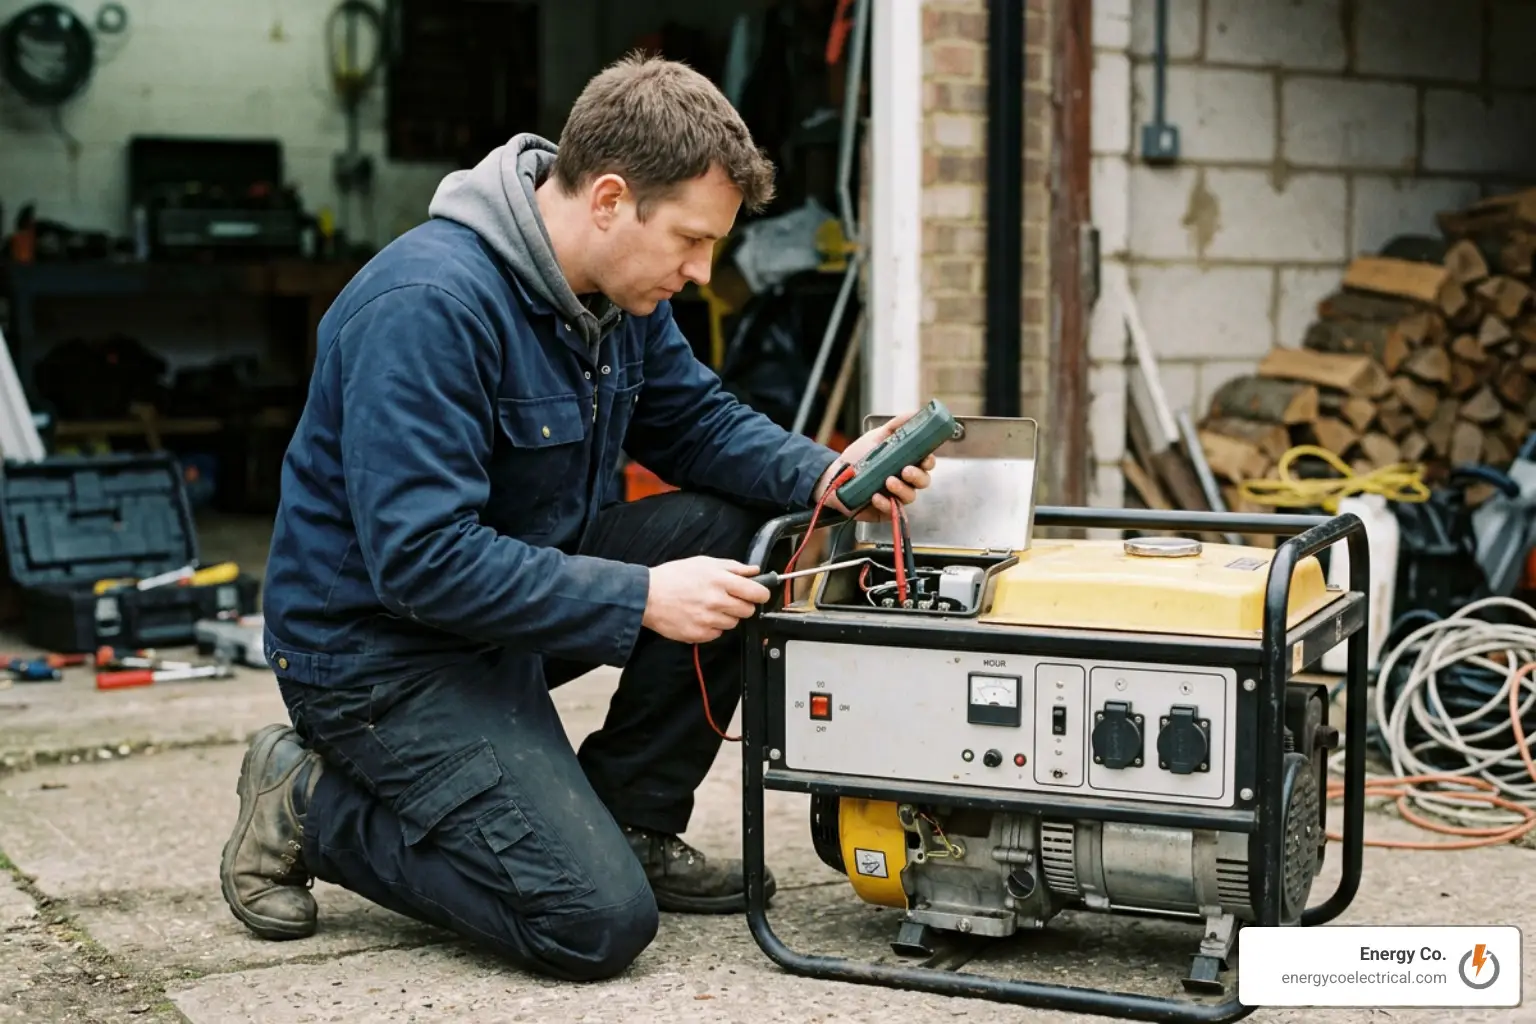
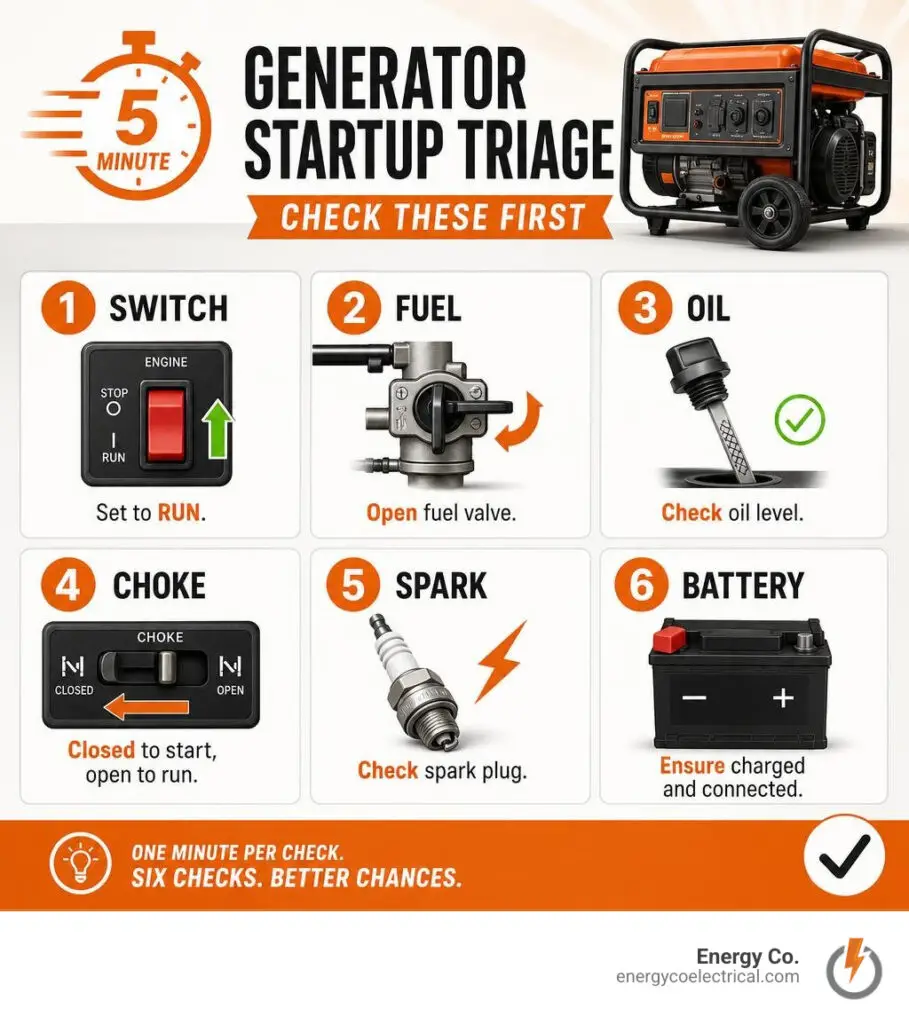
For a quick generator not starting fix, start with the simple checks: disconnect all plugged-in loads, place the unit on level ground, verify the engine switch is set to Run, open the fuel valve, check the oil level, and use fresh fuel. For a cold gasoline engine, set the choke to Closed/Start, then move it toward Run once the engine catches.
Many no-start problems come down to a closed fuel valve, low oil triggering a safety shutoff, stale gasoline, a flooded engine, or a weak battery on electric-start models. Check those items before removing the carburetor or buying parts. If it cranks but will not fire, inspect the spark plug next. If it starts and dies, suspect the choke setting, low-oil sensor, or a restricted carburetor jet.
Always troubleshoot outdoors, far from doors, windows, and vents. Never run a portable generator in a garage, even with the door open, because carbon monoxide can build up quickly.
I’m Michał Napieralski, an electrician serving Schaumburg and the Chicago suburbs with residential and commercial electrical work, including backup-power and generator-related concerns. This generator not starting fix walkthrough will help you rule out common mechanical issues quickly and recognize when a licensed professional should take over.
Terms related to generator not starting fix:
Preliminary Fast Checks: The 10-Minute Generator Not Starting Fix
When a storm knocks out utility power in Cook County and your backup system refuses to turn over, panic sets in quickly. However, field data shows that roughly 80% of generator no-start problems can be fixed in under 10 minutes without purchasing any replacement parts. Before grabbing a wrench set, work through basic physical checks.
A frequent point of failure is starting the engine under electrical load. If space heaters, sump pumps, or heavy-duty extension cords are plugged into the outlets while you yank the pull cord, the engine faces heavy electromagnetic resistance from the alternator. Always turn off all connected breakers and unplug every cord before attempting a startup.
For owners tackling a stubborn unit, consulting a field-tested checklist like Generator Won’t Start? (7 Most Common Causes – Fix in 10 Minutes) highlights how often basic oversight causes starting failures. Confirm the engine kill switch is flipped firmly to “ON” or “RUN”, verify that the unit has clean engine oil, and check that the fuel supply can flow freely.
Checking Fluid Levels and Oil Safety Sensors
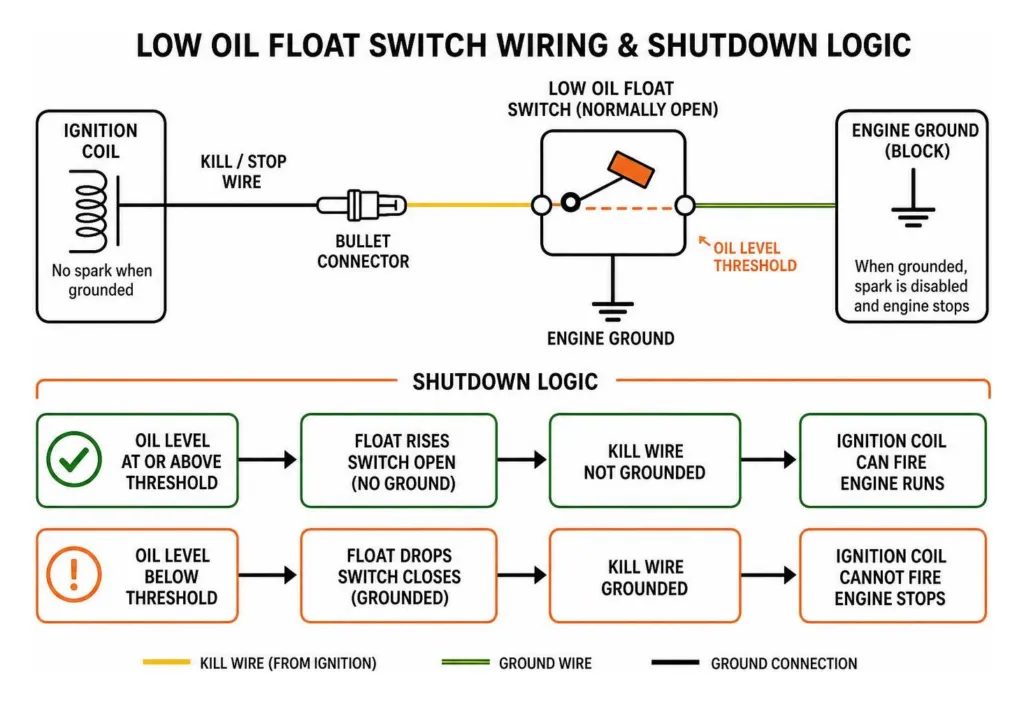
Low oil or overfilled oil accounts for approximately 10% of generator starting failures. Modern small engines feature an internal low-oil float switch inside the crankcase designed to protect critical moving parts. When oil drops below the safe operating threshold, this float switch grounds out the ignition circuit, cutting all spark to the spark plug.
Operating a generator on an uneven surface—such as an inclined driveway, gravel patch, or sloped lawn—causes the oil to pool on one side of the crankcase. This triggers a false low-oil shutdown even if the total volume of oil is technically sufficient. Always position your machine on completely level ground.
To test whether a sticky or malfunctioning oil sensor is killing your spark:
- Unscrew the dipstick on level ground and check that the oil level sits squarely at the top threads of the fill port.
- Locate the low-oil sensor wire exiting the lower engine block (typically a yellow or green/yellow wire with a bullet connector).
- Disconnect this bullet connector temporarily to isolate the switch from the ignition module.
- Attempt to start the engine. If it fires right up, the sensor is stuck or faulty. Reconnect the wire immediately after testing, as running without low-oil protection risks catastrophic engine seizure.
Verifying Fuel Delivery and Shutoff Valves
It sounds almost too simple, but a closed fuel valve accounts for 50% of first-time service calls for generators that will not start. The manual petcock valve lever must be oriented parallel to the fuel line to allow gravity feed into the carburetor.
In addition to the petcock, check these fuel delivery components:
- Fuel Tank Cap Vent: Modern fuel caps have a manual breather knob. If closed, the engine pulls a vacuum inside the tank within two minutes of running, preventing fuel from draining downward. Twist the vent cap to the “ON” position.
- In-Line Fuel Filter: Inspect the translucent filter along the line between the tank and carburetor. If sediment, rust flakes, or dark sludge obstruct the mesh screen, fuel cannot reach the bowl.
- Pinched Lines: Ensure the flexible rubber line has no sharp bends, kinks, or dry-rot cracks that collapse under suction.
To verify flow, place a small catch container beneath the carburetor, loosen the brass bowl drain screw, and open the petcock. A steady, unbroken stream of clean fuel should exit the drain tube.
Resolving Fuel System and Carburetor Failures
Fuel system degradation is responsible for approximately 60% of all small engine starting issues. Gasoline blends containing 10% ethanol (E10) begin oxidizing and breaking down within 30 to 60 days of storage. As the light volatile compounds evaporate, ethanol absorbs ambient atmospheric moisture, creating a heavy, gummy varnish that coats tiny internal passages.
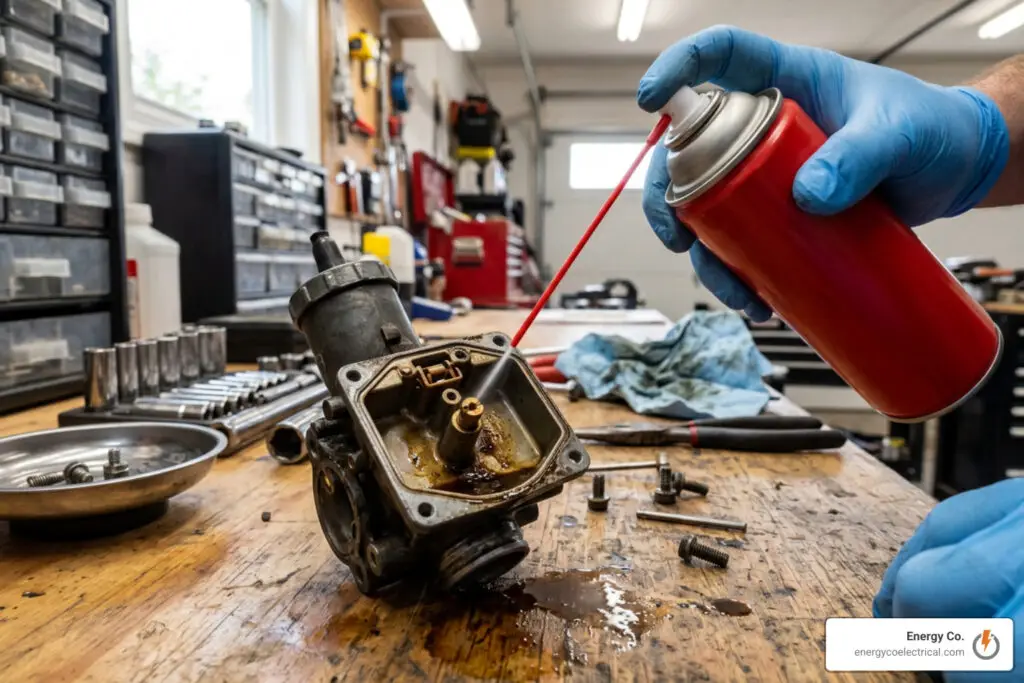
If your equipment sat in a garage or shed through a humid Midwest summer or freezing winter without regular maintenance, you likely need a thorough fuel cleanup. For a detailed breakdown of how long-term storage impacts these engines, review Why your generator won’t start after sitting idle and how to … to understand the gumming process.
How to Fix Stale Gas and Clogged Jets
Stale fuel accounts for 35% of all carburetor service calls. You can easily identify degraded fuel by smell and sight: stale gas loses its crisp petroleum scent, smelling instead like sour paint thinner or varnish, and darkens from light gold to a muddy amber tint.
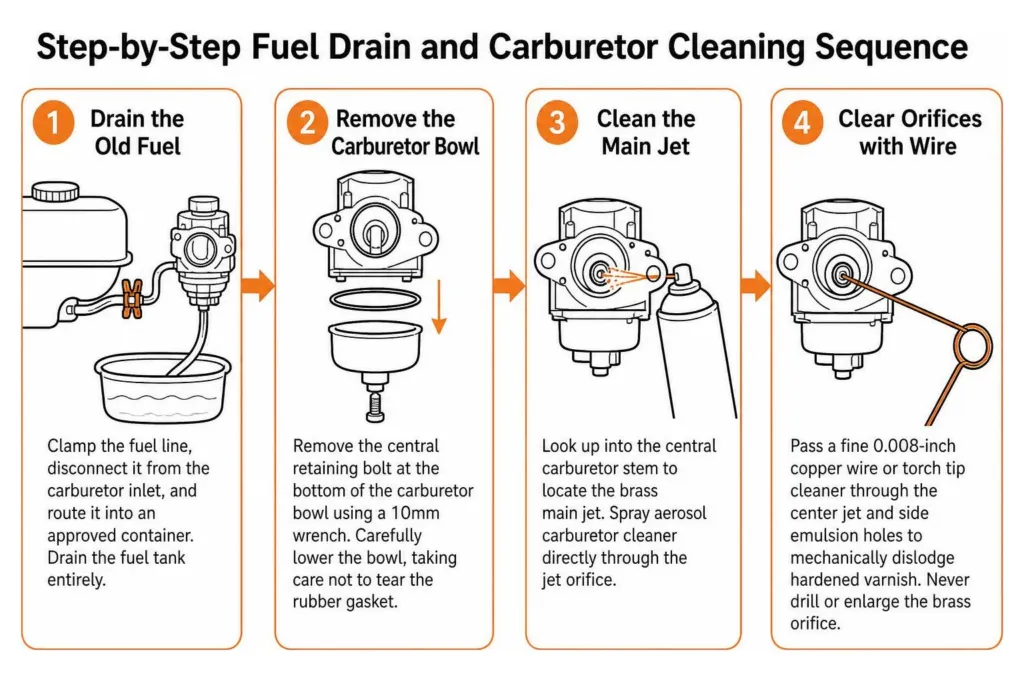
Follow these steps to clean a gummed carburetor:
- Drain the Old Fuel: Clamp the fuel line, disconnect it from the carburetor inlet, and route it into an approved container. Drain the fuel tank entirely.
- Remove the Carburetor Bowl: Remove the central retaining bolt at the bottom of the carburetor bowl using a 10mm wrench. Carefully lower the bowl, taking care not to tear the rubber gasket.
- Clean the Main Jet: Look up into the central carburetor stem to locate the brass main jet. Spray aerosol carburetor cleaner directly through the jet orifice.
- Clear Orifices with Wire: Pass a fine 0.008-inch copper wire or torch tip cleaner through the center jet and side emulsion holes to mechanically dislodge hardened varnish. Never drill or enlarge the brass orifice.
- Flush and Reassemble: Spray down the float needle, bowl interior, and passages. Reinstall the bowl with its gasket, tighten the bolt snugly, and refill the tank with fresh ethanol-free gasoline mixed with a high-quality stabilizer.
Clearing a Flooded Engine and Unsticking Linkages
Excessive cranking with the choke fully engaged pulls liquid gasoline directly into the combustion chamber without sufficient air, soaking the spark plug and extinguishing the ignition spark.
Signs of a flooded engine include a heavy smell of raw gasoline around the exhaust muffler and a wet, fuel-soaked spark plug tip. To clear a flooded engine:
- Turn the choke lever completely to the “RUN” or “OPEN” position.
- Set the throttle to full speed and verify the engine kill switch is set to “ON”.
- Pull the recoil starter cord briskly 5 to 10 times (or engage the electric starter for 5 seconds) to cycle fresh air through the cylinder and vaporize the pooled fuel.
- If it still fails to start, remove the spark plug, wipe the electrode dry with a clean rag, crank the engine three times with the plug removed to clear the cylinder, reinstall the dry plug, and pull the starter cord with the choke open.
While servicing the intake area, inspect the external governor arm and throttle return springs. Corrosion or grime can bind mechanical linkages, holding the throttle plate pinned shut. Spray linkage pivot points with light penetrating lubricant until they move freely under light spring tension.
Ignition, Choke, and Electrical Starting Diagnostics
If fuel flows freely into the combustion chamber but the engine still cranks without catching, the issue lies within the ignition circuit, starting electrical system, or choke positioning.
On electric-start models, battery failure is the number one failure point across every engine brand. Standby units require battery replacement every two to three years because internal plate sulfation and constant trickle charging degrade cold-cranking amps (CCA). In fact, factory data reveals that 60% of warranty returns for ‘engine won’t start’ had perfectly healthy engines where the real culprits were dead batteries, tripped charger breakers, and corroded terminals.
A healthy 12V battery should measure 12.6 volts at rest and must not drop below 9.6 volts under active cranking load. Clean white terminal corrosion using a wire brush and a baking soda slurry, tighten all terminal bolts, and recharge the battery fully before troubleshooting further.
Ignition Spark Plug Replacement and Testing: A Generator Not Starting Fix
A fouled, cracked, or incorrectly gapped spark plug prevents consistent air-fuel combustion. Spark plugs should be inspected every 50 hours and replaced after every 100 hours of continuous operation.
To test for a strong ignition spark:
- Disconnect the rubber spark plug boot and remove the spark plug using a 13/16-inch or 5/8-inch deep spark plug socket.
- Inspect the firing tip. A normal plug features light tan or gray deposits. Heavy matte black soot indicates carbon fouling (rich air-fuel mixture), wet shiny black residue indicates oil intrusion, and melted white electrodes point to severe overheating.
- Clean deposits using a brass wire brush, or install a new OEM-specified spark plug.
- Measure the electrode gap with a feeler gauge. Set the gap precisely to 0.025 inches (or the manufacturer’s specification, typically 0.024–0.028 inches) by gently tapping the ground electrode.
- Plug the spark plug back into the rubber boot. Hold the metal threaded body firmly against an unpainted metal cooling fin on the engine cylinder head.
- Pull the recoil starter cord while observing the electrode gap. You should see a bright, snappy blue-violet spark jump the gap. A faint yellow spark or no visible spark indicates a failed ignition coil, a grounded kill wire, or a bad low-oil sensor.
When internal ignition coils fail or flywheel magnets lose strength, professional diagnostic tools are needed. If you run into complex electrical dead-ends, finding a generator fix shop when DIY fails is your best bet to avoid damaging expensive ignition modules.
Adjusting Manual and Automatic Choke Mechanisms: Essential Generator Not Starting Fix
Gasoline engines require an air-fuel ratio rich in fuel vapor to start when cold. The choke plate restricts air intake, creating higher manifold vacuum to pull extra fuel into the airstream.
Setting errors cause frequent starting issues:
- Cold Engine Starting: Move the choke to the fully CLOSED (“START”) position. Pull the cord until the engine pops or starts, then smoothly transition the lever to OPEN (“RUN”) over a 15-to-30-second window.
- Warm Engine Restarting: If the generator was running minutes prior, leave the choke in the OPEN (“RUN”) position. Closing the choke on a hot engine floods the combustion chamber instantly.
For automatic choke assemblies, stuck linkages cause 40% of failures, bimetal choke thermostat failures account for 30%, and heater element burnout accounts for 15%. Fortunately, field data indicates that 80% of automatic choke problems are fixed in 10 minutes with no parts simply by cleaning and freeing binding pivot points.
For a complete diagnostic breakdown of automatic bimetal springs, check out the repair strategies outlined in Generator Starts Then Dies? Automatic Choke Problem? Fix in 10 Minutes to get sticky dampers back in working order.
When the Generator Starts Then Dies or Produces No Power
It is deeply frustrating when an engine fires up for five seconds, sputters, and shuts down, or runs at full speed while producing zero electricity at the control panel outlets. These dual symptoms point to secondary fuel delivery restrictions, safety sensor trips, or alternator excitation failures.
Diagnosing Immediate Stalling and Surging
If your generator starts briefly and then dies immediately, look into these five common root causes:
- Partially Clogged Pilot (Idle) Jet: The pilot jet governs fuel delivery when the throttle plate is near idle. If varnished, the engine will start while choked, but stall the instant the choke is opened because the idle circuit is starved for fuel.
- Delayed Low-Oil Trip: As the engine starts, oil splashes around the crankcase. If the oil level is borderline low, splashing drops the float switch after 3 to 5 seconds of running, grounding out the spark.
- Fuel Tank Vapor Lock: If the fuel cap vent is clogged, the engine runs until a vacuum forms in the fuel tank, starving the carburetor. Loosen the fuel cap slightly; if the engine stays running, replace the cap vent.
- Hot Restart Percolation: When shutting down a hot engine on a warm summer day, ambient heat soaks into the carburetor bowl, boiling the light ethanol fuel at roughly 180°F. This vapor lock prevents hot restarts until the machine cools down for 15 minutes.
- Surging Under Load: If the engine revs up and down rhythmically (hunting), the pilot jet is restricted or an air leak exists at the carburetor intake gasket, causing the mechanical governor to overcompensate.
Troubleshooting Loss of Voltage and Residual Magnetism
When the engine purrs smoothly at its rated 3,600 RPM but connected lamps and tools remain dead, the problem lies within the electrical generation head rather than the combustion engine.
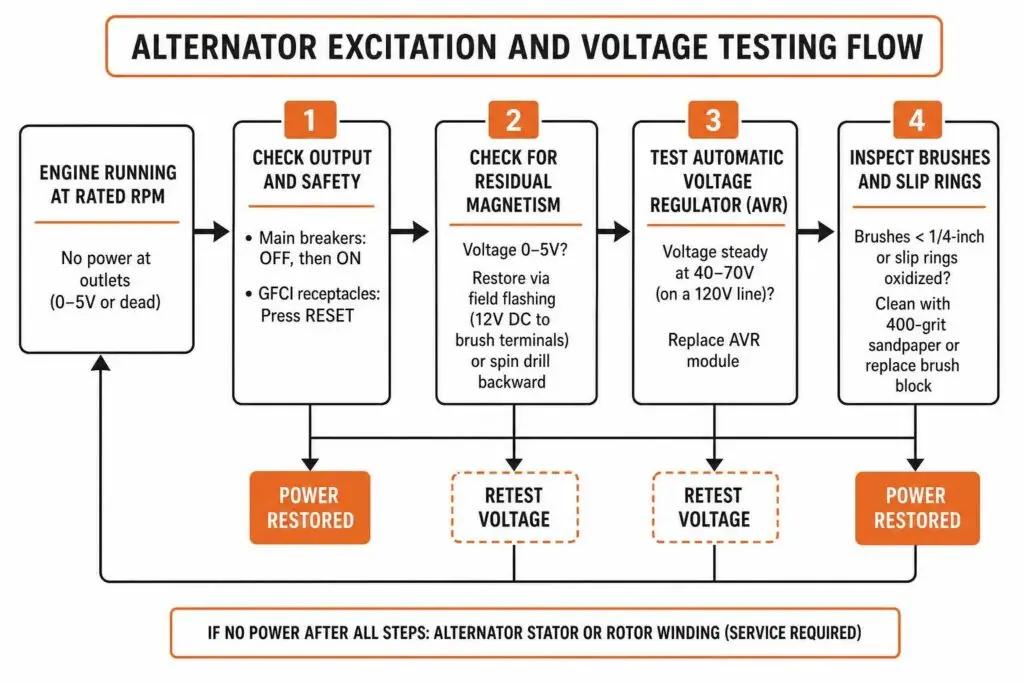
Check the following electrical components in order:
- Main Breakers and GFCI Receptacles: Push the main AC circuit breaker firmly to the OFF position, then snap it back to ON. Press the RESET button on all GFCI faceplates.
- Lost Residual Magnetism: Generators stored without use for months can lose the faint magnetic field in their rotor iron cores required to initiate power generation. Voltage output will hover around 0 to 5 volts. You can restore this via “field flashing”—briefly applying 12V DC power from an external battery to the brush terminals while running, or plugging in a spinning corded electric drill and spinning the chuck backward to induce a surge voltage.
- Automatic Voltage Regulator (AVR): A failed AVR typically outputs a weak, steady 40 to 70 volts on a standard 120V line. Replacing the horseshoe-shaped AVR module behind the rear alternator cover takes 15 minutes.
- Carbon Brushes and Slip Rings: Inspect the spring-loaded carbon brushes riding against the spinning copper slip rings at the back of the rotor. If brushes are worn down below 1/4-inch or slip rings are oxidized, clean them with fine 400-grit sandpaper or install a replacement brush block.
For specialized procedures on field flashing and testing stator excitation windings, consult the technical walkthrough at How To Fix a Generator Not Producing Power – TheGeneratorInsider.com and review component failure breakdowns in Generator Starts But Produces No Power: 6 Causes — smallengine.directory.
Repair vs. Replace: When to Retire an Aging Generator
Not every malfunctioning machine should be repaired. Small portable units face finite lifespans, and pouring money into major structural components often yields diminishing returns compared to buying modern, fuel-efficient inverter equipment or installing a permanently wired whole-home standby system.
| Symptom / Component Failure | Estimated DIY Part Cost | Professional Repair Cost | Action Recommendation |
|---|---|---|---|
| Closed Valve / Dirty Plug | $0 – $8 | $75 – $125 | Fix: Routine DIY maintenance |
| Clogged Carburetor | $0 (Clean) – $35 (New) | $120 – $180 | Fix: Clean or swap carburetor |
| Dead 12V Starting Battery | $45 – $90 | $110 – $160 | Fix: Replace battery (2-3 yr life) |
| Failed AVR or Brushes | $15 – $65 | $150 – $225 | Fix: Straightforward electrical swap |
| Burned Stator/Rotor Windings | $250 – $550 | $500 – $900+ | Replace: Cost exceeds equipment value |
| Loss of Cylinder Compression | $180 – $400 (Rebuild) | $450 – $800+ | Replace: Internal wear / scored walls |
| Unit Exceeds 10-12 Years Age | Varies | High / Scarce Parts | Replace: Upgrade to standby/inverter |
If your generator suffers from low compression (below 60–70 PSI on a gasoline engine gauge), blows continuous blue-gray smoke from worn piston rings, or has shorted internal copper windings, repair costs will quickly surpass the replacement value.
Homeowners across the Chicagoland area frequently transition from portable gas generators to permanently installed standby systems that eliminate pull cords, stale fuel, and manual transfer setups entirely. To evaluate whole-home power solutions, explore the definitive guide to standby generator installation costs for real-world budgeting insights.
Frequently Asked Questions About Generator Starting Issues
Why does my generator start on choke only?
When a generator fires up and runs smoothly with the choke lever closed, but sputters and dies the moment you move the lever to the “OPEN” or “RUN” position, the carburetor pilot (idle) jet is restricted. The choke plate physically chokes off air intake to richen the fuel mixture. When you open the choke, standard airflow resumes, but a clogged pilot orifice cannot supply enough gasoline to maintain the correct 14.7:1 air-fuel ratio. The mixture leans out instantly, causing the engine to stall.
To fix this, remove the plastic idle set screw and the brass pilot jet located directly beneath it on top of the carburetor body. Clean the fine passageway using a 0.008-inch wire and spray aerosol carburetor cleaner through the stem before reinstalling.
Can starting fluid damage a generator engine?
Yes. Never use aerosol ether starting fluid on small generator engines. Starting fluid lacks lubricating properties and washes protective engine oil films off the cylinder walls and piston rings during cranking. This direct metal-to-metal contact causes scuffing, ring land damage, and rapid compression loss.
Furthermore, ether ignites violently under lower compression thresholds than pump gasoline, creating severe engine knock that can bend connecting rods or shatter aluminum pistons. If an external ignition aid is needed for diagnosis, spray a quick 1-second burst of standard aerosol carburetor cleaner or dedicated fogging oil into the air intake instead.
How often should a backup generator be exercised?
Backup generators should be exercised once a month for 20 to 30 minutes under at least a 30% to 50% electrical load. For standby commercial systems, standards like NFPA 110 mandate monthly testing for emergency backup power reliability.
Running the engine periodically achieves four critical maintenance goals:
- Circulates oil to coat internal bearings, cylinder walls, and valve guides.
- Burns off moisture condensation that accumulates inside the crankcase oil and exhaust system.
- Exercises the mechanical carburetor float, internal needle valve, and automatic choke linkages to prevent seizing.
- Re-energizes the rotor iron core to preserve residual magnetism for seamless voltage excitation.
Conclusion
Getting a stubborn generator running during a power emergency does not have to be an overwhelming ordeal. By working systematically through physical fluid checks, fuel delivery, spark plug condition, and choke adjustments, you can resolve the vast majority of starting issues right in your driveway. Keeping fresh, stabilized fuel in your tank and maintaining an active monthly exercise routine will ensure that your equipment fires up on the very first pull when severe weather rolls in.
When small engine issues escalate into complex electrical distribution faults, transfer switch issues, or whole-home backup integration needs, our licensed team at Energy Co. is ready to help. We provide 24/7 emergency response, expert equipment troubleshooting, and professional installation services throughout Chicago, Schaumburg, and the surrounding Northwest Suburbs. Connect with our team for reliable generator installation service in Chicago to keep your home or business powered safely year-round.