Last updated:
Common Electrical Outlet Problems: What to Check First
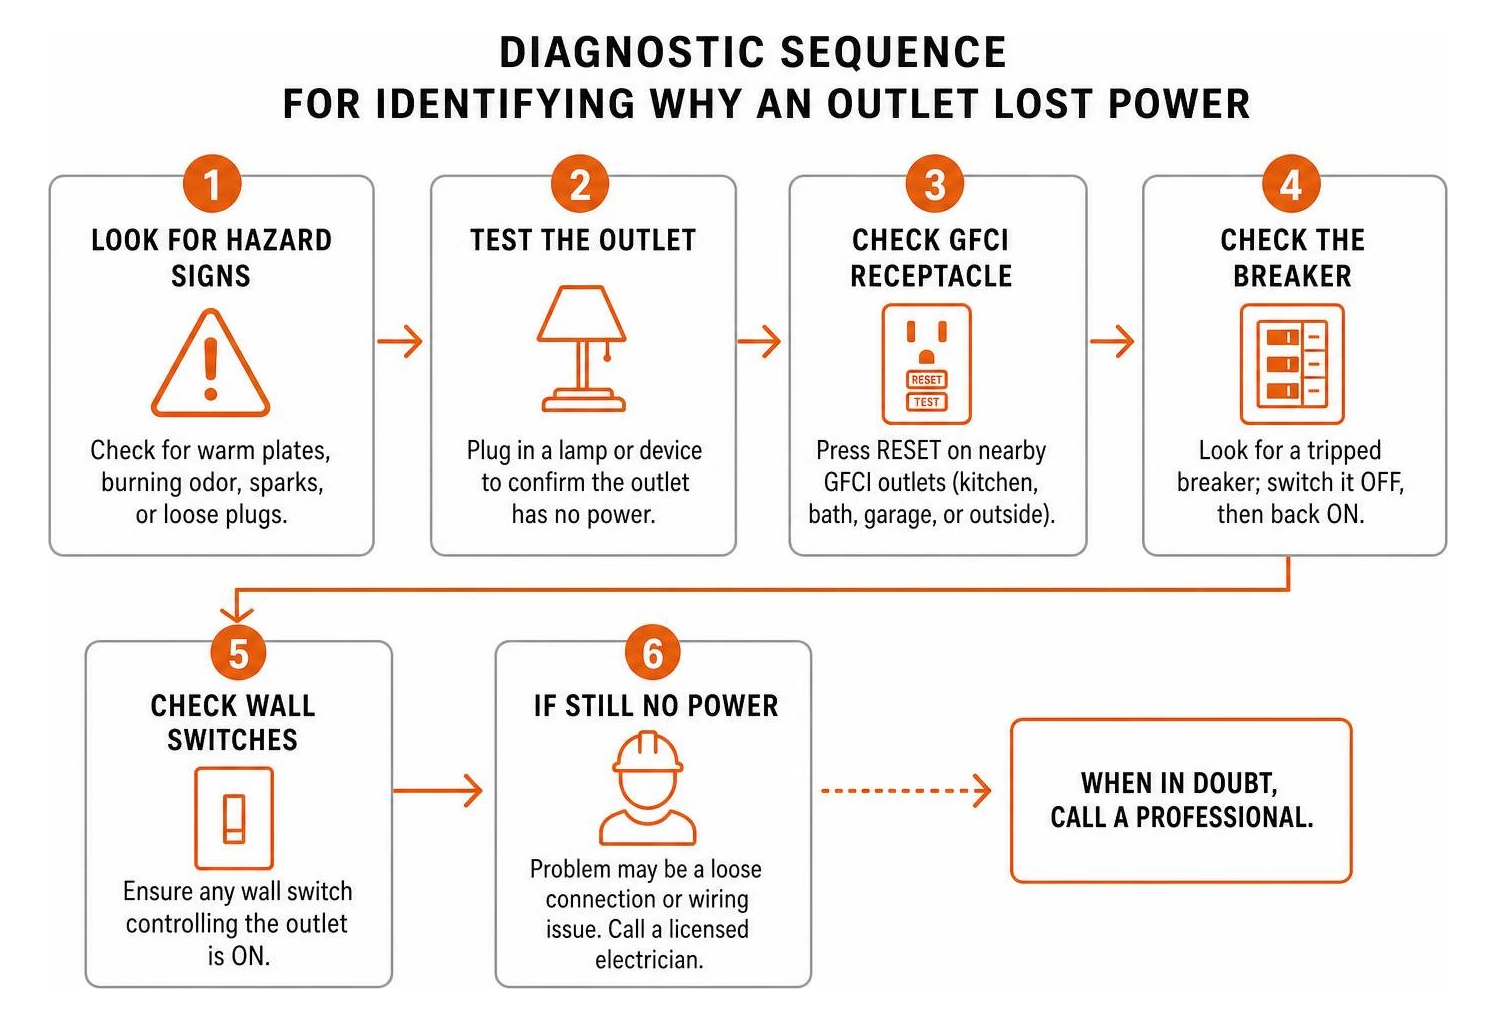
If an outlet stops working, unplug the device and check for heat, discoloration, sparks, or a burning smell first. If you notice any of these, stop using the outlet and call a licensed electrician. Otherwise, try a known-working lamp, check both halves of the outlet, reset any tripped GFCI, look for a breaker sitting between ON and OFF, and flip nearby wall switches. Keep the outlet cover on while you check.
Table of Contents
A dead outlet can also point to a loose connection, especially in an older building. If these simple checks do not restore power, leave the repair to a professional.
I’m Michał Napieralski, and I’ll walk you through the safe checks before explaining when to call for help.
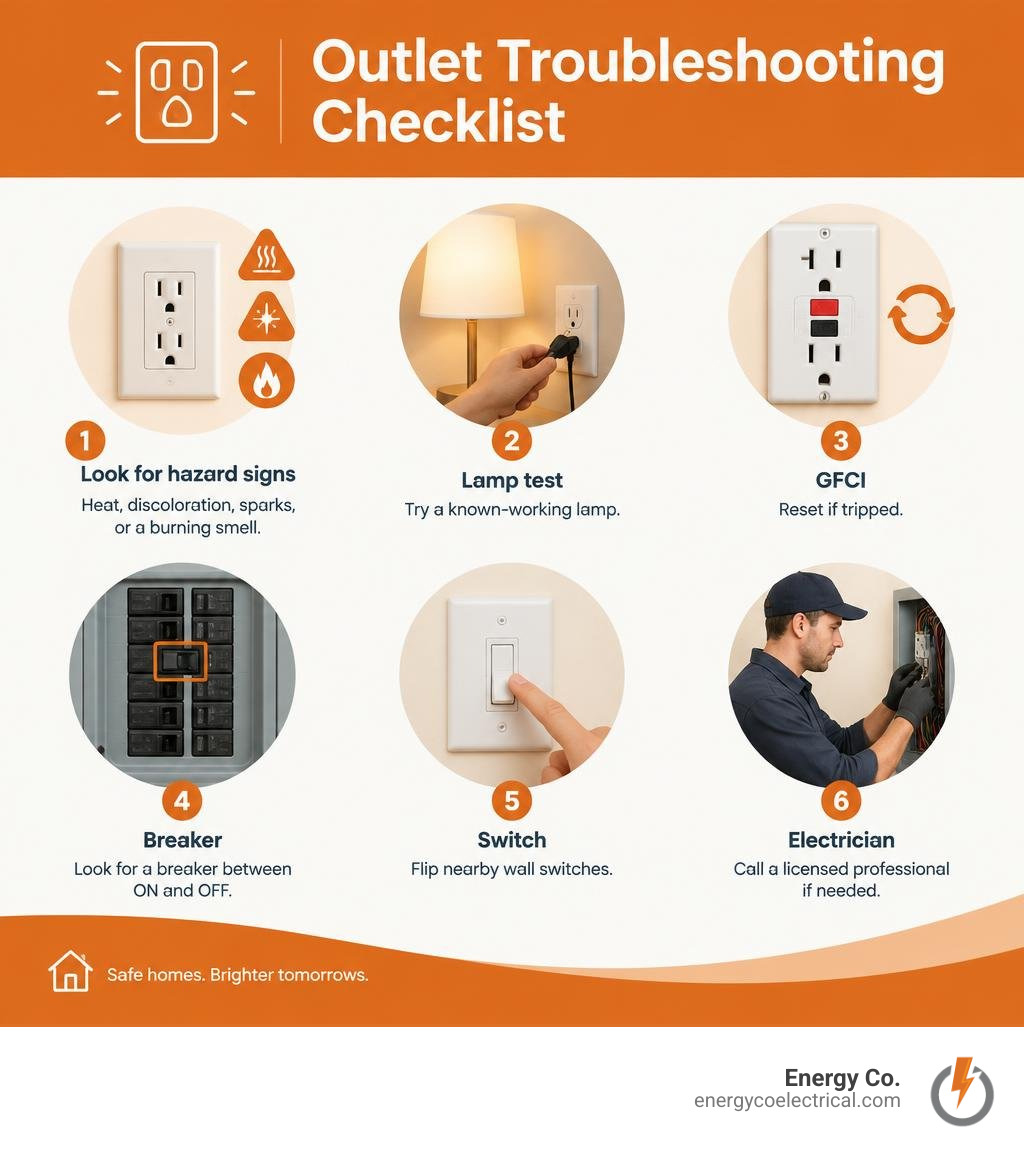
Essential common electrical outlet problems terms:
Identifying Common Electrical Outlet Problems and Root Causes
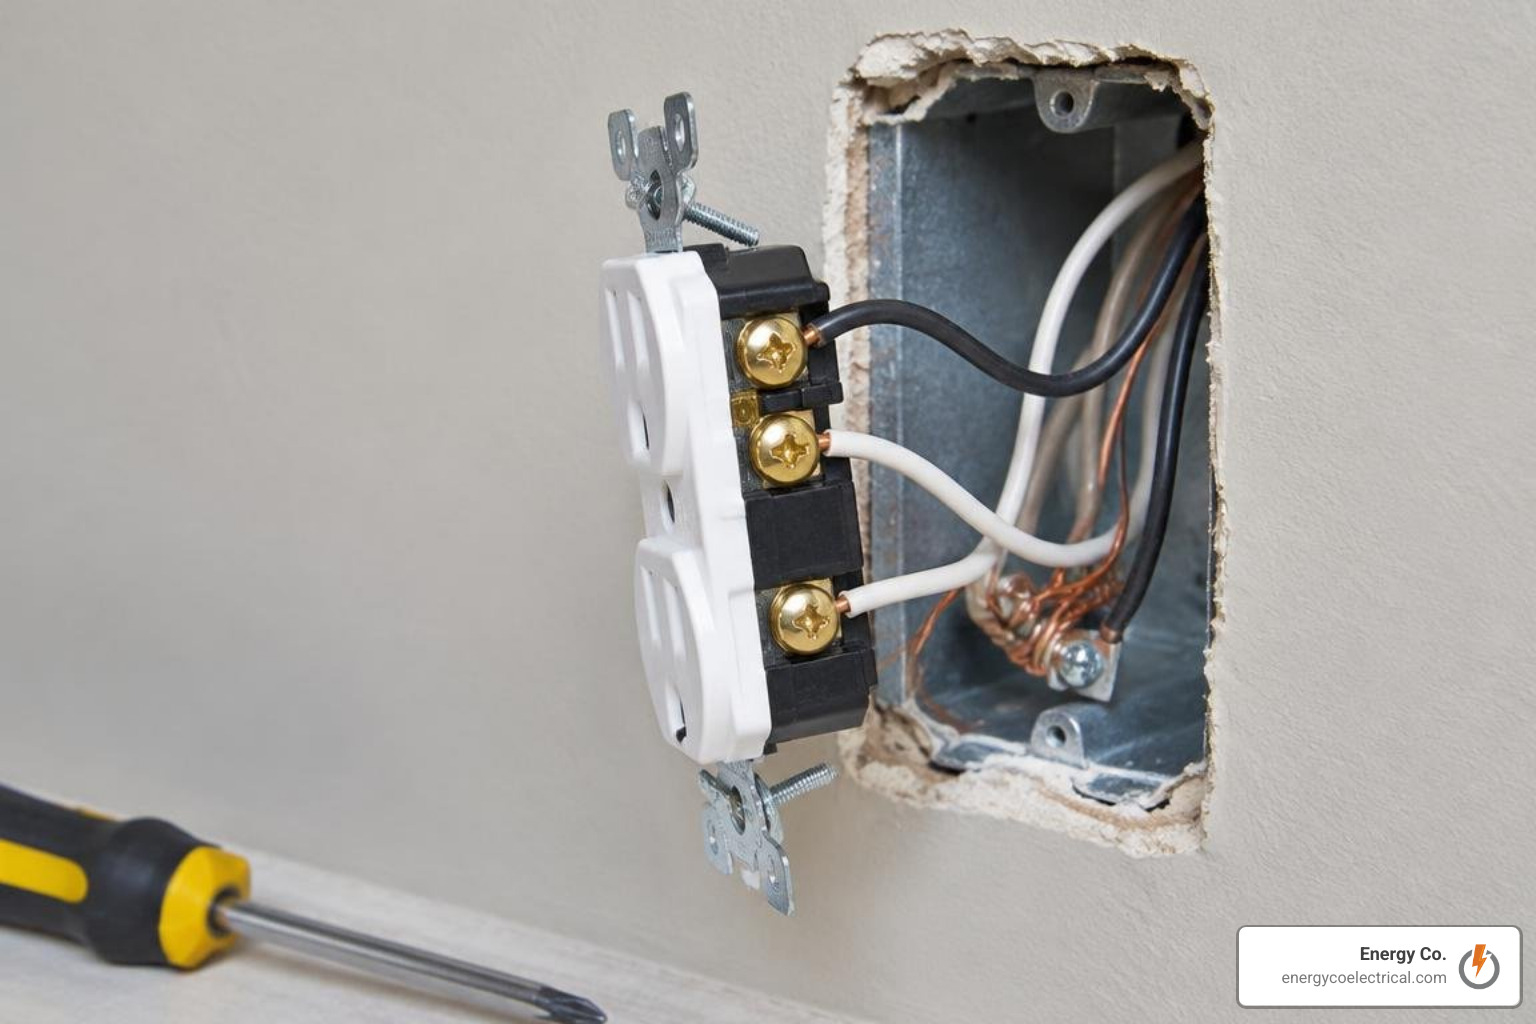
Plugging in your morning coffee maker only to be met with dead silence is frustrating. When power disappears, our initial instinct is often to blame the appliance. However, wall receptacles take the brunt of daily plug insertion, electrical load changes, and building vibration. Over time, physical wear and electrical stress create internal faults.
The U.S. Consumer Product Safety Commission (CPSC) emphasizes that dead outlets should never be casually ignored. An unpowered receptacle is not always an isolated failure; it often indicates loose internal wiring connections that generate high electrical resistance, localized overheating, and destructive arcing. When current struggles to cross a loose mechanical joint, heat builds up rapidly within the wall cavity.
Understanding the root cause behind why an outlet stops delivering power helps determine whether a quick reset will suffice or if hands-on rewiring is necessary. To understand why an outlet stops working without a breaker trip, review the primary symptoms below:
| Symptom | Probable Cause | Recommended Action |
|---|---|---|
| Top receptacle works; bottom is dead | Switched half-hot outlet or broken tab | Test wall switches; inspect circuit bridge |
| Multiple outlets dead in one room | Tripped upstream GFCI or breaker midway | Reset GFCI buttons; inspect panel switches |
| Plug falls out easily | Worn internal brass contact leaves | Replace the receptacle with a spec-grade unit |
| Warm faceplate or burning odor | Loose terminal connection or arcing | Shut breaker off immediately; call an electrician |
| Spark when inserting plug | Heavy draw load or short circuit | Turn appliance off before plugging; inspect box |
| Tester shows Open Neutral | Broken neutral wire in current or upstream box | Inspect and pigtail neutral junctions |
Recognizing Tripped GFCIs and Hidden Downstream Breakdowns as Common Electrical Outlet Problems
Ground Fault Circuit Interrupter (GFCI) receptacles are designed to protect people from severe electrical shocks by monitoring the balance of current between the hot and neutral conductors. If an imbalance as small as 4 to 6 milliamperes occurs—meaning current is leaking somewhere it shouldn’t—the GFCI trips its internal mechanism within milliseconds.
Many homeowners do not realize that standard branch circuits are wired in a series daisy-chain layout. A single GFCI receptacle installed near a wet location (such as a kitchen sink or bathroom vanity) has “LINE” terminals feeding it and “LOAD” terminals feeding downstream standard outlets. If that primary GFCI trips, every standard receptacle downstream goes completely dead, even if those outlets are in adjacent bedrooms, hallways, or outdoor patios.
Applying practical house electrical troubleshooting tips begins with a systematic search for remote GFCIs. Walk your home and inspect:
- Powder rooms and guest bathrooms
- Kitchen countertop backsplashes
- Garage walls and utility rooms
- Unfinished basements and crawlspaces
- Exterior weatherproof boxes
Press the “TEST” button firmly on each unit, followed by the “RESET” button. If the reset button clicks and stays depressed, power should immediately return to any protected downstream receptacles.
Spotting Breaker Panel Misalignments and Switched Receptacles
When an overcurrent or short circuit occurs, your circuit breaker snaps open to protect the branch wiring inside the walls from catching fire. However, modern circuit breakers do not always flip all the way to the “OFF” position when they trip.
As the Electrical Safety Foundation International (ESFI) points out, a tripped breaker often rests in a subtle midway position, hovering barely off the “ON” mark. On certain panels, such as Square D QO models, a bright orange or red Visi-Trip flag will appear in an inspection window. On other panels, the handle feels spongy or springy to the touch. To successfully reset it, you must firmly push the breaker handle all the way to the “OFF” position until you feel and hear a solid mechanical click, and only then flip it back to “ON.” If you want to safely navigate your electrical enclosure, reviewing basic breaker box troubleshooting techniques will keep you safe.
Another frequent non-electrical cause of a “dead” plug is a switched or “half-hot” receptacle. In many living rooms and bedrooms built without overhead ceiling fixtures, electricians wire wall receptacles so that a wall switch controls either the top or bottom outlet. On these duplex units, the brass bridging tab connecting the two hot brass screws is broken off. If a family member inadvertently flips a wall switch near an entryway, half of the outlet will instantly lose power.
Step-by-Step Diagnostic Protocol to Safely Troubleshoot Outlets
Before reaching for screwdrivers or opening any electrical gang box, follow this safe diagnostic workflow. You can refer to advanced guides on how to fix electrical outlet not working scenarios for deeper wiring layouts.
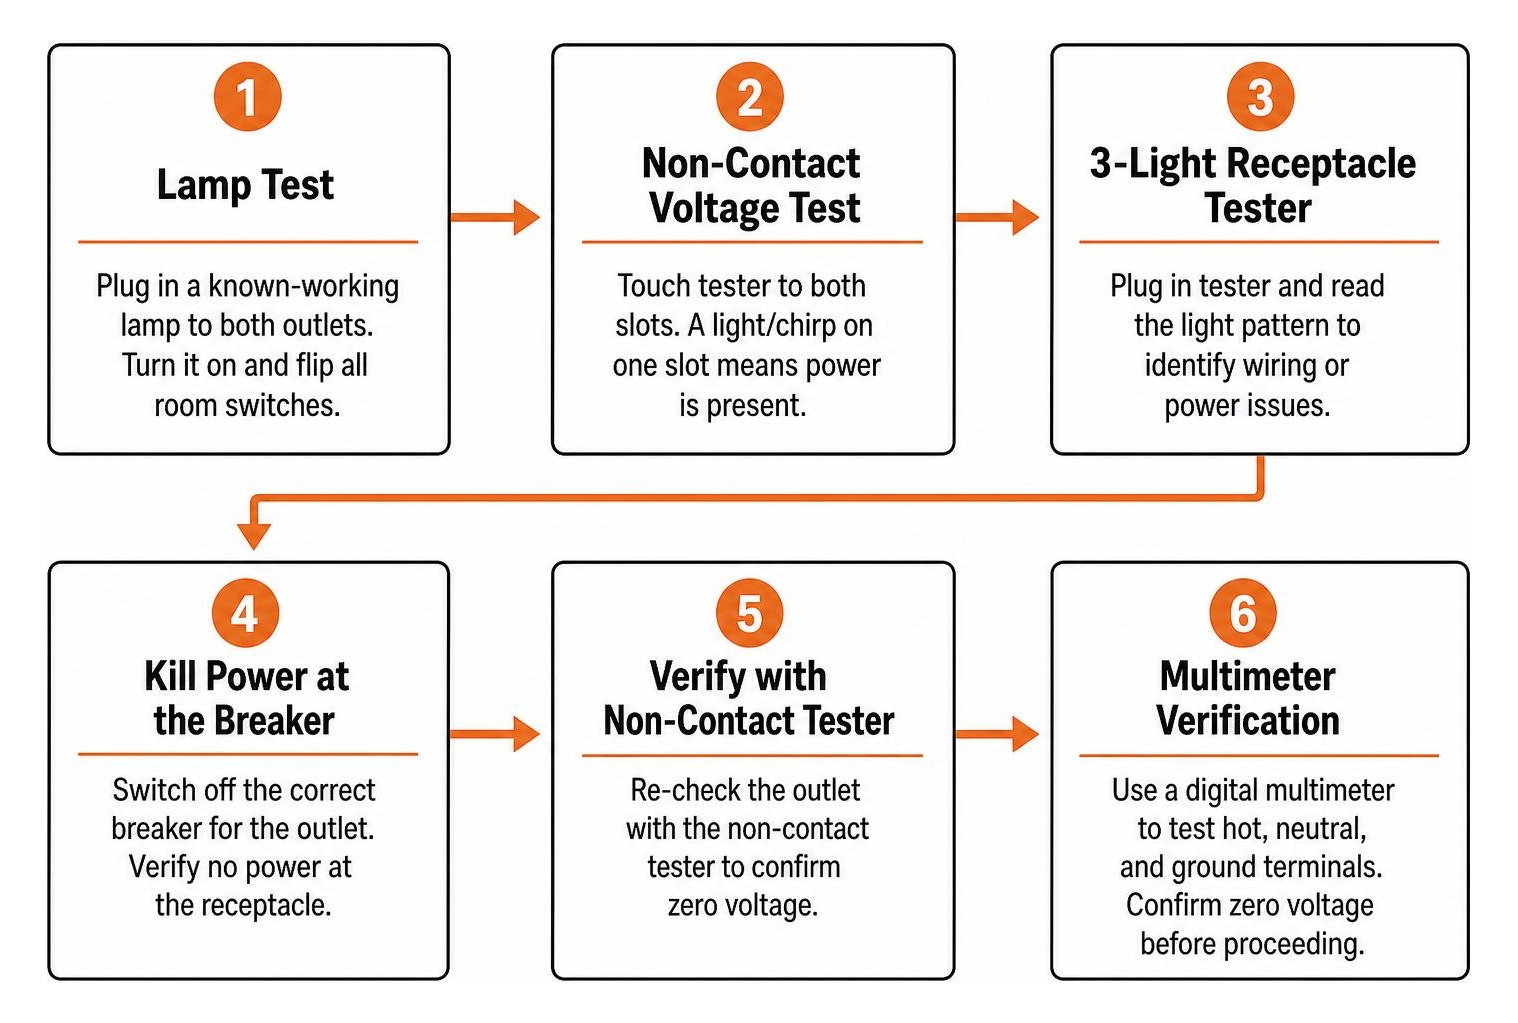
- Perform the Known-Working Appliance Test: Plug a standard table lamp that you know works into both the top and bottom sockets of the dead receptacle. Turn the lamp switch on and flip every wall switch in the room to rule out a half-hot switched setup.
- Scan with a Non-Contact Voltage Tester: Hold the tip of a non-contact voltage tester directly against both vertical slots of the receptacle faceplate. If the tester chirps or lights up red on one slot, power is entering the box, indicating that the internal contact blades or the neutral path may have failed.
- Analyze the Circuit with a 3-Light Receptacle Tester: Plug an inexpensive 3-light receptacle tester into the outlet. Read the illuminated light pattern:
- Two Amber Lights: Correct wiring and active power.
- One Amber Light (Center): Open neutral fault.
- Right Light Only: Open hot fault (no power arriving).
- Red and Amber Lights: Hot and ground reversed.
- Kill Power at the Breaker: If you need to remove the wall plate, switch off the corresponding branch breaker. Verify zero voltage at the outlet using your non-contact tester, then double-check across the hot, neutral, and ground screw terminals with a calibrated digital multimeter before touching bare copper.
Diagnosing Physical Wear, Loose Backstab Connections, and Daisy-Chain Breaks
If electrical power is present in the circuit line but the receptacle fails to operate appliances reliably, mechanical fatigue or poor termination methods are the most likely culprits.
The U.S. Fire Administration (USFA) recommends replacing wall outlets whenever electrical plugs fit loosely. Over thousands of insertion and removal cycles, the internal brass spring leaves that clamp onto plug prongs lose their mechanical tension. A loose plug creates microscopic air gaps that lead to arcing and heat accumulation.
Another widespread issue in homes built or remodeled between 1980 and 2015 is the use of “backstabbed” push-in wire terminals. Builders often pushed solid 14 AWG copper wires directly into the rear spring-clamp holes of standard 15-amp receptacles to save installation time. Over years of thermal cycling—where electrical currents heat the metal and seasonal changes cool it—these internal spring clips lose their grip.
A fatigued backstab connection creates a high-resistance joint. Because branch circuits route power through each receptacle to reach the next box down the line, a single broken push-in connection can disable four or five downstream outlets. Understanding how power travels through modern residential electrical wiring systems helps clarify why an upstream failure leaves downstream rooms completely dark.
Addressing Loose Terminals and Worn Receptacles as Common Electrical Outlet Problems
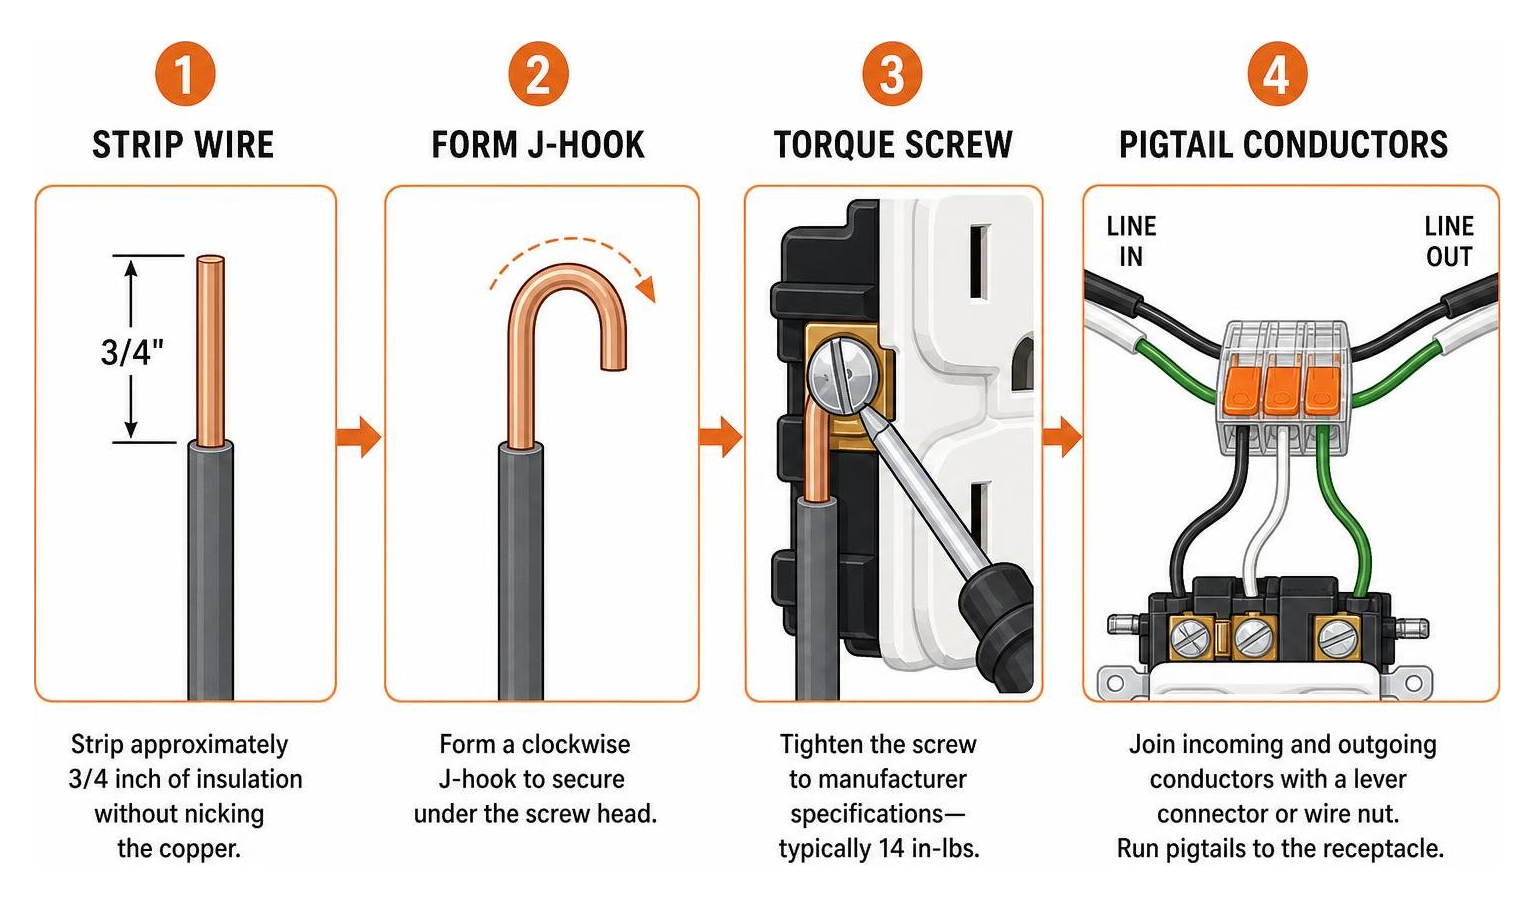
When replacing a worn or defective duplex outlet, using proper termination techniques ensures safety and longevity. Follow these standard practices and refer to basic electrical repair guidelines for beginners:
- Strip to Exact Specifications: Strip approximately 3/4 inch of insulation from each 14 AWG (for 15-amp circuits) or 12 AWG (for 20-amp circuits) conductor without nicking or gouging the solid copper core.
- Form Clockwise J-Hooks: Bend the bare copper conductor into a tight “J” shape and hook it clockwise around the side terminal screw. As the screw is tightened, the clockwise motion pulls the copper loop securely beneath the screw head rather than pushing it out.
- Torque Accurately: Modern National Electrical Code (NEC) standards require terminal screws to be torqued to manufacturer specifications—typically 14 in-lbs for standard duplex receptacles. A properly torqued terminal prevents loosening during thermal expansion cycles.
- Pigtail Incoming and Outgoing Conductors: Instead of using the receptacle’s brass bridging tabs to carry current downstream, join incoming and outgoing line, neutral, and ground conductors using modern lever connectors (such as Wago 221s) or heavy-duty wire nuts. Run a single short “pigtail” wire from the joined bundle to the receptacle. This ensures that if this specific receptacle ever wears out, downstream outlets on the circuit remain fully powered.
Critical Warning Signs: When to Stop and Call an Electrician
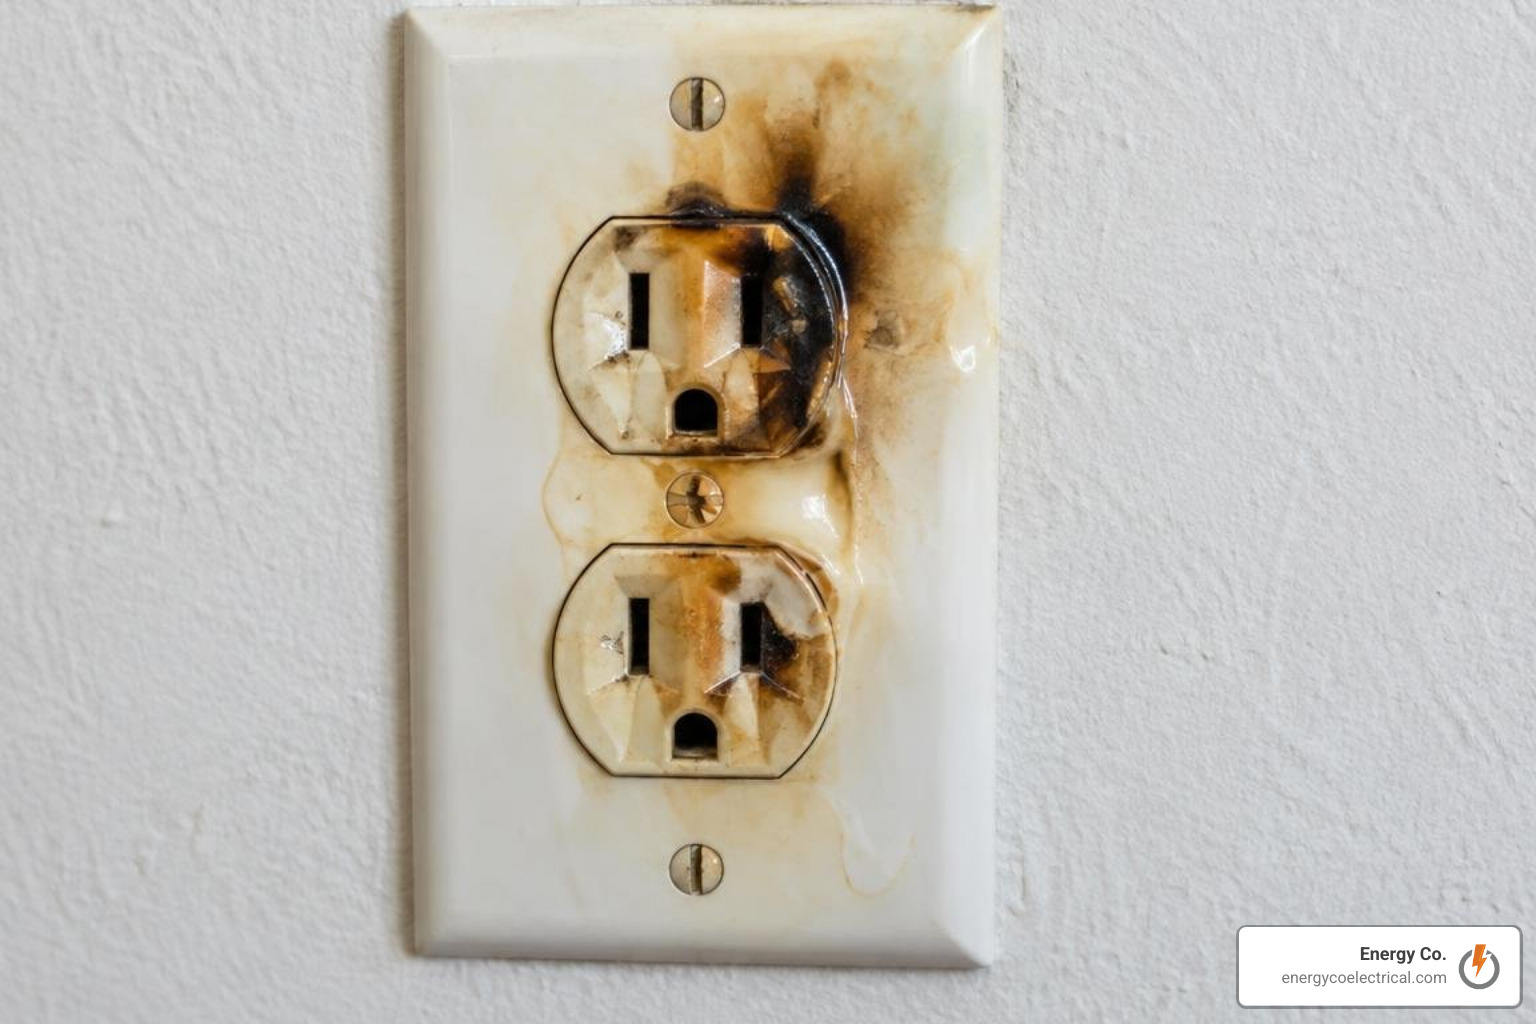
While checking a tripped breaker or resetting a GFCI is safe for homeowners, certain symptoms indicate active fire hazards that require immediate professional intervention.
The National Fire Protection Association (NFPA) warns that electrical distribution failures represent a leading cause of home structure fires. Stop troubleshooting immediately, shut off power to the circuit, and call a licensed professional if you encounter any of the following critical warning signs:
- Discolored, Melted, or Scorch-Marked Faceplates: Brown or black burn marks around receptacle slots or on the faceplate indicate severe localized arcing and excessive heat buildup inside the electrical junction box.
- Persistent Buzzing, Sizzling, or Crackling: Audible humming or crackling sounds coming from an outlet box signal micro-arcing, where current jumps through air gaps across loose terminals.
- Burning Plastic or Fishy Odor: Overheated wire insulation and melting receptacle plastics emit a pungent, chemical, or fishy smell. If you detect this odor, shut down the main panel breaker and treat the situation as an emergency.
- Warm or Hot Wall Surfaces: An outlet plate that feels noticeably warm or hot to the touch—even when nothing is plugged in—means current flowing through a daisy-chained joint is meeting severe resistance.
- Aluminum Branch Wiring (1965–1973 Construction): Homes built with aluminum wiring require specialized CO/ALR receptacles or COPALUM/AlumiConn crimp connections. Standard copper-only outlets connected to aluminum wires will oxidize, expand at differing rates, and create severe fire hazards.
For more details on recognizing dangerous warning signals, read our breakdown of sparks and smells in house wiring.
Long-Term Prevention and Maintenance Tips for Home Outlets
Preventing future outlet failures requires proactive maintenance, load management, and regular safety testing. Implementing these simple habits protects your electrical system and appliances:
- Perform Monthly GFCI and AFCI Testing: Press the “TEST” button on all GFCI receptacles and Arc-Fault Circuit Interrupter (AFCI) panel breakers once a month as recommended by the CPSC and NFPA. Verify that power cuts instantly, then press “RESET.” If a device fails to trip or will not reset, its internal sensing electronics have worn out and it must be replaced.
- Prevent Circuit Overloading: Standard residential general-purpose circuits are rated for 15 amps (providing 1,800 watts continuous capacity) or 20 amps (2,400 watts). Avoid plugging multiple high-draw appliances—such as space heaters, hair dryers, microwave ovens, and portable air conditioners—into the same circuit or into multi-outlet power strips.
- Upgrade to Tamper-Resistant (TR) Receptacles: If you have older outlets, upgrade to modern TR receptacles featuring internal sliding shutters. These prevent children from inserting foreign objects while ensuring smooth plug contact.
- Create an Accurate Circuit Directory: Map your home’s electrical panel. Label every breaker clearly with the specific rooms, outlets, and heavy appliances it controls. An accurate panel index saves valuable time during unexpected outages.
- Schedule Routine Panel Inspections: Keep your main service panel clean, dust-free, and properly maintained. Incorporating regular electrical panel maintenance routines ensures your system operates safely year after year.
Frequently Asked Questions About Common Electrical Outlet Problems
Why does only half of my outlet work?
When one half of a duplex wall receptacle functions normally while the other socket appears dead, the unit is almost certainly wired as a “half-hot” switched outlet. During installation, the electrician removed the small brass connecting tab on the hot (brass screw) side of the receptacle. This isolates the two sockets from each other, allowing one socket to receive constant 120-volt power while the second socket is controlled by a nearby wall switch. Plug a lamp into the dead half and flip all wall switches in the room. If flipping switches produces no result, a loose terminal screw on that specific half or an internal contact blade failure is likely responsible.
How do I reset a breaker that does not look completely off?
Circuit breakers contain internal trip springs designed to snap the internal electrical contacts open instantly when a fault occurs. When tripped by an overload or short circuit, the external operating handle rarely snaps all the way to the “OFF” position; instead, it settles in a neutral midway position between “ON” and “OFF.” To reset it safely:
- Push the breaker handle firmly toward the “OFF” position until you hear and feel a solid mechanical snap.
- Once the spring mechanism is re-engaged in the full “OFF” position, push the handle firmly back to “ON.”
- If the breaker instantly trips again with a loud pop, do not force it back on; an active short circuit or ground fault exists on that circuit.
What should I do if an outlet stays dead after checking breakers and GFCIs?
If you have verified that the circuit breaker is fully engaged, confirmed that no remote GFCI outlets are tripped, and checked that all wall switches are on, the issue is likely a physical wiring break. This often manifests as an “open neutral” or broken line conductor caused by a failed push-in backstab wire or a loose wire nut in an upstream junction box. Because locating an open connection requires de-energizing the circuit, opening gang boxes, and performing continuity and voltage testing across the branch run, call a licensed professional or reach out for 24-hour emergency electrical services to ensure the issue is resolved safely.
Conclusion
Diagnosing dead, loose, or switched receptacles starts with simple, safe observations: testing with a known-working lamp, checking for subtle breaker trips, and locating remote GFCI receptacles. However, when an outlet exhibits physical damage, scorch marks, buzzing sounds, or persistent power loss, the issue goes beyond simple troubleshooting.
Older residential wiring—particularly in vintage properties across the Chicagoland area with historical conduit runs, aging junction boxes, or legacy wiring methods—requires expert hands to ensure full safety and National Electrical Code compliance. Never attempt internal box rewiring if you are uncertain of the circuit layout or lack proper testing equipment.
When you need dependable, certified assistance, the licensed professionals at Energy Co. are here to help with all your residential, commercial, and emergency electrical needs. For safe, code-compliant repairs and comprehensive inspections, turn to our team for professional outlet and switch troubleshooting.