Electrical Wall Outlet Installation: A Safe Starting Point
Electrical wall outlet installation can be a practical DIY project when you are replacing a standard receptacle in an existing, sound electrical box. Turn off the correct breaker, verify that every wire is de-energized with a tester, connect hot to brass, neutral to silver, and ground to green, then test the finished outlet before using it.
For a new outlet location, the job becomes more complex. It may require new cable, an old-work box, circuit-load planning, permits, and compliance with local Chicago-area rules. A simple replacement can take 30 to 45 minutes, while adding an outlet often takes a few hours and may be better handled by a licensed electrician.
| Project | Typical DIY scope | Main concern |
|---|---|---|
| Replace an existing outlet | Often manageable with proper testing and matching parts | Loose, damaged, or unusual wiring |
| Add an outlet on an existing circuit | Intermediate project | Circuit capacity, cable routing, box fill, permits |
| Add a dedicated circuit | Professional work | Panel connections, code, and inspection |
I am Michał Napieralski of Energy Co., and our licensed team handles electrical wall outlet installation, wiring repairs, panel upgrades, and inspections across the Chicago suburbs. This guide will help you understand the safe DIY limits before you open an electrical box.
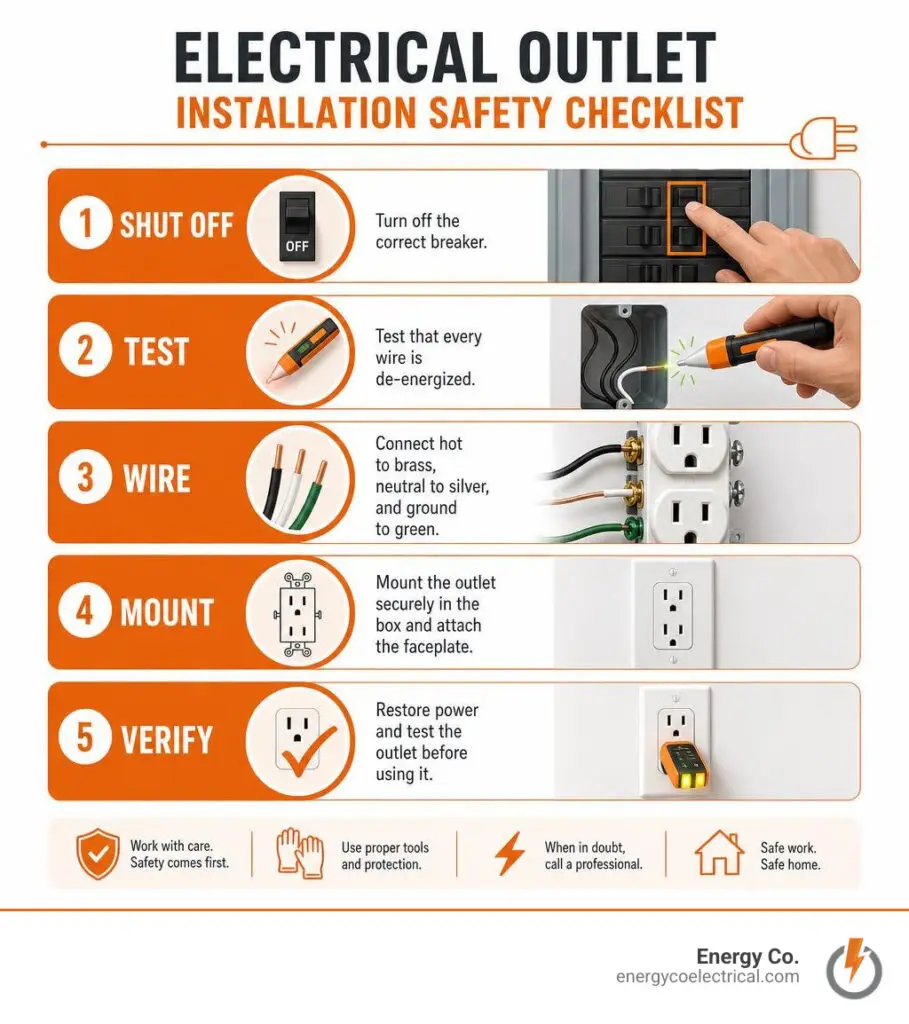
Electrical wall outlet installation word roundup:
Essential Tools and Safety for Electrical Wall Outlet Installation
Safety is the absolute foundation of any electrical project. Before touching a single screw or pulling off a wall plate, you must respect the circuit. Electricity does not give second chances, but following simple precautions will protect you and your home.
Before beginning, always equip yourself with essential personal protection: wear thick, rubber-soled shoes, work on dry floors, and never stand on metal ladders while handling electrical components. If you need a refresher on standard wiring principles, check out A Practical Guide to Electrical Installation or explore Mastering the Basics of Electrical Installation Work to boost your confidence.
Here is the non-negotiable safety procedure:
- Turn off power at the main circuit breaker panel. Find the specific breaker controlling the circuit you plan to work on and flip it firmly into the “Off” position. Placing a piece of brightly colored tape over the switch lets family members know you are working on the line.
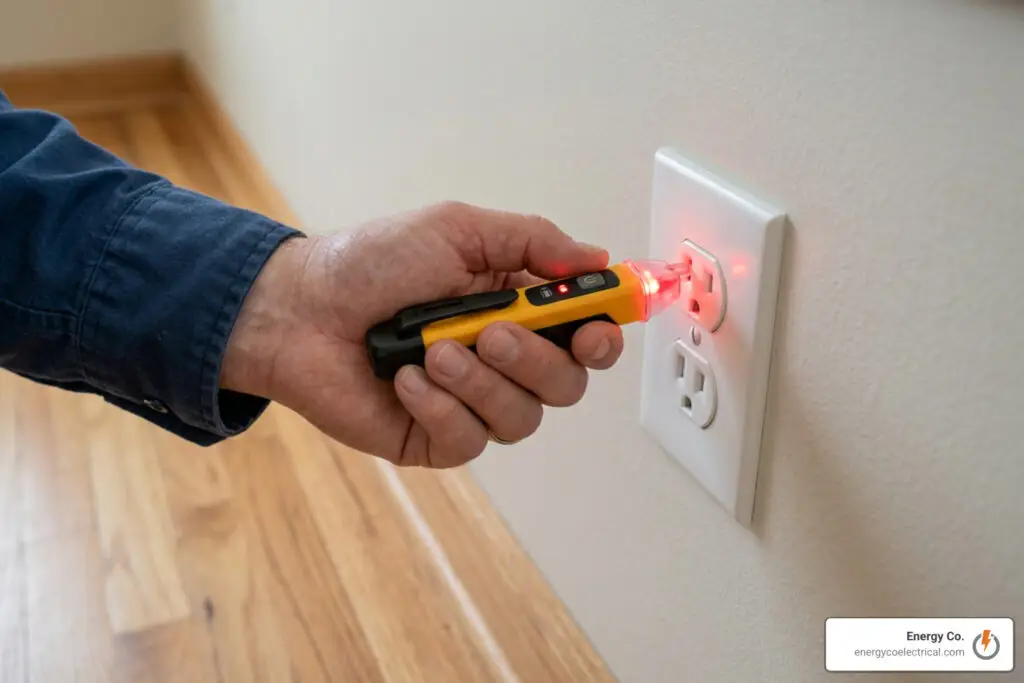
- Double-check with a non-contact voltage tester. Insert the tip into both slots of the wall receptacle. Then, once you unscrew the faceplate, test every single wire inside the box—not just the ones connected to the outlet face. Always test your non-contact tester on a known live outlet first to confirm the battery works properly before trusting it on your project circuit.
- Test again with a plug-in outlet tester. Plugs with indicator lights give secondary verification that power is completely dead before your hands touch copper.
If you ever encounter flickering lights or unexplainable power drops prior to installation, review our guide on Outlet Switch Troubleshooting and The Easiest Way to Troubleshoot Electrical Problems.
Replacing vs. Adding New Locations in Electrical Wall Outlet Installation
Replacing an existing outlet is fundamentally different from adding a brand-new outlet location to your wall.
When performing a direct receptacle swap, you are working within an existing wall box with established wiring. Replacing an outdated two-prong or worn outlet takes about 30 to 45 minutes for an intermediate DIYer, with material costs running between $15 and $80.
Adding an outlet to an existing circuit requires cutting drywall, fishing non-metallic (NM-B) cable or pulling wire through conduit, calculating junction box capacity, and tapping into a donor box. This process takes 2 to 3 hours for experienced DIYers. Professional installation for adding an outlet generally ranges from $100 to $300 for simple extensions, whereas installing a new dedicated 20-amp circuit directly from the breaker panel runs between $250 and $600. In local Chicagoland communities like Schaumburg, Palatine, or Arlington Heights, homeowners seeking hassle-free wall upgrades often rely on our Residential Electrical Services.
Before adding a new outlet to an existing line, you must do continuous load math to avoid tripping breakers:
- 15-Amp Circuit: Operates on 14-gauge wire. Total continuous load limit (80% of 1,800 watts) is 1,440 watts.
- 20-Amp Circuit: Operates on 12-gauge wire. Total continuous load limit (80% of 2,400 watts) is 1,920 watts.
National Electrical Code (NEC) guidelines suggest a maximum of 10 receptacles on a 15-amp circuit and 13 receptacles on a 20-amp circuit. If your existing circuit already operates near 80% capacity during peak usage—such as running a space heater, coffee maker, or hair dryer—adding another receptacle will cause nuisance breaker trips.
To tackle this project successfully, gather the following essential tools and materials:
- Non-contact voltage tester and 3-prong plug-in receptacle tester
- Wire strippers (with 14 AWG and 12 AWG cutting notches)
- Needle-nose pliers and linesman pliers
- Flathead and Phillips head screwdrivers (insulated handles preferred)
- Drywall saw or utility knife (if cutting new openings)
- New 15A or 20A duplex receptacle (matching your circuit rating)
- Cover plate and mounting screws
- Wire connectors (wire nuts) and 6-inch pigtail wires
For a complete look at DIY limits, refer to How to Install an Electrical Outlet: Step-by-Step Guide and learn How to Add an Electrical Outlet (2026): DIY — No Electrician Needed.
Step-by-Step Electrical Wall Outlet Wiring Guide
Step-by-Step Electrical Wall Outlet Installation Guide
Wiring an outlet receptacle requires strict attention to detail. Connecting the wrong wire to the wrong terminal creates a dangerous reverse polarity condition, which leaves devices energized even when turned off.
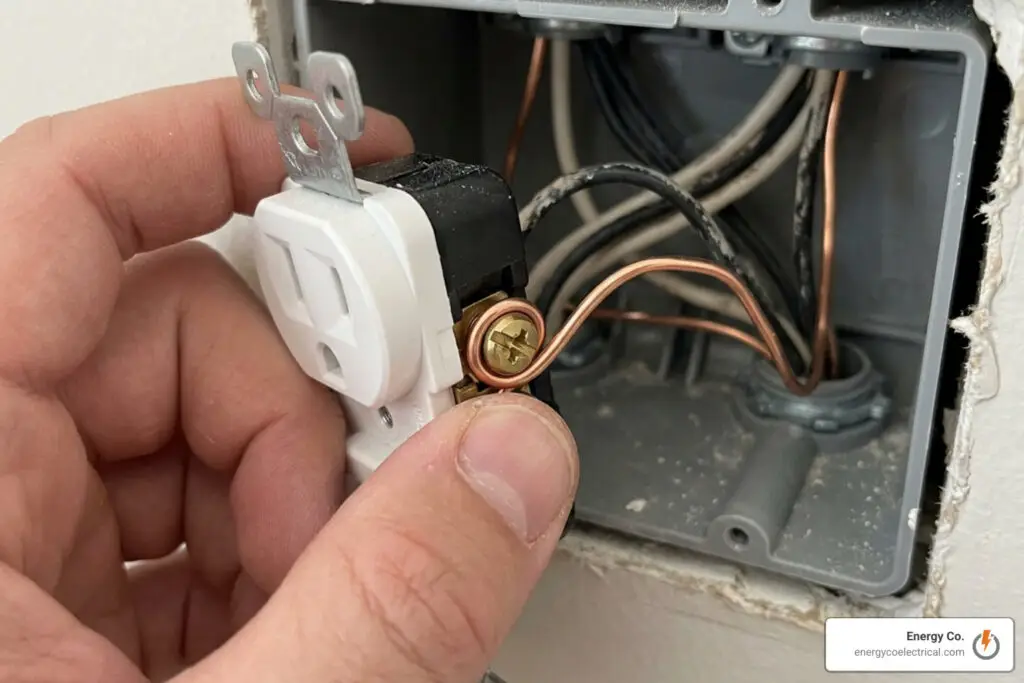
Follow this step-by-step procedure to ensure a solid mechanical and electrical bond:
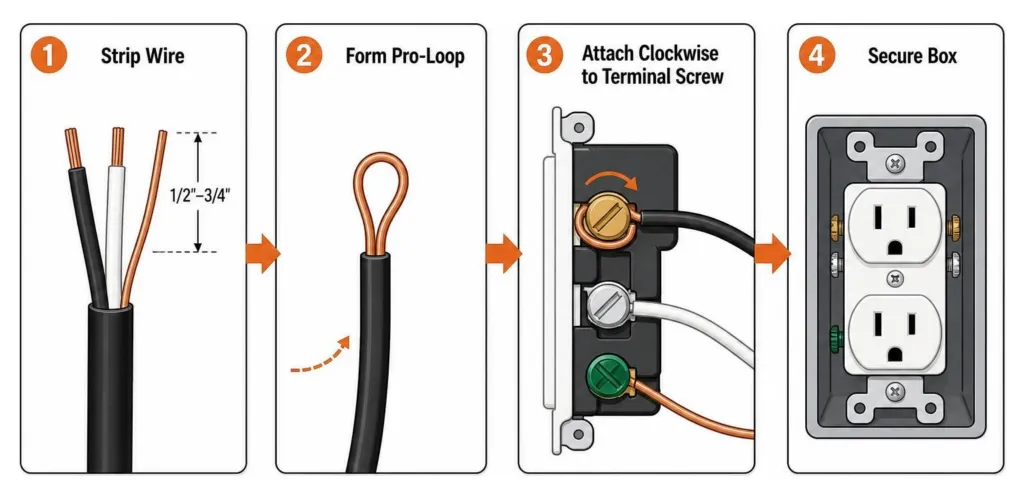
- Prepare and Strip the Wires: Remove roughly 6 to 8 inches of outer sheath cable from the box, then use wire strippers to strip 1/2 inch to 3/4 inch of insulation off the ends of each conductor.
- Identify Wire Colors and Terminal Matching:
- Hot Wire (Black or Red): Delivers power from the service panel. Connects strictly to brass/gold screw terminals.
- Neutral Wire (White or Light Gray): Completes the electrical circuit back to the panel. Connects strictly to silver screw terminals.
- Ground Wire (Bare Copper or Green): Safety path that diverts stray voltage to the earth. Connects to the green hexagonal ground screw.
- Master the Pro-Loop Technique: Using needle-nose pliers, bend the stripped copper end into a “J” or question-mark hook. Loop the wire hook clockwise around the terminal shank. Because screw heads tighten in a clockwise direction, tightening the screw actively pulls the copper loop tightly into the terminal rather than forcing it open.
- Torque Screws Securely: Tighten terminal screws firmly (around 12 inch-pounds of torque). Ensure no loose copper strands protrude past the sides.
- Accordion-Fold Wires: Push the wires back into the box using a gentle “Z” or accordion fold. This prevents terminals from pressing against box walls or loosening wire connections. Secure the outlet mounting ears with screws and attach the wall plate.
For detailed visual walkthroughs of proper physical wiring, read How to Wire a House Plug or Electrical Outlet [Step-by-Step] – EngineerSkill.blog or watch How to Wire an Electrical Outlet: Step-by-Step Installation.
Installing Old-Work Boxes and GFCI Receptacles
When adding an outlet to a finished drywall surface, an old-work (retrofit) plastic or fiberglass electrical box is ideal. Unlike new-work boxes that nail directly into open framing studs during construction, old-work boxes feature flip-out plastic wings (cotto clamps) that grip the backside of existing drywall as you tighten the mounting screws.
To install an old-work box:
- Hold the box face against the wall between stud cavities (use a stud finder to confirm placement).
- Trace the outline with a pencil, keeping it level and between 12 and 18 inches above finished floor height.
- Cut carefully along the pencil line using a manual drywall saw.
- Pull your electrical cable into the box through the rear tension clamps, push the box flush into the hole, and turn the corner screws clockwise until the wings clamp securely against the drywall back.
When wiring in areas where electricity could come into contact with water—such as kitchens, bathrooms, unfinished basements, garages, and outdoors—building codes mandate Ground Fault Circuit Interrupter (GFCI) receptacles. GFCIs constantly monitor current balance between hot and neutral conductors, cutting power in milliseconds if a leak occurs.
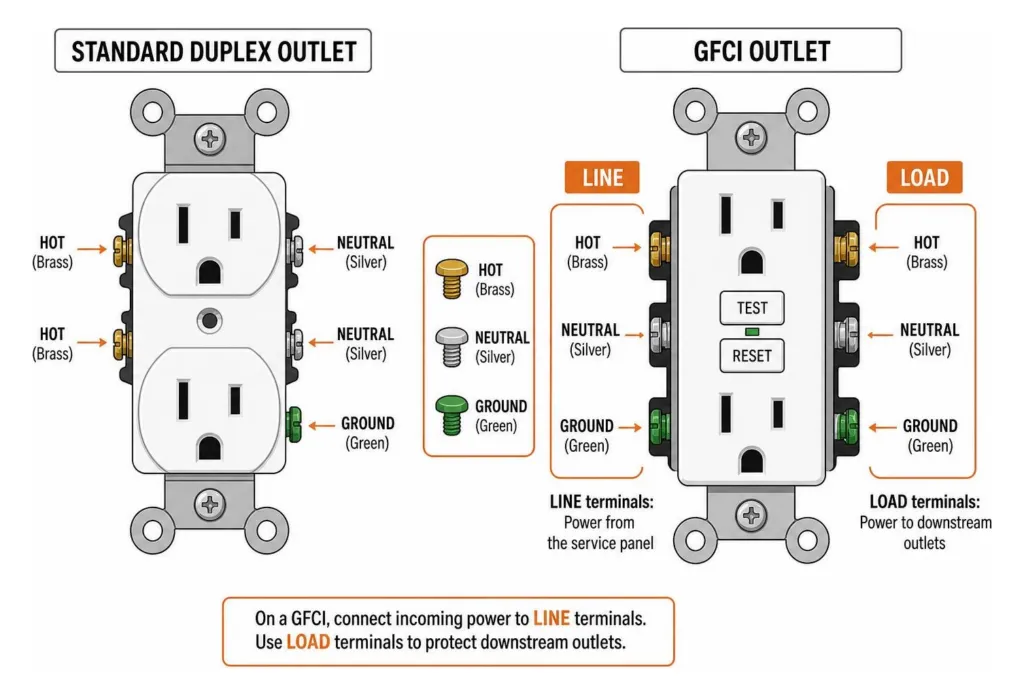
| Receptacle Type | Standard Duplex Receptacle | GFCI Receptacle |
|---|---|---|
| Primary Function | Standard dual-plug power distribution | Shock prevention via rapid imbalance detection |
| Code Requirements | Living rooms, bedrooms, hallways | Kitchens, bathrooms, basements, outdoors |
| Terminal Configuration | Side screws (hot, neutral, ground) | Separate LINE and LOAD terminal blocks |
| DIY Wiring Rule | Attach hot to brass, neutral to silver | DIYers should use LINE screws only; leave LOAD taped |
When installing a GFCI receptacle as a standalone upgrade, attach your incoming feed wires exclusively to the terminals marked LINE. The terminals labeled LOAD are designed to feed downstream protection to additional standard outlets on the circuit, which requires advanced circuit tracing.
For safety rules on beginner projects, review our guide on Electrical Repairs Dos and Don’t for Beginners. Additional guidance on extending existing lines can be found at Adding a New Outlet to an Existing Circuit and How to Add an Electrical Outlet to an Existing Line: A Step-by-Step DIY Guide – D and G Flooring.
Electrical Building Codes, Permits, and Professional Services
While standard receptacle replacements are common DIY tasks, adding new wiring or altering household circuits introduces legal and safety considerations. Building departments across Cook County and the Northwest Suburbs enforce electrical codes to prevent fire hazards and ensure home safety.
In most Chicagoland jurisdictions—including Chicago, Cicero, Elk Grove Village, Hoffman Estates, and Streamwood—running new electrical cable inside walls or extending branch circuits requires a building permit ($50 to $150 average fee) and official inspections (rough-in and final). Unpermitted electrical work can lead to municipal fines and may complicate future real estate transactions or invalidate home insurance claims in the event of an electrical fire.
Furthermore, local municipal codes often feature specific provisions that go beyond standard National Electrical Code guidelines:
- Chicagoland Conduit Rules: The City of Chicago and several nearby Cook County municipalities prohibit exposed flexible Romex (NM-B) wire inside residential walls, mandating rigid Electrical Metallic Tubing (EMT) conduit or metal armored cable (BX) for structural fire protection.
- Aluminum Wiring: Homes constructed in the 1960s and 1970s may feature aluminum branch wiring. Connecting copper outlets directly to aluminum wire causes galvanic corrosion, extreme heat, and severe fire risks. Aluminum connections require specialized CO/ALR rated devices or crimp connectors installed by professionals.
- Knob-and-Tube or Cloth Wire: Older properties in areas like Rolling Meadows, Roselle, and Mount Prospect often contain ungrounded vintage wiring systems that lack modern grounding conductors and require dedicated panel upgrades.
If your project involves long wire runs through finished walls, panel modifications, aluminum wiring, or complex conduit bending, it is best to hire a licensed professional. Homeowners seeking guidance on choosing qualified help can check our resources on how to Find the Best Residential Electrician in Chicago for Your Home Needs, Shock-Proof Your Home: Finding the Best Licensed Electricians Nearby, and How to Find an Affordable Electrician Without Getting Shocked by the Bill. In cases of sudden power loss or warm electrical boxes, consult our 24-Hour Emergency Electrical Repair Guide for Homeowners.
For step-by-step PDF references on standard wall box swaps, review How to Install a New.
Frequently Asked Questions About Outlet Installation
Do I need a permit to add a new wall electrical outlet?
Yes, in most Chicagoland municipalities and Cook County communities, pulling new wire through wall cavities or adding a new box location requires an electrical permit. The permit process typically involves submitting a simple plan, paying a small fee ($40 to $80 in many towns), and scheduling a rough-in inspection (before drywall is closed) and a final inspection. Replacing an existing outlet face in the exact same box generally does not require a permit.
How do I identify hot, neutral, and ground wires?
Standard NM-B residential cable uses industry-standard color coding:
- Hot Wire: Wrapped in black or red insulation. Connects to brass terminal screws.
- Neutral Wire: Wrapped in white or light gray insulation. Connects to silver terminal screws.
- Ground Wire: Bare copper wire or green insulation. Connects to the green grounding screw on the outlet frame or metal box.
In older homes with cloth-covered or faded insulation, always use a multimeter or voltage detector to confirm wire identity before making connections.
Why shouldn’t I use push-in backstab connectors on an outlet?
Backstab holes on the rear of inexpensive receptacles rely on tiny spring clips to grip the wire. Over time, heat expansion, vibration, and heavy plug usage weaken these internal springs. Backstab connections fail at 4 to 5 times the rate of side-screw terminals, leading to loose connections, high resistance, arc faults, and fire hazards. Electricians recommend wrapping wire hooks clockwise around side-screw terminals (the Pro-Loop technique) or using commercial-grade clamp terminals.
Conclusion
Taking on a simple like-for-like outlet replacement is a great way for DIY-minded homeowners to build confidence, save money, and update their home’s appearance. By respecting circuit safety, turning off main breakers, testing every wire, and taking the time to form tight clockwise screw connections, you can safely complete an outlet swap in under an hour.
However, when your project expands into running new wire through walls, installing old-work boxes, navigating Cook County conduit requirements, or working with older panels, taking the DIY route can quickly get overwhelming. When safety, code compliance, and structural integrity are on the line, our expert team is here to help.
Reach out to the licensed professionals at Energy Co. by visiting our Top-Rated Electrical Installation Service in Chicago pillar page to schedule an inspection or request expert outlet installation for your home today!